I love pattern hacking, so when I saw a hacker call for the Angie dress from SisBoom, I was immediately interested. The Angie pattern
would have been my second choice for the SisBoom tour in January, so I
was extra excited. After sewing this woven dress, I wanted to try more,
so this time I did not use my knitification skills. The hack I did was
redrafting the dart into a princess seam and adding visible contrasting
pockets.
Ik houd ervan om een patroon te hacken, dus toen ik zag
dat er hackers werden gezocht om met het Angie patroon van SisBoom te
spelen was ik meteen enthousiast. Zeker gezien het feit dat de Angie
mijn tweede keuze qua patroon was voor de SisBoom tour van januari.
Nadat ik deze jurk naaide smaakte geweven stoffen naar meer. Ik ging
daarom dit maal niet voor een tricot versie, maar maakte prinsessennaden
en zichtbare zakken.
The Angie is a sleeveless summer dress
without zipper or buttons. It goes over your head, and due to the
elastic in the back, the dress is still fitted. My choice of hack was
clearly inspired by the dresses that I have sewn for my girls, like this one and this one. I secretly was jealous of them, and I wanted my own
color block and pockets this summer.
De Angie is een
mouwloze zomerjurk zonder rits of knopen. De jurk gaat gewoon over je
hoofd en door het elastiek in de rug sluit hij toch mooi aan. Mijn hack
keuze was duidelijk geïnspireerd door jurken die ik voor mijn dochters
naaide. Deze en deze bijvoorbeeld lieten mij smachten naast colorblock
in prinsessennaden en zichtbare zakken.
The Angie pattern has
three neckline heights, normal and low. I felt adventurous and cut the
low neckline. After the first fit I decided to add a visible binding to
keep all the height that was left. The neckline is perfect like this,
but it should not have been a centimeter lower. During the first fit I
also took the dress in a bit just under my arms. I just stitched an
extra wide seam and then the fit was perfect.
De Angie heeft drie
neklijnen, hoog, normaal en laag. Ik voelde me avontuurlijk en knipte de
lage lijn. Na de eerste pasbeurt moest ik even slikken, dat was zeker
laag. Ik koos ervoor om er een zichtbare bias op te zetten, hiermee won
ik centimeter hoogte. Nu is de hoogte prima, maar die centimeter had er
echt niet afgekund. Bij de eerste pasbeurt nam ik het lijfje wat in
onder de armen, gewoon een extra naadje, Toen zat de jurk perfect.
I again
used See you at Six rayon, I just love the drape. I do not like having a
small piece of fabric left (because I have a hard time throwing scraps
away and they keep piling up), so I decided to have a bit fuller skirt.
Seeing the pocket part is not gathered, adding extra width in the skirt
was a little bit overdoing it. I even would advice to have a little
bit less wide skirt with this hack than the pattern usually prescribes.
I
gebruikte wederom See you at Six viscose, ik ben helemaal fan hoe de stof
valt. Ik houd er niet van om stof over te houden, ik bewaar namelijk
alles en die resten stapelen op. Ik knipte daarom een iets bredere rok,
zo kon ik mooi al mijn stof gebruiken. Maar aangezien het gedeelte bij
de zakken niet gerimpeld is werd het voor wel een hele boel stof, ik zou
dus aanraden om misschien zelfs een beetje minder brede rok te knippen
als je voor contrasterende zakken gaat.
I
used 1.5 meter of the See you at six fabric. One meter was bought at
the Stoffenmadam and the other half meter I bought as a remnant from Cas en Nina. In bought a big pile of remnants (over 6 meter in total) and
golden fabric that I used a s contrast was also part of the package. I
receive the package two weeks ago but already used three other
remnants a, so I will mention the
package more often the coming time.
Ik gebruikte 1.5 meter stof
voor de jurk. Een meter kocht ik vorig jaar al bij de Stoffenmadam toen
de stoffen uitkwamen. De andere halve meter zat in een restenpakket dat
ik samenstelde bij Cas en Nina. Ik kocht twee weken geleden meer dan 6
meter aan reststukken. De gouden contrasterende stof kwam ook uit het
zelfde pakket. Ik verwerkte al drie andere reststukken, dus die doos zal
de komende tijd meermaals ter sprake komen.
The
tutorial that I
wrote kind a assumes you have already sewn these kind of pockets, so I
do not go into detail on how to fold your fabrics there. I am also not
supplying exact pieces for pocket, you will have to be brave a bit and
just try, but you will be so proud of your self after drafting these
pieces. If you have an
questions, you can always ask.
De tutorial die ik schreef
gaat ervan uit dat je al eens zulke zakken naaide. Ik leg dus niet in
detail uit hoe je de stoffen precies moet leggen. Ook tekende ik voor
jullie geen zakdelen uit. Het is dus een beetje giswerk van jullie kant,
maar bedenk je hoe trots je zal zijn als het klaar is, je kunt het!
Mocht je toch vragen hebben, stel die dan gerust.
Step 1: Take the original front bodice part of the Aggie pattern
Step
2: Draw a straight line from the point of the dart to somewhere on the
shoulder. My straight line hits the shoulder approximately on 1/3.
Step
3: Slightly redraft the corner around the dart point into a curve and cut
the original bodice part in three pieces. You can throw away the
triangle dart piece, you will not need it any more.
Stap 1: Neem het oorspronkelijk lijfje van de Angie.
Stap
2: Teken een rechte lijn vanuit het punt van de coupenaad naar de
schouder. Ik tekende de lijn op ongeveer 1/3 van de schouder. Je
verandert niks aan de pasvorm, dus het maakt niet uit waar je de lijn
precies zet.
Stap 3: Herteken nu die scherpe punt in het midden
tot een lichte ronding. Knip vervolgens het lijfje in drie stukken, het
driehoekje van de coupnaad mag je weggooien.
Step
4: Take the side front bodice piece and put it above a piece of pattern
paper. Now
draft a pocket like I did in the picture. The exact shape is up to you.
Just put you hand on it (keeping you hand hand like it would be in a
pocket) to check the size. The main pocket (the
outside lines) should be a bit wider than the bottom width of the bodice
part. Now draft the inner line of the pocket piece. This will be the
visible contrasting line, this part should be
just as wide and the bodices bottom.
Step 5: Copy the
entire pocket on another piece of paper and then separate the inner
piece from one of the first pocket pattern piece that you created. You
now have three
pocket pieces. One for the contrasting fabric (the biggest piece), one
for the lining (this one will not be visible, this is the one in the
middle) and one that you will use to cut a piece from the skirt (the
smallest piece on top).
Step 6: Now you add seam allowances to all these
pieces, check my picture to see where it is needed. For the bodice you
only have to add it to the line you cut. Two of the pocket pieces need
seam allowance on the outside (except for the side). The easiest way to
add such seam allowance is to just redraw the pattern piece on a new
paper. For the smallest piece you will have to cut the seam allowance
away from the exciting piece, so the smaller piece will actually become smaller.
Stap
4: Neem nu het zijdeel van het lijfje en leg het boven een stuk nieuw
patroonpapier (of gewoon een A4). Teken er nu een zakdeel onder. De
buitenste lijn op mijn plaatje is de daadwerkelijk zak, je kan je hand
erop leggen om te zien of hij groot genoeg is voor je hand. De zak hoort
een paar centimeter breder te zijn dan de onderkant van de
zijpatroondeel. Daarna teken je in de zak het contrasterende deel, dat
is die extra lijn erin. De contrasterende deel moet groot genoeg zijn om
je hand door te laten en aan de bovenkant moet het even breed zijn als
de zijkant van het lijfje.
Stap 5: Kopieer nu de gehele zak
op nog een ander papier, je hebt nu dus twee maal de buitenzak. Knip dan
uit de eerste versie de kleine ronding, je hebt nu drie zakdelen. Het
grootste gedeelte knip je uit contrasterende stof, het middelste deel is
de voering en de stof daarvan zie je niet. Het kleinste deel gebruik je
om een stuk uit de rok te knippen.
Stap 6: Voeg nu aan alle delen
naadwaarde toe. Ik tekende de naadwaarde met rood. Bij het lijfje teken
je naadwaarde aan de rand van de doorgeknipte lijn. Bij het grote zak
deel en de voering teken je naadwaarde rondom, maar niet aan de zijkant.
Het makkelijkste om naadwaarde bij te tekenen is het patroondeel
nogmaals op papier leggen en overtekenen. Het kleinste zakdeel heeft een
naadwaarde nodig aan de binnenkant, deze kan je er dus gewoon
afknippen. Het kleinste deel word dus nog iets kleiner.
Step 7: You will use the smallest pocket
piece to cut the pocket from the skirt. Cut from both front corners a
piece exactly the size of the small pocket piece (of which you cut the
seam allowance already. You will not need the pattern piece or the cut outs from the skirt in a later stage, these are waste.
Step
8 and 9: Use the new adjusted
pattern pieces to cut you fabric for the bodice (the middle should be
cut on the fold) and the pockets. Put the
middle part of the front bodice with the right side up on the table.
Put a side piece on aligned at the top and pin the princess seam from
top to bottom and sew. Do the same thing on the other side. I did not
pin and made my pictures with that in
mind, but while writing the tutorial I realized that normal people just
pin their fabric. If you live dangerously like me, you start sewing on
the top and while sewing you adjust the pieces such that you nicely sew
the curve. Clip the middle point just to the stitching and finish the
seam. Press the princess seam toward the side (I also did it, not
skipping pressing
darts etc any more).
Stap 7: Gebruik het kleinste zakdeel op
uit de voorkant van de rok aan beide bovenkanten het zakdeel weg te
knippen. Gebruik hiervoor de het kleinste patroondeel na het wegknippen
van de naadwaarde. Zowel het patroondeel en de uitgeknipte stukjes heb
je hierna niet meer nodig.
Stap 8 en 9: Gebruik de aangepaste
patroondelen om de stof voor het lijfje (knip het midden van het lijfje
op de vouw) en de zakken te knippen. Leg dan het middenstuk van het
lijfje op de tafel met de goede kant boven en spelt de prinsessennaad
van boven naar beneden en naai het vast. Ik spelde niet, en zo maakte ik
ook het plaatje, maar tijdens het schrijven realiseerde ik me dat
normale mensen wel spelden. Mocht je net als ik gevaarlijk en snel
naaien, zorg er dan voor dat je stof tijdens het naaien mooi op elkaar
blijft liggen. Naai vervolgens de andere prinsessennaad. Geef een knipje
in de hoek/curve in het midden, werk de naad af en pers het netje naar
de zijkant.
Step 10: Put the skirt on the table with the ride
side up and put the pocket lining on it with the right side down (so
good sides facing each other). The curves should be aligned exactly. Sew
the inner
curve. Clip the seam, than turn it such that the right side of the
fabric is visible, press
and optionally understitch.
Step 11: Put the skirt on the
table with the
wrong side up, put the big pocket piece on top with the wrong side up.
Pin the outside curves on each other and sew the outside curve of the
pocket. Do not sew through the skirt, but lift the pocket pieces such
that you only sew the lining and the main piece together. Finish the
seam. Sew the sides of the skirt pieces together and
gather the skirt as described in the original instructions. Do not
gather the visible part of the pockets.
Step 12: Now the most
tricky part to explain (and to sew). For the nicest effect, you want the princess
seam to perfectly blend into your pocket. Pinning and possibly even adding some
basting stitching is crucial. Put the skirt on the table with the right
side up, put the bodice on top of it, with the right side down (so right sides facing each other) and while
pinning, check if the seams line up. Sew the bodice to the skirt.
Continue with adding the elastic and finishing the armholes and neckline
according to the instructions.
Stap 10: Leg de rok
op tafel met een goede kant boven. Leg de voering van de zak op de rok
met de goede kant van de zak naar beneden (goede kanten op elkaar dus)
zodat de uitsnijdingen precies matchen. Naai langs de kleine curve. Geef
knipjes over de hele curve, draai naar de goede kant, pers de curve en
eventueel maak je een onderstiksel.
Stap 11: Leg de rok nu
met de verkeerde kant naar boven op de tafel en plaats het grote
zakdeel op de voering (de goede kant van de voering en de goede kant van
de grote zak liggen dus op elkaar. spelt en naai nu de buitenste curves
aan elkaar. Naai hierbij niet door de rok, maar naai alleen de zakdelen
aan elkaar. Werk de naad af. Naai nu de zijkanten van de rok aan elkaar
en volg de instructies van het patroon om de rok te rimpelen. Rimpel
echter niet over de zak.
Stap 12: Nu het lastige deel,
zowel om te doen als om uit te leggen. Voor het mooiste effect loopt de
naad van het lijfje precies door in de zak. Om dit te bereiken moet je
goed spelden en eventueel de stof even vast zetten met een met een
rijgstiksel. Leg de rok met de goede kant naar boven op de tafel. Leg
het lijfje op de rok met de goede kant naar beneden (dus goede kanten op
elkaar). Spelt dan zodat de naad precies doorloopt. Naai vervolgens het
lijfje aan de rok vast en werk alles af volgens de oorspronkelijke
instructies.
This week, Sofilantjes* is celebrating her second anniversary. Looking at
the amount of patterns you would never have guessed she only started
two years ago. Anne is launching with light speed! Therefore I am very
proud to be part of her anniversary blog tour. For the happy occasion I
created two tutorials for you. The first one is showing how to mash up
the Solis* and the Nivalis*. In the second tutorial I show you how do do a
blind seam in jersey without a special blind seam foot. There is also a
giveaway, at the very end of this post. If you use the coupon code
"CELEBRATE" in the Sofilantjes' web shop you get 25% off at checkout
during the blog tour.
Sofilantjes* viert deze week haar tweede
verjaardag. Als je ziet hoeveel patronen Anne al gecreëerd heeft zou je
nooit denken dat ze pas twee jaar bezig is. Geweldig om te zien met
hoeveel passie en tempo zij patroon na patroon lanceert. Naar aanleiding
van deze feestelijk gelegenheid is er een hack en mash up blog tour.
Heel veel verschillende blogger laten zien dat er nog meer mogelijk is
met de patronen van Sofilantjes. Ook ik mag deel zijn van dit leuke
circus en ik schreef voor deze keer maar liefst twee tutorials. In de
eerste laat ik zien hoe je een mash up kan maken tussen de Solis* en de
Nivalis. In de tweede laat ik zien hoe je de jersey blindzoom steek van
je naaimachine kan gebruiken. Naast alle tutorials deze week geeft
Sofilantjes ook stof en patronen weg. Aan het einde van deze post vind
je een rafflecopter. Ten slotte is er ook nog eens een 25% kortingscode,
te gebruiken in de webshop (met uitzondering van bundles). De code is
"CELEBRATE" .
Let's start this party with the dress I sewed
for this happy occasion. The day the Solis was launched a member of the
Sofilantjes Sew and Show Facebook group asked if somebody mashed up the
Solis and Nivalis yet. She wrote that she loved the Solis' back, but
that her daughter considered herself to big for circle skirts (and she
did not want to use the pleated version). I was intrigued, and decided
to try it.
Maar laten we beginnen met de jurk die ik voor de tour naaide. Toen
de Solis uitkwam vroeg iemand in de Sofilantjes Sew and Show Facebook group of
de Solis al was gecombineerd met de Nivalis rok. Ze vond de achterkant
van de Solis zo mooi, maar haar dochter voelde zich te oud voor een
cirkel or plooien rok. Ik vond het een intrigerend idee en besloot om
het idee voor de blogtour te doen.
The bunny fabric is from
Droomstoffen. This particular fabric is no longer available, but there
is an amazing big selection of black and white fabrics there. Black and
white is the trend, but my kids prefer to have some color in their
clothes. Using monochrome fabric with a color splash is the optimal
solution in that case. I used yellow jersey from Joyfits for the bodice
and the pockets.
The konijnenstof is van Droomstoffen. Ik kocht
het in februari en hij is helaas uitverkocht. Droomstoffen heeft echter
nog een schat aan zwart wit stoffen, ga er zeker eens kijken. Hoewel
zwart wit de hype is op dit moment, houden mijn kids nog steeds vooral
van kleur. Ik combineerde het zwart wit daarom met een duidelijk
kleuraccent. De gele jersey haalde ik bij Joyfits.
Making this
mash up was much easier than I anticipated. If you want to make your own
you will need to copy/cut the neck strap, the back strap, the front
bodice and the back bodice pattern pieces from the Solis. From the
Nivalis you will need both skirt pieces and the front bodice. The neck
strap and back strap can be used without any alterations. I will now
walk you through the mash up steps.
De mash up was een stuk
makkelijk dan ik in eerste instantie gedacht had. Als je ook een mash up
wil maken heb je de volgende patroon delen nodig: van de Solis de voor
en achterkant van het lijfje, de nekband en de rugband (en eventueel de
zakken). Van de Nivalis heb je de voorkant en de rokken nodig. De
neckband en de rugband kan je gebruiken zonder er iets mee te hoeven
doen.
Step 1: Align the front bodices (so one from the Nivalis
and one from the Solis) at the shoulder line and such that the fold
lines (straight line on the left side) are parallel (the fold lines do
not overlap because the Nivalis is slightly wider). If you place the
Solis front at the bottom you can simply draw the Nivalis bottom bodice
curve on the Solis. Cut off the bottom piece and your front bodice for
the mash up is already done. You will end up with the green outline in the picture.
Stap 1: Leg de schouders van de twee
voorkanten (dus 1 van de Solis en 1 van de Nivalis) gelijk. Zorg ervoor
dat de kanten die op de stofvouw horen paralel aan elkaar liggen. De
vouwlijnen liggen niet op elkaar omdat de Nivalis iets breder is. Als je
zorgt dat het SOlis deel onder ligt, kan je met een stift de curve van
de Nivalis makkelijk op het Solis patroon tekenen. Knip vervolgens dat
getekende onderstuk af. Je voorkant is nu al klaar en die zou gelijk moeten zijn aan de groene lijnen in het voorbeeld.
Step 2: To
adjust the back bodice, place the bottom cut off (so what used to part
of the front Solis bodice) on the back bodice such that the bottom is
aligned. Mark the lowest of the two sides and remove the cut off. Draw a
straight line (parallel to the bottom) such that the sides of the
bodice have the same height.
Stap 2: Om de achterkant aan te
passen plaat je het zojuist afgeknipte stuk (de onderkant die je dus
later niet nodig hebt) op het patroondeel van de achterkant. Markeer het
laagste stuk, verwijder het extra deel en teken een rechte lijn,
evenwijdig aan de onderkant. De zijkanten van de voor en achterkant van
het lijfje (dus de kant die niet tegen de vouwlijn aanligt) zouden nu
even lang moeten zijn.
Step 3: The Nivalis is slightly wider so
you will have to make the skirt pieces a bit narrower, to make the
connection between the skirt and bodice possible. My girl does no longer
have a toddler belly, so I simply cut of the difference in width
between the two bodice. I hope the picture speaks more than a 1000
words. If not please ask. Use your newly formed pattern pieces to cut your fabric and follow the instructions of the Solis for the construction.
Stap 3: De Nivalis is dus iets breder
dan de Solis, hierdoor moet je dus het rokdeel iets smaller maken.
Bepaal het verschil in breedte tussen de bovenstukken van de Nivalis en
de Solis. Het verschil in breedte haal je vervolgens van de rok af aan
de vouwkant. Mijn dochter heeft geen peuterbuik meer en de smaller rok
past perfect. Ik denk dat de plaatjes de stappen duidelijk laten zien,
maar mocht je het spoor bijster zijn, laat het even weten. Naai vervolgens alles in elkaar volgens de instructies van de Solis.
Now
for the second tutorial, the blind seam in jersey. In the last few
weeks this has become my favorite jersey hemming method. I use it for
all kind of hems, but the method is especially great for curves which
are usually hard in Jersey.
Dan nu de tweede tutorial van
vandaag, een blindzoom in tricot. Deze steek is de afgelopen weken mijn
favoriete afwerkingsmethode geworden. Het werkt voor alle tricot zomen,
en vooral voor die lastige cirkel rokken zoals bij de Solis is het een
uitkomst! Zij was mijn proefkonijn en op basis van mijn foto's en uitleg
lukte het, ik hoop dat dat betekent dat jullie het ook gaan begrijpen.
Step
1: Folding the fabric. Follow the steps in the pictures, I have no
better way to explain this. She succeeded with them, so I hope this
means that they clearly show the folding method. I fold such that the
end is just 1 cm wide. You could choose to give yourself some more work
space and cut off close to stitches in the end. I take a width of the
double layer of about 1.5 to 2 cm. This means that in the end my entire
seam will be about 2.5 to 3 cm high. I advice to practice and you will
quickly see how much working space you need/like.
Stap 1: Het
vouwen van de stof. Ik zou hier heel veel woorden aan vuil kunnen maken,
maar het volgen van de plaatjes lijkt me het beste. Goed kijken en
volgen dus. Bij mij is die enkele laag aan de buitenkant ongeveer een
centimeter breed. Mocht je jezelf wat meer ruimte willen geven is het
ook een optie om aan het einde een reepje van de stof af te knippen. Ik
ben echter lui, en met dicht bij de zijkant naaien ben je direct klaar.
De dubbele laag is bij mij 1.5 tot 2 centimeter. De gehele zoom wordt
dan 2.5 tot 3 cm hoog. Dit is echt iets dat je een keer moet oefenen,
dan kan je mooi bepalen welke verhoudingen bij jou het beste werken.
Step
2: Sewing. Find the stretch blind seam stitch on your machine. The idea
behind it is a small zigzag combined with a big zigzag. Your machine
will do a few small zigzag stitches on the narrow single layer and one
big zigzag that catches the double layer, then it goes back to small
zigzag stitches again. the easiest way to understand it is looking at
this picture of the finished stitches.
For this tutorial I used
the default setting of my Pfaff 3.0 which resulted in a relatively big
visible stitch. For the mash up dress I changed the settings such that
the difference between the big and small zigzag was less. The stitches
are much more hidden this way. I advice you to play around a bit. My
Pfaff makes a small extra stitch just before the big zigzag comes, which
is great for preparing for the big stitch.
Stap 2. Een blindzoom
steek voor tricot is een combinatie van een grote en kleine zigzag
steek. De kleine zigzag steekjes komen op die enkele laag en de grote
zigzag pakt net de vouw mee. De makkelijkste manier om te begrijpen wat
het is, is om deze foto te bekijken van het stiksel.
Voor deze
tutorial fotos gebruikte ik de standaard instelling van mijn Pfaff 3.0
wat er voor zorgde dat de steken relatief groot uitvielen. Voor de mash
up jurk paste ik de steken verhouding iets aan. Ik maakte de grote steek
wat minder hoog en op de detail foto zie je dat de steken daar bijna
niet zichtbaar zijn. Je zal dus ook misschien een beetje moeten spelen
met de instellingen. Mijn Pfaff maakt een klein extra steekje net
voordat hij uitspringt naar de grote zigzag, heel fijn voor de
voorbereiding op de grote steek.
Step 3: Turning the
fabric. You really have to push out your stitches a bit, or else the
result will look weird. A good steaming always helps. Please let me
know if you get lost somewhere.
Stap 3: Klap nu de zoom naar
buiten, hierbij zal je het stiksel een beetje moeten rekken. Een goede
stoombeurt doet altijd wonderen.
Okay now for the give away!
On the picture you can see all the sponsors of the tour and you can fill
in the rafflecopter to win both patterns and fabric (you can scroll
through all the gifts by pressing the dots at the top of the
rafflecopter. In the Sofilantjes Sew and Show Facebook group there are
even more options to win patterns and fabric, check out the scavenger
hunt instructions there. My own give away from last week is still active
for two days, so you might also want to try your luck for two meter of
jersey fabric. Like I said at the beginning of the post you can use the
coupon code "CELEBRATE" in the Sofilantjes' web shop* to get 25% off at
checkout during the blog tour.
Nu is het dan eindelijk tijd voor
de give away. Hieronder zie je alle sponsors samen, er is heel veel stof
en patronen te winnen. Als je op de bolletjes in de Rafflecopter drukt
kan je alles zien wat er te winnen valt. In de Sofilantjes Sew and Show
Facebook group zijn nog andere leuke wedstrijden, zo is er een digitale
speurtocht door de blogs. De give away van mijn vorige post loopt ook
nog twee dagen, daar kan je twee meter stof winnnen. Ten slotte is er
dus, zoals ik aan het begin al zei de code "CELEBRATE" om 25% korting te krijgen in
de Sofilantjes webshop* (met uitsluitsel van de bundels). Mocht er dus nog iets in je collectie ontbreken
is dit je kans.
Feel free to leave a comment in the language you prefer
(although Google translate might have to assist me if you choose
something different than English, German, Dutch or Hungarian). If you
buy anything through my affiliate links (*), I get a small commission
(the price stays the same for you), I am very grateful for everything
that feeds my fabric addiction.
Ik vind
het altijd leuk om reacties te lezen. In deze post zitten enkele
affiliate linken, aangeven met een *. Mocht je het patroon aankopen
doordat je in de shop kwam via een link van mij, dan krijg ik een kleine
commissie. Het patroon wordt niet duurder voor jou, maar mijn
stoffenkast is er wel heel blij mee.
You know I love to hack patterns, so when Jessica from Flossystyle asked
who wanted to write a hack post for the new Zoo Collection, I kind of
waved my arm off. Today, I will show you how to adjust the front of the
Stork to have an exposed bounded zipper closure instead of a snap one.
This method will work for both the Monkey and Koala bottom. The tutorial
is also suitable for other types of patterns in which you would like to
put a decorative front zipper.
You might have seen these
decorative zippers. They are beautiful, but a bit expensive as well. To
mimic the effect you can bind an inexpensive zipper's sides and just sew
the whole thing on the garment, like you would do with the official
decorative zipper. I am sure someone else had the same idea already, but
I have not seen it yet, so I thought you might like a tutorial on it.
The
Zoo Collection pattern has two cutting lines. One cutting line for using the placket
and one for the Turtle option (full front - when you cut the pattern
piece on the fold). For this tutorial you need the fold cutting line. Cut one
half front on the fold cutting line (do not actually fold the fabric)
and cut the other (mirror image) with 1.5 cm extra width (just place it 1.5 cm
from the side of your fabric). This extra piece will become your zipper
guard. Mark the middle line on the wider front with an aqua trick
marker (or other washable marker). Use your serger or sewing machine to
finish the inner sides.
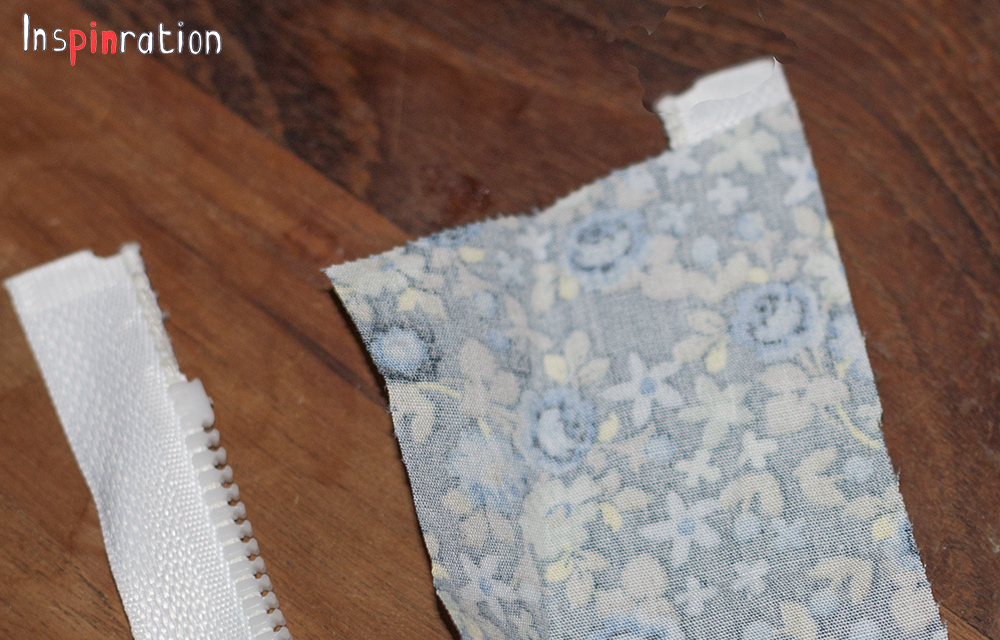
Cut two strips of 2.5 cm wide times the
length of the garment plus 2 cm (these will be the pieces that will be on
the side of your zipper and you will have to fold it over the top of the zipper). These
strips will not have to stretch so you do not have to cut on the bias.
Sew the shoulders such that both fronts are connected to the back. Note that this will be an unlined garment. So you also have to cut a
piece of bias to bind the neckline. Also cut two strips of bias to bind the
armholes (these pieces will bind a curve so they have to be cut on the
bias). For how to finish neckline and armholes use the pattern's
explanation on how to finish the legs. Just measure the length of the
neckline after finishing the shoulders to determine the necessary length
of the bias, do the same for the armholes. Finish the neckline and
armholes.
Take the zipper, turn one of the strips bad side up
and align the right side of the fabric with the right side of the right
zipper half. Use your zipper foot to sew as close to the teeth as
possible. Now fold the fabric back, over the side of the zipper and you
will see the side of the zipper is covered.
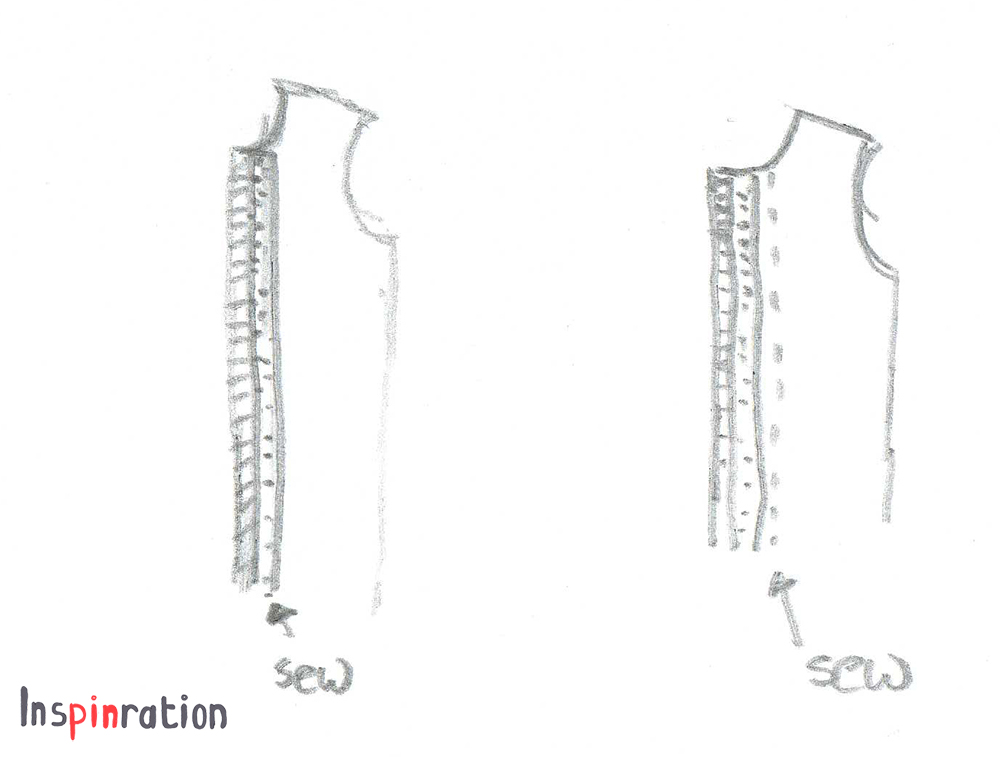
Fold over the top
of the fabric such that the top of the zipper is also nicely wrapped.
Place the zipper on the piece that was cut to the fold cutting line, such that
the teeth are lined up with the side of the fabric. The teeth should hang slightly over the fabric's edge (about one millimeter). The zipper halves will become one. The exact middle of the zipper, while closed, should align with the front line. For this step it is important that the the strip on the
zipper does not obscure your view of the front line. If the piece is a
bit too wide, just cut is back slightly. Now sew close to the right side
of the edge of your bounded zipper (but still on it). Now finish the
zipper strip with a narrow zigzag (you could do this beforehand, but
because everybody will use slightly different zipper width, in this
order you will not have to cut off the finished side if the strip turns
out too wide). Fold both the main fabric and the zipper strip back
towards the outer side. Stitch both the folded side of the main fabric and the zipper strip to the main fabric, just off the zipper edge.
Now sew the other fabric strip on the
other zipper side, in mirror image of what you just did. So, align the left side of
the fabric with the left side of the zipper. Fold under the strip, both under the side and under the top. Now place the zipper teeth on the line you
made with the aqua trick marker (or any other washable marker). Stitch
again close to the edge of the zipper, but still on the zipper. Now, cut
back the zipper strip seam allowance to 3 millimeter. The next stitch
line is close to the zipper teeth (for the other side you sewed on the
main fabric to fixate). The stitching of the two sides is not
symmetrical, but if you use matching thread it does not show.
Now just finish the garment as usual.
For
this tutorial I made an unlined garment, you can of course also make a
zipper front with a lined garment. In that case you sandwich the zipper
between main and lining (like you usually do with the placket option).
You will have to subtract half the width of the zipper from the fabric
pieces in that case.
If you want the zipper guard to be a double layer, you could make the left front 3.5 cm wider instead of 1.5 cm wider. Then, fold it
backwards just before the last stitch line, this will secure it under
the zipper. If you do not need a zipper guard, you could cut two pieces
the width of the fold line. In that case finish the left side of the
garment the same as right (so finish the rest piece of your binding, to
avoid fraying).
The fabrics are both from Eline Pellinkhof. I used some home made bias I had laying around from earlier projects and as you can see, I just did not have enough for both legs, this is not visible usually though.
I love to hear what you think of my creations. Feel free
to leave a comment in the language you prefer (although Google
translate might have to assist me if you choose something different than
English, German, Dutch or Hungarian).