

Friday, December 7, 2012
Secret Santa gift
Sunday, November 4, 2012
Crochet cactus tutorial (the one with the red ball on top)
**updated May 3rd 2015 with some pictures to illustrate the tutorial**
As I mentioned earlier, I started my crocheting with a cactus garden. I correctly assumed that a cactus is a great beginners project. The shape of a cactus in real life is usually not very symmetrical and a cactus often shows all kinds of irregularities. Another good reason to crochet a cactus is that they require even less care than a real one and that you do not have to get some tweezers if one of your small children (or husband) decides to take a closer look. The cactuses have kind a stole my heart and I created several to brighten up the house and give as a gift.
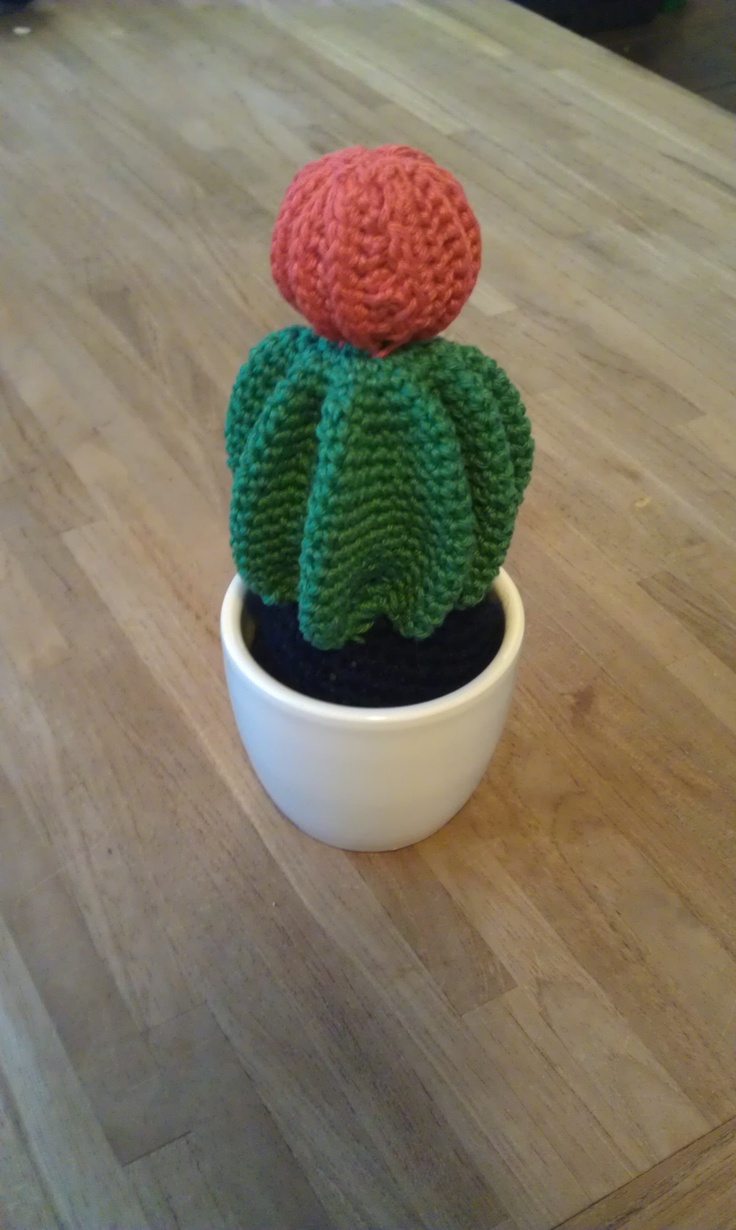

Last week a friend came over and asked me for the pattern of one of the cactuses. I created the cactus in question (the one with the red ball on top) from a picture only and kind a cheated by sewing the whole thing together to keep its shape. Although the end result is much more important than the method (at least in crochet) I was not totally satisfied with this particular cactus because the whole thing gets kind a messed up if somebody touches it. I decided to create a real pattern that I would like to share with you as well.
I prefer crocheting in a spiral, not closing all the individual rounds. By crocheting in a spiral it is wise to mark the beginning of your ring with a piece of yarn or something else you have laying around. You can also simply adapt the pattern by closing every round.
round 1: make a magic loop, make 10 single crochet inside the ring and close the ring with a slip stitch.
round 2: Crochet two single crochets inside every stitch (you now have 20 stitches)
round 3: Crochet one single crochet in two stitches and two single crochets into the third stitch. Repeat this the whole round, making an extra stitch per three stitches which gives you 30 stitches at the end of the round.
You now should have a relatively flat circle (no problem if the shape is more like a bowl, this will solve itself in the end). In the next step you will create the bottom of the ribs of the cactus. After round 4 you will not make extra stitches and the 2D shape will become 3D.

Round 4: Make a chain of 4, single crochet into the second stitch from your needle. Move back to the circle by crocheting a single crochet into each of the other two stitches from your chain. Make a single stitch into the stitch next to the stitch were your made the chain in. You now have create a little "leg" which will become one rib when you make more rounds. If you want your cactus to have six ribs, you will make one leg every 30/6=5 stitches. The leg is two stitches wide which means that you now have to make 3 single crochet into the next three stitches and start your next leg.

round 5 until x Crochet a single crochet in every stitch. After a few round you can push the ribs out a bit in the bottom to really see your cactus develop. Keep on crocheting until your cactus reaches the height you prefer.


Round x: shape your cactus in such a way that you see the ribs clearly. In this round you will have to decrease 4 stitches per rib. Count 4 stitches before the most outside point of your first rib. Now 4 times a single crochet decrease ( best result by crocheting two stitches together and only stitching in de front loop).

Round x+1 now you will decrease three stitches per rib. Count three stitches before the top of the rib and make three times a single crochet decrease. The exact position of your decreases is not that important, just make sure it is distributed approximatly evenly.
Round x+2 decrease one stitch in every three stitches by making one single crochet and than crochet two together around the whole circle.
Round x+3 decrease half of the stitches by just crocheting two together over the whole circle. Cut the string and leave a relative long tail.


A red ball on top looks great and covers up any irregularities in your decrease. The ball on top is crocheted flat. For finishing simply close the side and weave the top and bottom together with a sewing needle. I prefer my "flower" to have vertical lines. This is created by stitching not through the top stitch but in one below. Do this backstitching on one side, the other side make normal single crochet stitches.
 The size of your earth depends on the size of your pot. Start by making a flat circle, which will be the top. Make your circle a bit smaller than the top of your pot. You make the circle by starting with for example 10 stitches in a magic ring. Increase to 20 the next round by stitching two in every stitch. The next stitch you leave 1 stitch between the increases. The next two stitches between every round etc. If the round has the size of the top of your pot stop increasing and make as much rounds as the height of the pot. The size of the earth is probably not exactly the size of your pot, but with stuffing you can correct this later. After reaching the right height start decreasing. Decrease the same way as you increased but in backward order. If in the last increase row you had 4 stitches between every increase you now start decreasing by leaving four stitches between your decreases and crochet the fifth and sixth together.
Friday, November 2, 2012
Christmas angel
Yesterday I received one of the new crochet books that I ordered. Christels Christmas book. The book contained several very nice projects. I simply had to immediately start my favorite: an angel sitting on a Christmas ornament. I have no special connection to angels, but this cute girl immediately stole my heart. The pattern explanation was clear and I even learned two cool new tricks for creating bending shapes!
 I once heard that the best camera is the camera you always carry with you. This is so true. Although we have a great photo camera I definitely prefer taking pictures with my phone. It is so much easier to transfer the pictures onto my computer. I will try to be less lazy in the future, for now it is almost time to go to bed and a post with a bit blurry pictures is better than no post right...
 The original pattern in the book used black beads for eyes. My non existing supply of beads forced me to use an alternative for the eyes. While searching I came across a perfect set of eyes. in an Etsy shop. Besides gorgeous eyes, these dolls are really amazing and great inspiration for the future.

In the book the angel really sits straight on the ornament while the ornament hangs in mid air. I either used a very heavy kind of stuffing or the picture is photoshoped a little. Based on basic physics knowledge I presume the second. My angel looks much less comfortable on her ornament when floating in mid air. She seems to need a firm grip to avoid slipping. Although it might look a bit tiring, she seems to enjoy it, because she keeps smiling ;)

Wednesday, October 31, 2012
Crochet snowmen heads
I finally made the snowman head that set me on the path of crocheting. Last year around the same time I came across this awesome Christmas ornament.

At the same time that I spotted these great snowmen I also spotted ornament knitting with Arne and Carlos. Which ignited my current creativity wave. The child sweater that I knitted after Christmas re-acquainted me with the art of crocheting. After knitting the ornaments and the sweater I got a been-there-done-that-feeling with knitting for a few months. I seized the opportunity and decided that I had to change my lack of crochet skills and started to search on you tube for patient teachers. I found a bunch of them with one particular favorite . The lady in these movies explains very clear and the image quality is great. I was wondering if I could recommend these movies to a non-dutch speaker by using the automatic capture button. The results were very funny but far from useful. In the first few seconds you tube came up with word suggestions like "hike" and "holocaust". After having a quit productive crochet year filled with several cactus and stuffed animals, yesterday I finally made a snowman!

Thursday, October 4, 2012
The very hungry caterpillar

Wednesday, August 8, 2012
New dresses

Looking trough the pictures of dresses online the thought occurred to me that I might be able to make a dress (or three) myself. I had inherited a sewing machine and knew how to use it.

I felt the dress was a bit short and too wide and decided to try again. I bought some new fabric made the bodice less wide and the skirt longer. This time the whole thing was spot on and I created two more dresses from the same pattern in two weeks. In the second picture she is playing me, apparently this would also have been a great pregnancy dress pattern.

Monday, February 27, 2012
Hooked/zpagetti bag
One of my colleagues told me she was making a toy storage bin with Zpagetti or Hooked yarn and it was going very fast. I got intrigued by this thick material and with my birthday coming around the corner I found myself the perfect gift suggestion.

I got four different cones and started with making a small pink hand bag for my daughter. Because of the thickness of the material the bag was really ready in a jiff. I just crocheted a rectangle in single crochet and crocheted the whole thing together to form a small bag. The strap is made from a chain and one dingle crochet in every stitch from the chain. I crocheted a flower to function as a length adjuster for the strap. The blurred flower fabric is my daughters skirt while she was dancing with joy. The thing in the right corner, is indeed my foot. Do other people have the same problem that if you want to take a picture from something lying lower than you your feet often end up on the picture?And the blob on the left.. No idea... Now I am more serious in documenting my creative adventures I am at least trying to take better pictures, but also this early history artifact got misplaced somewhere in the past.
Thursday, January 26, 2012
Knitted girl sweater
Arne and Carlos restarted my knitting activities, but after Christmas I did not want to make more tree ornaments. Although the tree was far from full, creating Christmas decorations looses its charm if you have to wait 11 more months before you can use them again. So, I needed a new project.
I had some green yarn lying around, which was already waiting for years to get some purpose. I had bought it probably ten years earlier but never came around to use it. I felt that I had to use the old materials first before I could buy new ones (another habit that I got rid of for which re-installment wouldn't hurt).

Around the time I bought the green yarn I also had a subscription to a knitting magazine. I kept all the magazines and after browsing (through the seemingly very old fashioned models) I found one I liked. I did not feel up to knitting an adult size sweater yet, so I knitted one for my eldest daughter.
The green yarn I had was really very green... so when I finished the sweater I felt it needed some extra color to spice it up. I decided I wanted some light green accents and some crocheted flowers on them. I had never crocheted a flower, so thank god for the internet! Flowers really are a great, very small scale crocheting project. They only take a few minutes (not counting the hour you need to finding out what single, double and triple stitch are...).
Forgive me for the extremely poor quality of the picture. This is the only picture I have of the sweater. The yarn I had was 100% polyester and I really did not like the feel of it, so after lying on the shelve for a year I just threw it out. Although I do not have a garment to show for it, I did learn a very valuable lesson from this project: always use good materials which in my case means cotton. I realize this is not a universal lesson for everybody, but I love to knit with (good quality) cotton. If you decided to try out cotton start with Phildar cotton 3. It really has every color you can imagine and it has a nicely woven threat. The sweater also steered me onto the crocheting path, so all in all a very successful sweater I would say ;)
Subscribe to:
Posts (Atom)