
**updated May 3rd 2015 with some pictures to illustrate the tutorial**
As I mentioned earlier, I started my crocheting with a cactus garden. I correctly assumed that a cactus is a great beginners project. The shape of a cactus in real life is usually not very symmetrical and a cactus often shows all kinds of irregularities. Another good reason to crochet a cactus is that they require even less care than a real one and that you do not have to get some tweezers if one of your small children (or husband) decides to take a closer look. The cactuses have kind a stole my heart and I created several to brighten up the house and give as a gift.
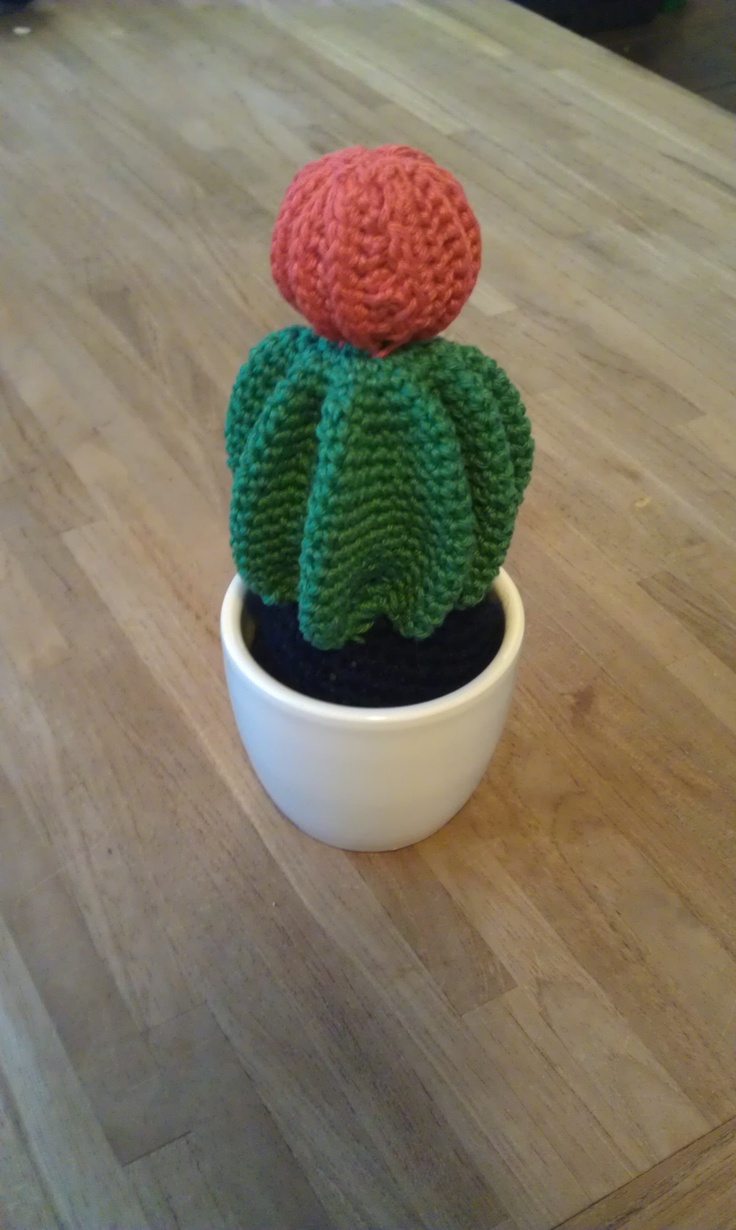

Last week a friend came over and asked me for the pattern of one of the cactuses. I created the cactus in question (the one with the red ball on top) from a picture only and kind a cheated by sewing the whole thing together to keep its shape. Although the end result is much more important than the method (at least in crochet) I was not totally satisfied with this particular cactus because the whole thing gets kind a messed up if somebody touches it. I decided to create a real pattern that I would like to share with you as well.
I prefer crocheting in a spiral, not closing all the individual rounds. By crocheting in a spiral it is wise to mark the beginning of your ring with a piece of yarn or something else you have laying around. You can also simply adapt the pattern by closing every round.
round 1: make a magic loop, make 10 single crochet inside the ring and close the ring with a slip stitch.
round 2: Crochet two single crochets inside every stitch (you now have 20 stitches)
round 3: Crochet one single crochet in two stitches and two single crochets into the third stitch. Repeat this the whole round, making an extra stitch per three stitches which gives you 30 stitches at the end of the round.
You now should have a relatively flat circle (no problem if the shape is more like a bowl, this will solve itself in the end). In the next step you will create the bottom of the ribs of the cactus. After round 4 you will not make extra stitches and the 2D shape will become 3D.

Round 4: Make a chain of 4, single crochet into the second stitch from your needle. Move back to the circle by crocheting a single crochet into each of the other two stitches from your chain. Make a single stitch into the stitch next to the stitch were your made the chain in. You now have create a little "leg" which will become one rib when you make more rounds. If you want your cactus to have six ribs, you will make one leg every 30/6=5 stitches. The leg is two stitches wide which means that you now have to make 3 single crochet into the next three stitches and start your next leg.

round 5 until x Crochet a single crochet in every stitch. After a few round you can push the ribs out a bit in the bottom to really see your cactus develop. Keep on crocheting until your cactus reaches the height you prefer.


Round x: shape your cactus in such a way that you see the ribs clearly. In this round you will have to decrease 4 stitches per rib. Count 4 stitches before the most outside point of your first rib. Now 4 times a single crochet decrease ( best result by crocheting two stitches together and only stitching in de front loop).

Round x+1 now you will decrease three stitches per rib. Count three stitches before the top of the rib and make three times a single crochet decrease. The exact position of your decreases is not that important, just make sure it is distributed approximatly evenly.
Round x+2 decrease one stitch in every three stitches by making one single crochet and than crochet two together around the whole circle.
Round x+3 decrease half of the stitches by just crocheting two together over the whole circle. Cut the string and leave a relative long tail.


A red ball on top looks great and covers up any irregularities in your decrease. The ball on top is crocheted flat. For finishing simply close the side and weave the top and bottom together with a sewing needle. I prefer my "flower" to have vertical lines. This is created by stitching not through the top stitch but in one below. Do this backstitching on one side, the other side make normal single crochet stitches.
 The size of your earth depends on the size of your pot. Start by making a flat circle, which will be the top. Make your circle a bit smaller than the top of your pot. You make the circle by starting with for example 10 stitches in a magic ring. Increase to 20 the next round by stitching two in every stitch. The next stitch you leave 1 stitch between the increases. The next two stitches between every round etc. If the round has the size of the top of your pot stop increasing and make as much rounds as the height of the pot. The size of the earth is probably not exactly the size of your pot, but with stuffing you can correct this later. After reaching the right height start decreasing. Decrease the same way as you increased but in backward order. If in the last increase row you had 4 stitches between every increase you now start decreasing by leaving four stitches between your decreases and crochet the fifth and sixth together.

