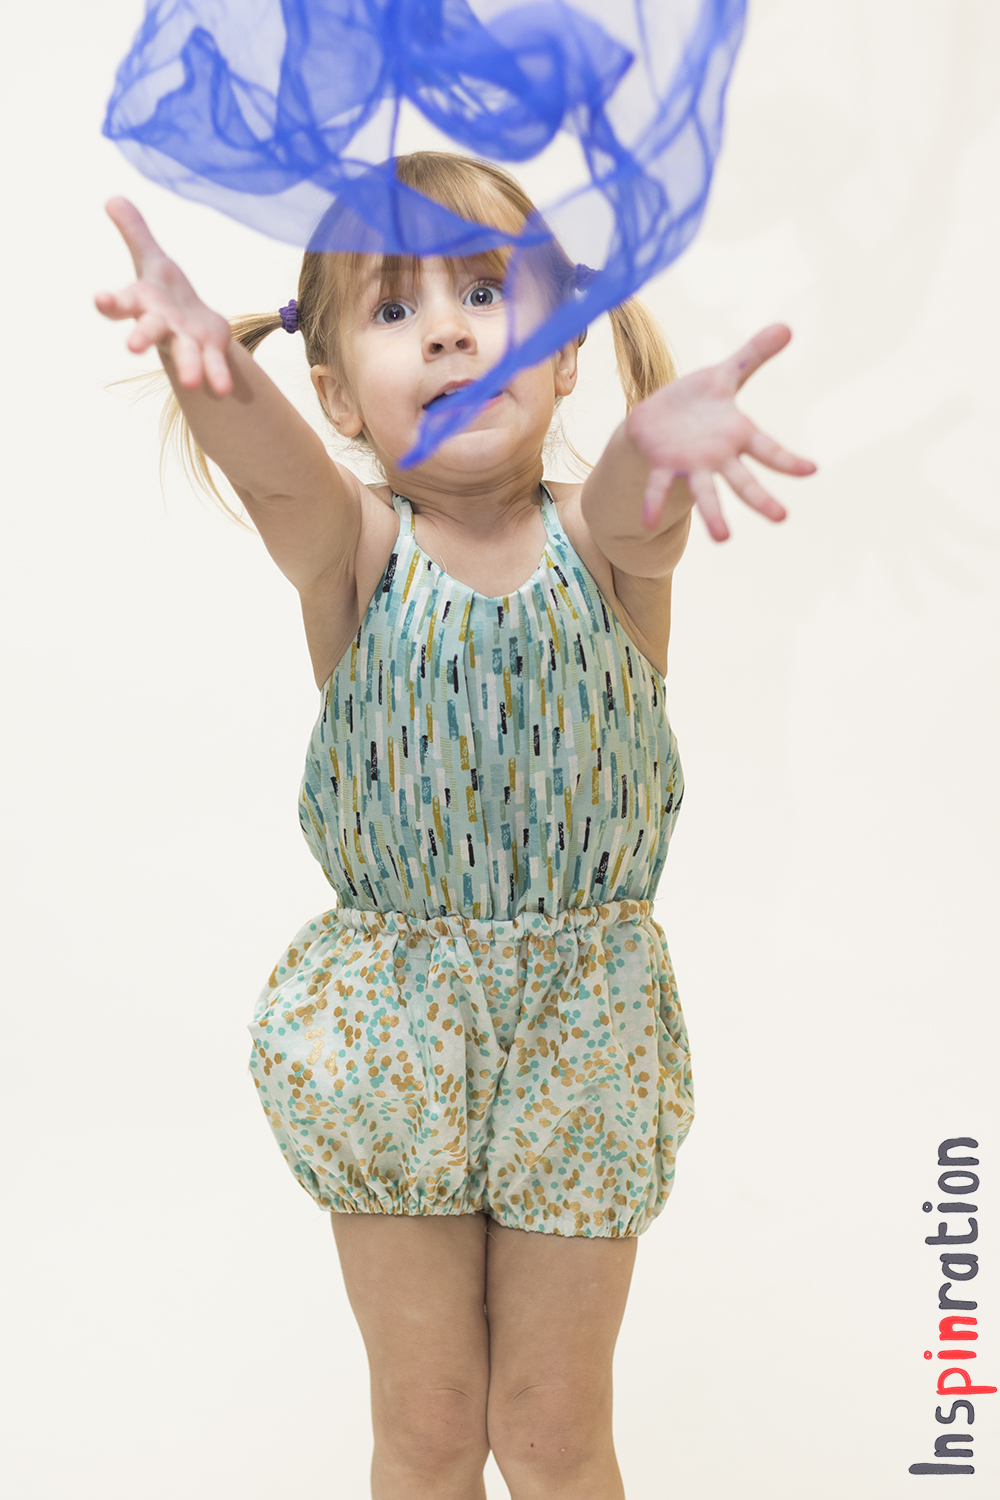
The woman who designed these dresses and these trousers has started her own pattern label and today I am showing you the first pattern released under Sansahash. With the Kamaria pattern you can sew a sunsuit, a dress and a top and you can have them with gathered waist or paperbag waist, so a pattern with many possibilities.
De dame achter deze jurken en deze broek is haar eigen patroon label gestart, Sansahash Designs en vandaag laat ik jullie het eerste officiële patroon zien. Met het Kamaria patroon kan je een top, een jurk en een korte onesie naaien. De versies kunnen met alleen elastiek in de taille of met elastiek en froezels genaaid worden, een patroon waar je veel kanten mee op kan dus.
All variations in the pattern have the front pleat with a subtle V neckline and neck straps. During testing I sewed two sunsuits and a top. As usual, let's start with the one I sewed last, the garment sewed with the final pattern, this blue with white flowers. This last version I made is without pockets, but the sunsuit has pockets that are perfect for color block, in the first sunsuit I did put pockets, but I did not use a contrasting fabric for them.
Alle patroonopties zijn met een plooi aan de voorkant en worden in de nek geknoopt met smalle bandjes. Tijdens het testen naaide ik twee onesies en een top. Zoals gebruikelijk begin ik met diegene die ik als laatste naaide, dat is namelijk de versie genaaide met het finale patroon. Deze blauwe met witte bloemetjes onesie is zakloos. Het onesie patroon heeft de optie voor contrasterende zakken, ik naaide ze in de eerste versie (alleen niet met contrasterende stof), maar liet ze weg bij deze laatste.
The pattern includes instructions how to make woven straps the easy way, so no pulling though a very small tube. For the top I used alternative straps, I used my crochet yarn to make a cord. The Soft Cactus remnant from making this dress was the perfect canvas for this quick sew. The pattern includes a dress option, one with elastic in the waist like the sunsuit. Simply lengthening the top pattern piece would also give a very nice dress I think.
Het patroon bevat instructies over hoe je makkelijk spaghetti bandjes maakt, niet die versie waar je stof door een te kleine koker probeert te trekken. Voor de top die ik naaide gebruikte ik echter een hele andere methode voor de bandjes, ik draaide mijn eigen koordje (aan de deurklink) van haakkatoen. De Soft Cactus rest van toen ik deze jurk naaide en gedraaide koortjes leverde me een super snel genaaide top op. Het patroon heeft dus een jurk optie, eentje met elastiek in de taille zoals bij de onesie. Ik denk echter dat als je de top een beetje verlengt je ook al een hele leuke jurk hebt.
For the first sunsuit that I sewed, I used two of my most treasured scraps, I still have a weak spot for gold elements. My daughter apparently had a growth spurt the last weeks because she turned out to be 2 centimeter taller than the last time I measured. This first version is therefore a size smaller than I should have used, and the pattern got lengthened during testing, so the trouser part of this version are much shorter than the final version. The pattern instructs you to first make the trousers and than sew it to the top. So, with just a little bit of creativity you can use this pattern to make a stand-alone bubble shorts.
Voor de eerst onesie die ik naaide gebruikte ik twee zeer geliefderestjes, ik ben nog steeds helemaal fan van gouden details. Mijn dochter deed blijkbaar een groeispurtjes deze maand, dus ik naaide de onesie officieel een maatje te klein daarnaast werd het patroon nog wat aangepast qua maat, dus de pijpjes op deze zijn een stuk korter dan die aan het finale patroon. Het patroon laat je eerst het broekje apart in elkaar zetten en daarna naai je hem aan de top, dus met een beetje creativiteit maak je met dit patroon ook heel gezamenlijk een los bubbelbroekje.
So, besides the versions that I showed you, the pattern also includes instructions on the earlier mentioned dress option, a snap crotch and versions with a paper bag ruffle in the waist. The pattern is on sale for just $5 dollar up until Easter Sunday, so if you are still wondering how to spend that day, this is a nice filler.
Naast de versies die ik in deze post liet zien zijn er dus ook instructies om een jurk met elastiek in de taille te maken, een kruis met snaps zodat je makkelijk kan verschonen en versies met froezels in de taille. Het patroon is tot en met Paaszondag verkrijgbaar voor 6 dollar (inclusief btw), dus mocht je nog een leuke tijdsbesteding zoeken.
I am always on the look out for new (to me) pattern designers and I managed to find another that I am honored to show you today. Today, I am a participant of the Zierstoff * blog tour. Zierstoff is a team of German women that besides having German patterns also have a selection of English ones. Zierstoff is clearly only new to me, because their pattern database is packed. I was allowed to pick whatever I wanted, and I thought that this was the perfect time to finally make my eldest a jumpsuit. I promised her one almost a year ago...
Ik ben altijd opzoek naar (voor mij) nieuwe patroon designers en ik vond er weer een die ik aan jullie mag voorstellen. Vandaag doe ik namelijk mee aan de Zierstoff *blog tour. Zierstoff is een groep Duitse vrouwen die naast Duitse patronen ook een selectie Engelse patronen aanbiedt. Zierstoff is duidelijk alleen nieuw voor mij, want hun patronen database is enorm. Ik mocht kiezen wat ik wilde voor de tour en dat leek mij het ultieme moment om eindelijk eens die jumpsuit te naaien die ik mijn oudste een jaar geleden beloofde.
I chose the Henrike* Jumpsuit, a jumpsuit pattern for jersey fabrics. I really liked the front design, it looks super comfortable, but nothing like a pj due to the contrasting bands. Those bands make this jumpsuit a very quick sew. There is no hemming at the neckline, neither at the sleeves. I did need my sewing machine for the elastic at the legs, but if you are a serger addict like me, you could also just put bands on the ankles. The pattern advices to use clear elastic at the waist, but I was a bad girl, and skipped it. I know that this quality jersey does not really need it.
Ik koos voor de Henrike* jumpsuit, een patroon voor tricot stoffen. Ik ben helemaal fan van het design, super comfortabel, maar totaal geen pyjama door die contrasterend kruisende boord en schouderstukken. Die boord maakt het naaien van dit pak super snel. De mouwen zijn dubbel en hoeven niet gezoomd te worden en het zelfde geld dus voor de neklijn. Ik had alleen mijn naaimachine nodig voor het elastiek in de pijpen, maar als je een mede lock junkie bent, dan kan je daar ook gewoon een boordje opzetten. Officieel hoorde er Framilion elastiek in de taille, maar met deze kwaliteit tricot vind ik dat persoonlijk niet nodig.
The fabric I used is from Finch fabrics, I just love all their panels. This is one of the first panels, and has been in my stash for a while. I just did not know what to make of it because I only bought a relatively narrow piece. The flowers are only on the bottom of the panel, and I did not know what kind of patterns would use the optimally. When I was studying the Henrike pattern pieces, inspiration hit me and I used the flowers for the bodice. A little bit of flowers remained and they ended up on the back of one leg. I had a very efficient fabrics use, and almost nothing was left after I cut the pieces.
De stof die ik gebruikte is een "oudje" van Finch Fabrics. Ik ben dol op die panelen en verwerkte er al verscheidene. Dit was er eentje van een eerste lichting die was blijven liggen. Ik kocht een relatief smal stuk en de bloemen staan alleen op de onderzijde. Ik vond dus geen optimaal patroon om zoveel mogelijk te gebruiken. Wat in het vat zit verzuurt niet, en het stofje leek speciaal gemaakt voor deze jumpsuit in deze maat. Ik gebruikte de bloemen bijna helemaal op voor het lijfje en het laatste stukje plaatste ik op een broekspijp, geen bloem ging verloren zo en ook de luchtballonen en de rest van de stof was zo goed als op.
The sizing charts* of Zierstoff was a very pleasant surprise, my kids actually fit with their measurements within one size bracket. I did not have to blend at all for my eldest, I also checked the others and they fit almost perfectly, so if you have rather skinny kids that you usually have to blend for, check these sizes. This tour started months ago and I worked with the measurements of my daughter from then, but apparently she had a small growth spurt (last week she turned out to have grown both in length and chest size), because with hindsight I could have made one size bigger (again totally in line with the chart), but I think she will have a good wear out of this one this spring.
De maattabel* van Zierstoff was voor mij een aangename verrassing. Mijn kinderen bleken gewoon volledig in de tabel te passen, ik hoefde voor mijn oudste dus helemaal NIKS aan te passen, dat overkwam me nog nooit geloof ik. Als je dus relatief smalle kids heb, bekijk die patronen dat zeker eens. De Tour werd een paar maanden geleden al in gang gezet en toen knipte ik mijn patroon ook al. Mijn dochter bleek echter niet stil te staan en blijkt nu, ondertussen volledig in lijn doorgegroeid naar de volgende maat. Gelukkig is het tricot en gaat het nog prima deze lente zo.
Be sure to check out the Zierstoff website* there is a 30% discount until the end of April with the code MahlicaDesigns30. You can visit the other tour participants for more inspiration:
Mocht ik je nieuwsgierigheid gewekt hebben, check dan zeker de Zierstoff site* tot eind april is er een korting van 30% met de code MahlicaDesigns30. Voor meer inspiratie bezoek je de andere deelnemers van de tour.
Feel free to leave a comment in the language you prefer (although Google
translate might have to assist me if you choose something different
than English, German, Dutch or Hungarian). If you buy anything through
my affiliate links (*), I get a small commission (the price stays the
same for you), I am very grateful for everything that feeds my fabric
addiction.
Ik vind het altijd super leuk om reacties te lezen om mijn creaties. In
deze post zitten enkele affiliate linken, aangeven met een *. Mocht je
het patroon aankopen doordat je in de shop kwam via een link van mij,
dan krijg ik een kleine commissie. Het patroon wordt niet duurder voor
jou, maar mijn stoffenkast is er wel heel blij mee
My son started asking for dungarees a few months ago, about the same
time Compagnie M released the Charles dungarees. I bought the pattern,
but then got distracted by other sewing projects. Last week my son asked
for dungarees and this time I immediately acted on it.
At first he only
wanted to pose in the shirt he was already wearing, the three little pig
ones, but during the shoot I convinced him to switch to a bit less
crowded shirt which combines better with the dungarees. The best
combination would be a uni color shirt, but none of those were clean
unfortunately.
The
fabric I used is the same type as my own trousers, the Kaufman Shetland flannel which I bought at fabric.com, just a different color. My son is very skinny so I made him a
size two width and size five length. The size two turned out perfect,
the size five a bit to long. The extra length is not a big issue the
breast piece has a perfect height, only the legs and shoulder straps
were a bit long, but that was easily overcome.
Due to my son's a-normal
proportions the side fake pockets stayed open too much, which you can
see on the next two pictures. The pockets are a bit too high, for the
next dungarees I will have to adjust this, now his underwear is showing.
I first thought about putting another button but I decided to sew the
lower part closed. I was afraid the extra kam snap would create friction
and my son can easily go in and out of the trousers even with the
button of the pocket closed.
When my son first saw the
dungarees he was on one hand exited but on the other hand a bit
disappointed because the breast piece did not have a small pocket. That
was easily fixed. I changed the details of pattern a bit to make it less
girly by replacing the rounded pieces with corners. This turned out
great at upper part of the breast flap, the pockets still seem a bit round
though.
Before I closed the lower part of the fake pocket my
son loved to put his hand there, he loves pockets. After I closed the
holes he quickly found another way to still put his hands in.
The contrasting fabric with the whales is from
Lillestoff. I bought it to make this dress. I still had a small part
left and the colors matched very well with the flannel. The fabric has a
bit yellow in it and I decided to take the same color of kam snaps. I
love how the back turned out with that contrasting band of jersey. All
jersey pieces were lined with flannel.
In my quest to limit scraps I made another baby onesie from the piece that was left. My model was already sleeping when I made the pictures.
I love to hear what you think of them. Feel free to leave a comment in the language you prefer (although Google translate might have to assist me if you choose something different than English, German, Dutch or Hungarian).
In an earlier posts I mentioned that my son loves colorful cloths and he
loves his twovery happy trousers. He apparently is not the only one,
because one of his friends placed an order for such a pair of trousers.
The fifth birthday of my sons friend is this week and I therefore
created another pair of Small Fry Jeans. The friend is similarly build
as my son. I hope that both the friend and his mother will like it.
I
have made more gifts this year which I did not blog about yet. Some of
the pictures are from before I made my resolution to make better
pictures.
From this girly skirted onesie I actually made two,
for two different girls. I used an Ottobre pattern for the onesie and I
based the skirt part on an exiting skirted onesie I received when our
youngest was born.
One of my friends liked the (regular)
onesies I sewed my youghest and when she gave birth to her second child,
I gave her this one.
This dino I made for a small boy. It was a very easy and quick gift, you find the tutorial here.
Besides
sewing I crocheted a moos/deer. You can see the other animals I made
earlier this year here. This moos/deer is not from the Edward's Managerie book, but
from a pdf pattern set that I received because I bought the book
directly through Toft.
In my previous post I already said
that I used my recently acquired Silhouette for multiple types of
projects. When a loved daycare lady stopped working at our location I
made her a mug. With my Silhouette I cut two pictures of our youngest
girls (the ones she took care of) and peeled the "negative part". Then I
glued them on a mug and colored the cut-out pieces with a porcelain
pen. After half an hour in the oven the mug is dishwasher proof.
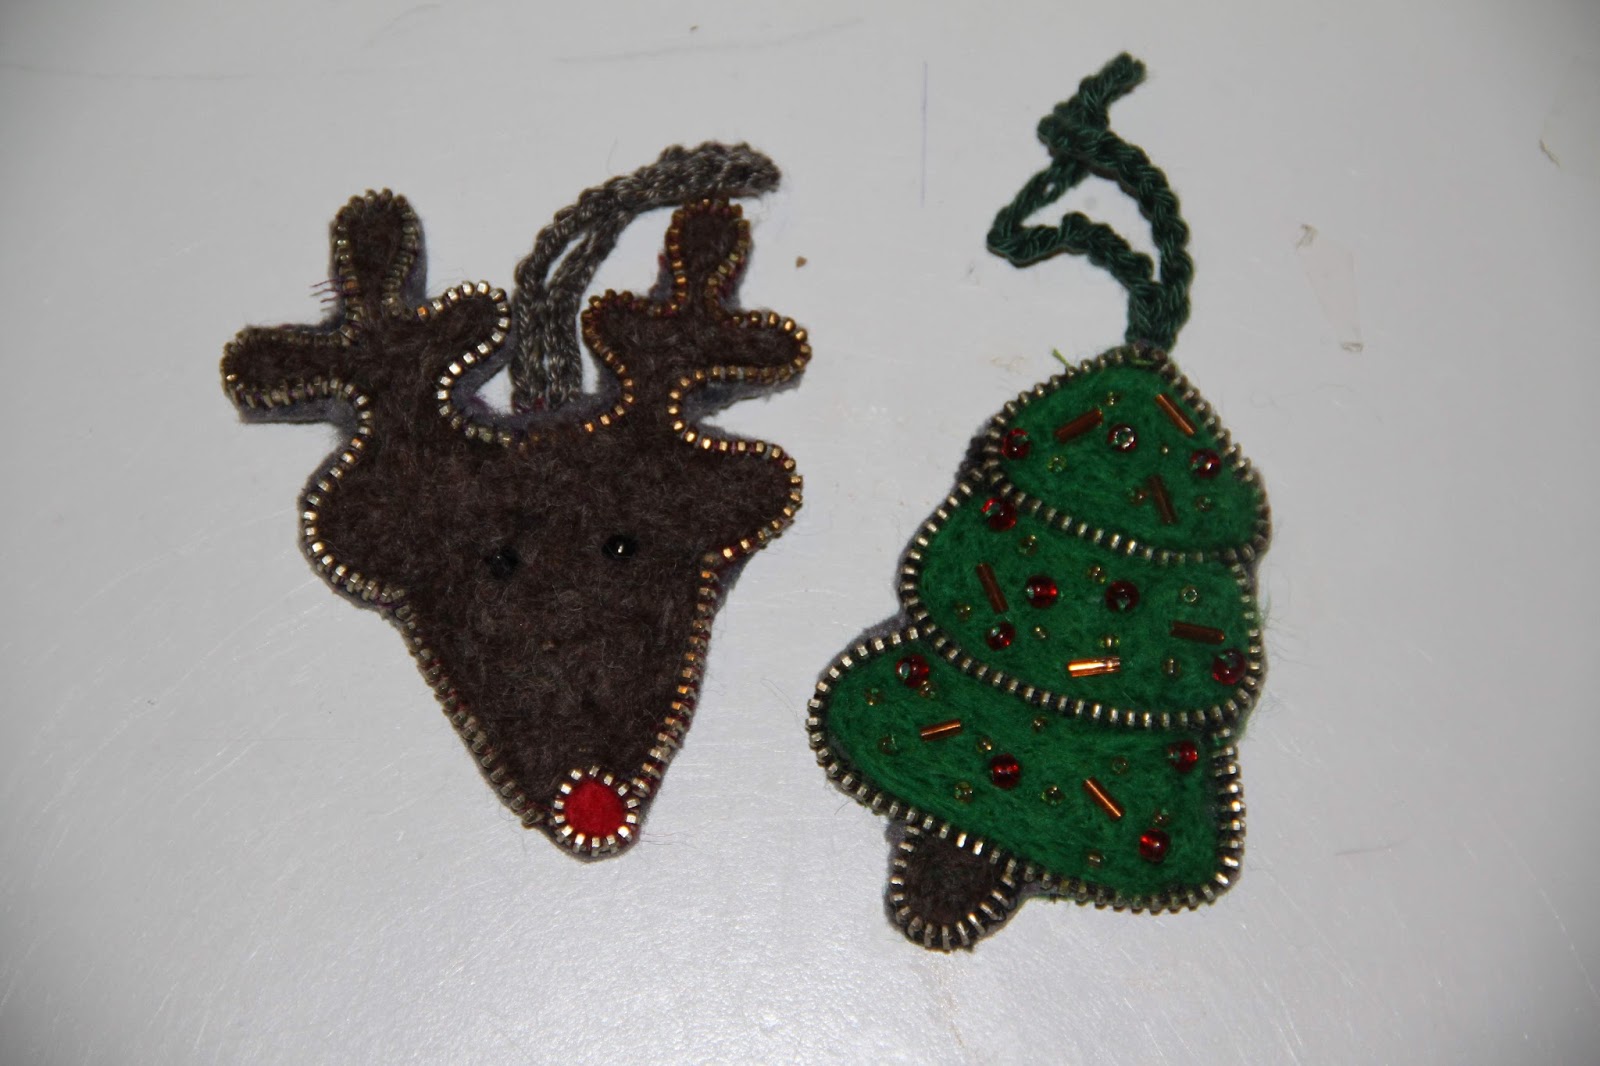
The
last set of pictures shows another recently made gift. I came across a
technique that I had never seen. With zippers a frame is created and the
spaces between the zipper parts are filled with needle felting. I
simply had to try it (I have a big pile of jeans zippers waiting to be
re-purposed). It took me a relatively long time to fixate the zippers, I
hand stitched all the teeth individually, but this can easily be done
in front of the television.
Feel free to leave a comment in the language you prefer (although Google
translate might have to assist me if you choose something different
than English, German, Dutch or Hungarian).
Although the upcycle sew along ended this weekend, I still had one post
to write. Last week I made a onesie from two of my husband's shirts. The
pile of cloths that needs upcycling contained two dark shirts that were
not giving me any inspiration. I could have cut new dark shirts for the
kids from them, but I did not get exited about that idea. Then I
remembered how happy my middle daughter is with her onesie and decided
to make her a new one.
The previous one is made from fabric that I
did not like that much, and I assumed would be perfect for a pyjama. I
did not realize that I would be looking at this fabric a big chunk of
the week. Whenever we get home my daughter immediate changes in
comfortable cloths (sometimes she has even changed before I have taken
of my coat) and her onesie is on the top of her list. The dark shirts
therefore seemed perfect to be refashioned into a onesie, the dark makes
her a bit more dressed when she peeks around my legs to see the
mailman.
The shirts were not long enough to facilitate a one
piece front (and back), and I opted for diagonal seams on the body. The
two shirts contained just enough fabric, one of the shirts had a very
big letter print which I did not wanted to use. I did not make "before"
pictures because I felt they were just plain shirts and would not have
been pictured well (which I am of course regretting now). One of the
shirts had decorating seams on the sleeves, which became decorating
seams for the hood. I also sewed a decorating label that was on one of the shirts to a sleeve . I made a bounded seam with a contrasting binding
(which came from one of the two shirts)
for the connection of the hood and the collar. I have a good
relationship with my serger and I do not fear changing thread, but I
refuse to adapt the collor thread to the fabric, when worn the seams do
not show.
This time I ironed on stay-tape on the right zipper
location and used an invisible zipper. The sewing of the zipper went
perfectly this time, no wobbly fabric. The onesie will most often be
worn without anything underneath and I therefore also bounded the zipper
sides. The picture might not be very clear, but now only the teeth are
not covered in jersey, the rest is. Last time I bounded it with fabric
from the front piece and folding it. Now I just used an extra strip.
After
seeing the beautiful Silhouette shirts at Miekatoentje I lost my
resolve and bought one myself. This Elsa is my first flex application. I
now have the machine for one week, and have already used it for three
very different types of projects!
I used the same pattern pieces
as for the previous onesie, but somehow I added too much seam allowance
length wise, which resulted in a bit too big onesie. My daughter did not
mind, but I felt that the legs were just too long and would create
tripping danger. I was considering sewing in elastic at the ankles but
then realised the onesie would probably perfectly fit my son. He tried
it on and it indeed fits perfectly. He has been asking for something
from Frozen for long, he had something with Olaf in mind but does not mind
that it became an Elsa application. My daughter was sad that the onesie
passed her by, but I promised I would make her a new one and that she
will get this one when she has grown a bit.
The pictures are from mixed models, both my son and middle daughter. I mention it because they are really very similar, even my husband
did not notice that the model in the pictures changed (just compare the two pictures where they were laying down). I usually joke
that we have a 3D printer at home.
Feel free to leave a comment in the language you prefer (although Google
translate might have to assist me if you choose something different
than English, German, Dutch or Hungarian).