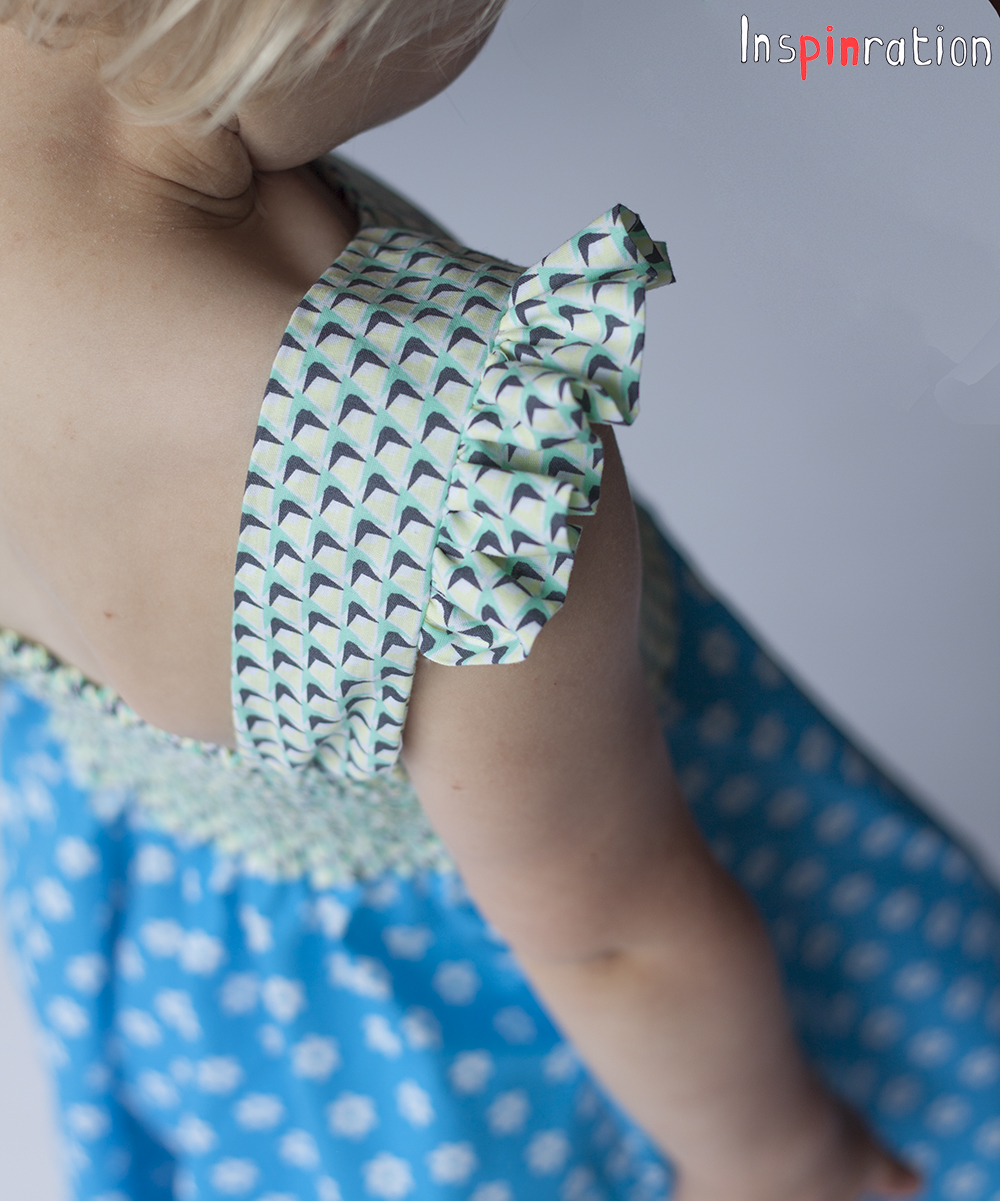
Bellasunshine*, the designer that made this awesome fitting women's dress
pattern, has recently released the Felicity top and dress pattern*. I
was among the lucky testers. The pattern contains a top and dress
length, optional ruffles, pin tucks or gathered front and either shirred
or elastic back. So, quite some options. On a sidenote, I want to congratulate Lauren S. on winning the give away from my 200 followers post. You can email me within 10 days on inspinration(at)gmail.com to claim your prize.
Bellasunshine*, de
designer van die super goed passende vrouwenjurk, heeft een een nieuw patroon.
De Felicity top/jurk* en ik mocht weer fijn meetesten. Het patroon heeft
een top en jurk lengte, plooitjes of gerimpelde voorkant, mogelijkheid
tot froezels aan de onderkant en een smok or elastieken achterkant. Heel
wat opties dus om de je eigen favoriete combi samen te stellen.
I
tested the pin tuck front on a top length with shirred back. You know I
have a weak spot for shirring right? I just love how easy it is to do
and what an awesome effect it gives. If you are a bit afraid of the
process or own a Brother (those machines seem to be the only ones that
do not make shirring easy), the elastic back is a great alternative. The
shirred back fitted perfectly from the start.
Ik testte de
plooien optie op een top lengte met smok achterkant. Jullie weten dat ik
super fan ben van dat smokwerk, zo snel klaar en geweldig effect. Mocht
je het echter toch eng vinden, of een Brother machine hebben, dan is de
optie met gewoon elastiek een super alternatief.
I managed to
screw up the pin tucks twice, but both times I managed to safe the
situation. In the top that I am showing you first, I somehow pleated the
tucks such that the whole thing ended up further from the middle than
they should have been. I solved it by ironing the pink tucks inward,
instead of outwards. This way the view is very similar. The first
mistake I made with the pin tucks, was on an earlier version. There was a
slight error in the tutorial, which caused the pin tucks to end up at
the inside of the garment. This is where testing is for, now in the
final version it is clear as rain.
Ik kreeg het voor elkaar om
twee keer de mist in te gaan met die plooien. Op de top versie, plooide
ik het op een of andere manier zo, dat het geheel net wat meer uit het
midden lag dan de bedoeling was. Door de plooien naar het midden te
strijken werd het geheel toch heel toch zeer gelijkend op de officiële
versie. Ik naaide echter nog een iets vroegere versie en door een klein
foutje in de instructies kwamen mijn plooien aan de binnenkant. Daarvoor
zijn er echter testers, dus de instructies zijn nu helemaal tip top.
I
did not feel like unpicking the first try of the pin tucks and decided
to turn it into a dress. After I realized that the pin tucks had to be
on the outside, I went for an uni colored fabric, which shows of the pin
tucks best. Initially, I had chosen striped fabric because I felt that
fitted the hidden pleats nicely, so I was curious to see how it would
look finished. It turned out, I did not have enough fabric to properly
finish the dress. I ran out of fabric for the bottom ruffle, so just
look at the examples of the website*, how the ruffle version should look.
I might remove the bottom ruffle, but even I won't the dress will be
worn a lot this summer any way.
Ik had geen zin om de plooien
uit de eerste versie te halen, en ik besloot voor andere stof te kiezen.
Plooien aan de voorkant komen namelijk het beste uit op effen stof. I
was ook wel benieuwd hoe het er uit eindelijk uit zou zien met de
plooien aan de binnenkant, dus ik maakte het geheel gewoon af als jurk.
Achteraf bleek ik niet genoeg stof te hebben voor de froezels, dus het
resultaat is niet helemaal geworden wat het zijn moest. Kijk maar even
naar de voorbeelden hier*, hoe het wel had gemoeten. Misschien verwijder
ik de onderste froezel nog, maar ook als hij blijft zitten zal de jurk
deze zomer veel gedragen worden.
You have to be a patient and
precise sewist for those pin tucks, so if you are like me, you will be
happy to see that just gathering the front also gives an awesome result.
The turquoise fabric was an inexpensive sheet cover that we used as
Fatboy cover, before I sewed this new one. The red and white stripes, I
bought a long ago to make this type of project. Futures change though.
Voor
die plooien gedraag je je het liefst als precieze en geduldige
naaister. Mocht je echter op mij lijken, dan word je vast heel blij van
de gerimpelde voorkant. Die turquoise stof is van een goedkoop
dekbedovertrek. We gebruikte die vroeger als Fatboyhoes, totdat ik deze naaide. De rood met witte stof kocht ik ooit voor dit soort plannen.
Plannen veranderen hier echter vaak.
The Felicity* is on special
release price for $5.95. Due to it being Memorial day coming
Monday, all patterns have a 30% discount in the web shop. So, if you were considering
buying that women's dress pattern*, this is a very good moment to buy it.
De Felicity* heeft nog de speciale lanceringsprijs van $5.95. Alle andere
patronen in de Bellasunshine webshop* zijn nu met 30% korting i.v.m.
Memorial Day op maandag. Mocht je dus interesse hebben in die
vrouwenjurk*, sla je slag!
Feel free to leave a comment in the language you prefer (although Google translate might have to assist me if you choose something different than English, German, Dutch or Hungarian). If you buy anything through my affiliate links (*), I get a small commission (the price stays the same for you), I am very grateful for everything that feeds my fabric addiction.
Dan rest mij nog te melden dat Lauren S. de giveaway van vorige week heeft gewonnen. Ik vind
het altijd leuk om reacties te lezen. In deze post zitten enkele
affiliate linken, aangeven met een *. Mocht je het patroon aankopen
doordat je in de shop kwam via een link van mij, dan krijg ik een kleine
commissie. Het patroon wordt niet duurder voor jou, maar mijn
stoffenkast is er wel heel blij mee.
This week, Sofilantjes* is celebrating her second anniversary. Looking at
the amount of patterns you would never have guessed she only started
two years ago. Anne is launching with light speed! Therefore I am very
proud to be part of her anniversary blog tour. For the happy occasion I
created two tutorials for you. The first one is showing how to mash up
the Solis* and the Nivalis*. In the second tutorial I show you how do do a
blind seam in jersey without a special blind seam foot. There is also a
giveaway, at the very end of this post. If you use the coupon code
"CELEBRATE" in the Sofilantjes' web shop you get 25% off at checkout
during the blog tour.
Sofilantjes* viert deze week haar tweede
verjaardag. Als je ziet hoeveel patronen Anne al gecreëerd heeft zou je
nooit denken dat ze pas twee jaar bezig is. Geweldig om te zien met
hoeveel passie en tempo zij patroon na patroon lanceert. Naar aanleiding
van deze feestelijk gelegenheid is er een hack en mash up blog tour.
Heel veel verschillende blogger laten zien dat er nog meer mogelijk is
met de patronen van Sofilantjes. Ook ik mag deel zijn van dit leuke
circus en ik schreef voor deze keer maar liefst twee tutorials. In de
eerste laat ik zien hoe je een mash up kan maken tussen de Solis* en de
Nivalis. In de tweede laat ik zien hoe je de jersey blindzoom steek van
je naaimachine kan gebruiken. Naast alle tutorials deze week geeft
Sofilantjes ook stof en patronen weg. Aan het einde van deze post vind
je een rafflecopter. Ten slotte is er ook nog eens een 25% kortingscode,
te gebruiken in de webshop (met uitzondering van bundles). De code is
"CELEBRATE" .
Let's start this party with the dress I sewed
for this happy occasion. The day the Solis was launched a member of the
Sofilantjes Sew and Show Facebook group asked if somebody mashed up the
Solis and Nivalis yet. She wrote that she loved the Solis' back, but
that her daughter considered herself to big for circle skirts (and she
did not want to use the pleated version). I was intrigued, and decided
to try it.
Maar laten we beginnen met de jurk die ik voor de tour naaide. Toen
de Solis uitkwam vroeg iemand in de Sofilantjes Sew and Show Facebook group of
de Solis al was gecombineerd met de Nivalis rok. Ze vond de achterkant
van de Solis zo mooi, maar haar dochter voelde zich te oud voor een
cirkel or plooien rok. Ik vond het een intrigerend idee en besloot om
het idee voor de blogtour te doen.
The bunny fabric is from
Droomstoffen. This particular fabric is no longer available, but there
is an amazing big selection of black and white fabrics there. Black and
white is the trend, but my kids prefer to have some color in their
clothes. Using monochrome fabric with a color splash is the optimal
solution in that case. I used yellow jersey from Joyfits for the bodice
and the pockets.
The konijnenstof is van Droomstoffen. Ik kocht
het in februari en hij is helaas uitverkocht. Droomstoffen heeft echter
nog een schat aan zwart wit stoffen, ga er zeker eens kijken. Hoewel
zwart wit de hype is op dit moment, houden mijn kids nog steeds vooral
van kleur. Ik combineerde het zwart wit daarom met een duidelijk
kleuraccent. De gele jersey haalde ik bij Joyfits.
Making this
mash up was much easier than I anticipated. If you want to make your own
you will need to copy/cut the neck strap, the back strap, the front
bodice and the back bodice pattern pieces from the Solis. From the
Nivalis you will need both skirt pieces and the front bodice. The neck
strap and back strap can be used without any alterations. I will now
walk you through the mash up steps.
De mash up was een stuk
makkelijk dan ik in eerste instantie gedacht had. Als je ook een mash up
wil maken heb je de volgende patroon delen nodig: van de Solis de voor
en achterkant van het lijfje, de nekband en de rugband (en eventueel de
zakken). Van de Nivalis heb je de voorkant en de rokken nodig. De
neckband en de rugband kan je gebruiken zonder er iets mee te hoeven
doen.
Step 1: Align the front bodices (so one from the Nivalis
and one from the Solis) at the shoulder line and such that the fold
lines (straight line on the left side) are parallel (the fold lines do
not overlap because the Nivalis is slightly wider). If you place the
Solis front at the bottom you can simply draw the Nivalis bottom bodice
curve on the Solis. Cut off the bottom piece and your front bodice for
the mash up is already done. You will end up with the green outline in the picture.
Stap 1: Leg de schouders van de twee
voorkanten (dus 1 van de Solis en 1 van de Nivalis) gelijk. Zorg ervoor
dat de kanten die op de stofvouw horen paralel aan elkaar liggen. De
vouwlijnen liggen niet op elkaar omdat de Nivalis iets breder is. Als je
zorgt dat het SOlis deel onder ligt, kan je met een stift de curve van
de Nivalis makkelijk op het Solis patroon tekenen. Knip vervolgens dat
getekende onderstuk af. Je voorkant is nu al klaar en die zou gelijk moeten zijn aan de groene lijnen in het voorbeeld.
Step 2: To
adjust the back bodice, place the bottom cut off (so what used to part
of the front Solis bodice) on the back bodice such that the bottom is
aligned. Mark the lowest of the two sides and remove the cut off. Draw a
straight line (parallel to the bottom) such that the sides of the
bodice have the same height.
Stap 2: Om de achterkant aan te
passen plaat je het zojuist afgeknipte stuk (de onderkant die je dus
later niet nodig hebt) op het patroondeel van de achterkant. Markeer het
laagste stuk, verwijder het extra deel en teken een rechte lijn,
evenwijdig aan de onderkant. De zijkanten van de voor en achterkant van
het lijfje (dus de kant die niet tegen de vouwlijn aanligt) zouden nu
even lang moeten zijn.
Step 3: The Nivalis is slightly wider so
you will have to make the skirt pieces a bit narrower, to make the
connection between the skirt and bodice possible. My girl does no longer
have a toddler belly, so I simply cut of the difference in width
between the two bodice. I hope the picture speaks more than a 1000
words. If not please ask. Use your newly formed pattern pieces to cut your fabric and follow the instructions of the Solis for the construction.
Stap 3: De Nivalis is dus iets breder
dan de Solis, hierdoor moet je dus het rokdeel iets smaller maken.
Bepaal het verschil in breedte tussen de bovenstukken van de Nivalis en
de Solis. Het verschil in breedte haal je vervolgens van de rok af aan
de vouwkant. Mijn dochter heeft geen peuterbuik meer en de smaller rok
past perfect. Ik denk dat de plaatjes de stappen duidelijk laten zien,
maar mocht je het spoor bijster zijn, laat het even weten. Naai vervolgens alles in elkaar volgens de instructies van de Solis.
Now
for the second tutorial, the blind seam in jersey. In the last few
weeks this has become my favorite jersey hemming method. I use it for
all kind of hems, but the method is especially great for curves which
are usually hard in Jersey.
Dan nu de tweede tutorial van
vandaag, een blindzoom in tricot. Deze steek is de afgelopen weken mijn
favoriete afwerkingsmethode geworden. Het werkt voor alle tricot zomen,
en vooral voor die lastige cirkel rokken zoals bij de Solis is het een
uitkomst! Zij was mijn proefkonijn en op basis van mijn foto's en uitleg
lukte het, ik hoop dat dat betekent dat jullie het ook gaan begrijpen.
Step
1: Folding the fabric. Follow the steps in the pictures, I have no
better way to explain this. She succeeded with them, so I hope this
means that they clearly show the folding method. I fold such that the
end is just 1 cm wide. You could choose to give yourself some more work
space and cut off close to stitches in the end. I take a width of the
double layer of about 1.5 to 2 cm. This means that in the end my entire
seam will be about 2.5 to 3 cm high. I advice to practice and you will
quickly see how much working space you need/like.
Stap 1: Het
vouwen van de stof. Ik zou hier heel veel woorden aan vuil kunnen maken,
maar het volgen van de plaatjes lijkt me het beste. Goed kijken en
volgen dus. Bij mij is die enkele laag aan de buitenkant ongeveer een
centimeter breed. Mocht je jezelf wat meer ruimte willen geven is het
ook een optie om aan het einde een reepje van de stof af te knippen. Ik
ben echter lui, en met dicht bij de zijkant naaien ben je direct klaar.
De dubbele laag is bij mij 1.5 tot 2 centimeter. De gehele zoom wordt
dan 2.5 tot 3 cm hoog. Dit is echt iets dat je een keer moet oefenen,
dan kan je mooi bepalen welke verhoudingen bij jou het beste werken.
Step
2: Sewing. Find the stretch blind seam stitch on your machine. The idea
behind it is a small zigzag combined with a big zigzag. Your machine
will do a few small zigzag stitches on the narrow single layer and one
big zigzag that catches the double layer, then it goes back to small
zigzag stitches again. the easiest way to understand it is looking at
this picture of the finished stitches.
For this tutorial I used
the default setting of my Pfaff 3.0 which resulted in a relatively big
visible stitch. For the mash up dress I changed the settings such that
the difference between the big and small zigzag was less. The stitches
are much more hidden this way. I advice you to play around a bit. My
Pfaff makes a small extra stitch just before the big zigzag comes, which
is great for preparing for the big stitch.
Stap 2. Een blindzoom
steek voor tricot is een combinatie van een grote en kleine zigzag
steek. De kleine zigzag steekjes komen op die enkele laag en de grote
zigzag pakt net de vouw mee. De makkelijkste manier om te begrijpen wat
het is, is om deze foto te bekijken van het stiksel.
Voor deze
tutorial fotos gebruikte ik de standaard instelling van mijn Pfaff 3.0
wat er voor zorgde dat de steken relatief groot uitvielen. Voor de mash
up jurk paste ik de steken verhouding iets aan. Ik maakte de grote steek
wat minder hoog en op de detail foto zie je dat de steken daar bijna
niet zichtbaar zijn. Je zal dus ook misschien een beetje moeten spelen
met de instellingen. Mijn Pfaff maakt een klein extra steekje net
voordat hij uitspringt naar de grote zigzag, heel fijn voor de
voorbereiding op de grote steek.
Step 3: Turning the
fabric. You really have to push out your stitches a bit, or else the
result will look weird. A good steaming always helps. Please let me
know if you get lost somewhere.
Stap 3: Klap nu de zoom naar
buiten, hierbij zal je het stiksel een beetje moeten rekken. Een goede
stoombeurt doet altijd wonderen.
Okay now for the give away!
On the picture you can see all the sponsors of the tour and you can fill
in the rafflecopter to win both patterns and fabric (you can scroll
through all the gifts by pressing the dots at the top of the
rafflecopter. In the Sofilantjes Sew and Show Facebook group there are
even more options to win patterns and fabric, check out the scavenger
hunt instructions there. My own give away from last week is still active
for two days, so you might also want to try your luck for two meter of
jersey fabric. Like I said at the beginning of the post you can use the
coupon code "CELEBRATE" in the Sofilantjes' web shop* to get 25% off at
checkout during the blog tour.
Nu is het dan eindelijk tijd voor
de give away. Hieronder zie je alle sponsors samen, er is heel veel stof
en patronen te winnen. Als je op de bolletjes in de Rafflecopter drukt
kan je alles zien wat er te winnen valt. In de Sofilantjes Sew and Show
Facebook group zijn nog andere leuke wedstrijden, zo is er een digitale
speurtocht door de blogs. De give away van mijn vorige post loopt ook
nog twee dagen, daar kan je twee meter stof winnnen. Ten slotte is er
dus, zoals ik aan het begin al zei de code "CELEBRATE" om 25% korting te krijgen in
de Sofilantjes webshop* (met uitsluitsel van de bundels). Mocht er dus nog iets in je collectie ontbreken
is dit je kans.
Feel free to leave a comment in the language you prefer
(although Google translate might have to assist me if you choose
something different than English, German, Dutch or Hungarian). If you
buy anything through my affiliate links (*), I get a small commission
(the price stays the same for you), I am very grateful for everything
that feeds my fabric addiction.
Ik vind
het altijd leuk om reacties te lezen. In deze post zitten enkele
affiliate linken, aangeven met een *. Mocht je het patroon aankopen
doordat je in de shop kwam via een link van mij, dan krijg ik een kleine
commissie. Het patroon wordt niet duurder voor jou, maar mijn
stoffenkast is er wel heel blij mee.
The title speaks for itself right? Last week, I realized that I was
almost at 200 posts the 200th Bloglovin follower was coming close. I
have a few projects photographed and ready to be blogged, but for such a
special occasion I wanted something a bit more special. In my earlier
two happy occasions here and here I made a Bruearam* dress from
Sofilantjes* (who has her own big celebration at the moment use code CELEBRATE for 25% off your cart excluding bundles). Let's make that a tradition for all my future celebrations,
I just love that pattern!
De titel spreekt boekdelen lijkt
me. Vorige week zag ik dat ik aan 199 berichten zat en ook de Bloglovin
teller stond bijna op 200. Tijd voor een klein feestje leek me. Ik heb
nog enkele projecten klaar staan, de foto's zijn al gemaakt, maar voor
deze post wilde ik iets extra's. Voor mijn vorige twee blogfeestjes,
hier en hier maakte ik beide een Bruearam* van Sofilantjes* (die week trouwens haar eigen feestje heeft met veel leuks, gebruikt de code CELEBRATE voor 25% korting op je bestelling, de code geldt niet voor bundels). Ik hou van dat patroon, mooie
traditie voor al mijn toekomstige blogfeestjes lijkt me.
So,
today's Bueram is a hacked version (as could have been expected). I
could have stopped at one hack, leaving the rest of my current ideas for
future celebrations, but well, that is not like me. So, I repositioned
the straps, added a flutter and made a circle skirt. The strap
replacement is suboptimal, the idea is nice, but the position is not
ideal. Guessing the right position on a shirred back is hard. This
explains why designers usually sew up several pre- pre- versions before
the pattern goes into testing. My daughter loves the dress and the
shirring keeps the dress in place anyway, so I will not loose sleep over
the wide straps, I just have to try again.
Natuurlijk paste ik
enkele dingen aan. Ik had het bij één aanpassing kunnen houden en wat
ideeën sparen voor mijn blogverjaardag in september, maar dat past niet
bij mij. Ik paste dus en de plaatsing van de bandjes aan, en ik voegde
een schouder froezel toe en tekende een cirkel rok. De plaatsing van die
schouderbandjes is een leuk idee, maar de uitvoering laat wat te wensen
over. Van te voren bepalen waar die bandjes precies gaan komen met zo'n
gerimpelde rug is niet zo heel makkelijk. Dit laat ook maar eens zien
waar patroon designers vaak vele pre pre versies van een jurk maken
voordat een patroon aan een echte test toe is. Mijn dochter is echter
super blij met de jurk en het smokwerk houd de jurk super goed omhoog,
dus de bandjes toren me niet echt. Volgende keer beter lijkt me.
The
flutter sleeves totally fit the flutter trend that is going around. She
and she, are regularly treating us on them and the seems to be
addictive. The shape of this flutter is based on the flutter sleeve in
the Zoo collection. I still have a very full post to write about my
Flossstyle sews, but I did not get to it since February! Maybe next week.
Froezels zijn een trend in blog wereld. Zij en zij alleen al
trakteren ons regelmatig op froezel moois. Blijkbaar is het
aanstekelijk, want hoewel ik niet zo van de froezels ben, liet ik me er
ook toe verleiden. Ik tekende de froezel op basis van de froezel uit het
zoo patroon. Ik heb nog een zeer volle blogpost over de Flosstyle
kleren die ik al naaide, maar er komt elke keer iets anders tussen.
Misschien volgende week.
That circle skirt is the thing that
fills me with pride. I actually had to use several math skills to figure
out the shape. The problem is the shirred back. The back piece is much
wider unshirred than the front, so the top of the skirt part had to be
wider than the front skirt part, but I wanted the bottom of the piece to
be just as wide as the front skirt. The sides of course also had to
have the same length. It doesn't matter if you totally lost me, just
believe me that it took me time to figure out that I had to take 1/19
piece of a circle with a diameter of 2.30 meter!
Die cirkel rok
is dus het parade paardje van deze jurk. Het lijkt super simpel, een
cirkelrok aan een jurk tekenen. Die gesmokte rug maakt het echter toch
wel uitdagend. Ongesmokt is dat patroondeel namelijk langer dan de
voorkant en ik wilde de onderkant van de rok aan de achterkant even
breed hebben als de rok aan de voorkant (zodat het echt een cirkel zou
zijn). Natuurlijk moesten de zijkanten ook even lang zijn. Mocht je het
spoor bijster zijn, geen probleem, geloof mij maar dat het lastig was.
Ik gebruikte dus behoorlijk wat wiskunde voor ik kon berekenen dat ik
1/19 van een cirkel met een diameter van 2.30 meter nodig had!
The
bodice fabric is from Soft Cactus and the flowers have been in my stash
from the beginning (of my sewing) time. I still have enough fabric to
sew with for the coming two years (especially if I take into account my
upycle piles), even if I would not buy anything, but I am nicely
tackling the ones that have been there the longest. Did you that perfect
shirring top line. I used the same trick, as here. I learned it from
the Dear Prudence pattern from Sewpony. After shirring, you take a
narrow piece of elastic and thread it trough the top casting you
created. Just pull the elastic such that the top is nice and tight as
the rest of your shirring.
Het lijfje is uit Soft Cactus stof en
de rok uit een stof die ik al een paar jaar had liggen. Ik heb nog
steeds genoeg stof liggen om twee jaar niks te hoeven kopen, en toch
gewoon door te kunnen naaien. Zeker als ik ook mijn recykleer stapel
meepak, Toch gaat het aanpakken van mijn voorraad heel goed. Vooral de
stoffen voorraad die al erg lang ligt begint goed te slinken. Zag je
trouwens die super mooie bovenste smok rij? Ik paste weer de truck van Sewpony toe. In haar Dear Prudence patroon legt ze uit dat als je na het
smokken een elastiek door de bovenste rij rijgt, je een super strak
resultaat krijgt.
Okay, now, that give away that you have been
waiting for. I love to get fabric, especially if I am on a self imposed
buying ban, so let's give away some fabric. The last three months you
have read a few times about Droomstoffen, a Dutch fabric store with a
web shop full with goodies. She was open to sponsor this give away, and
after scrolling trough all her fabric, a few times (it is like an candy
store, and you should not choose to quickly), I chose to give away one
meter of both these fabrics. If you want to get a change of winning
these beauties, fill in the rafflecopter and make sure you are around
when I announce the winner. If you have problems with filling in the
rafflecopter, or do not understand how it works, just leave a comment to
this post. I would love to know if there are people not participating
because of those issues. The give away is open internationally, but if
you live outside of Western Europe, you will be asked to pay postage.
Okay,
nu waar vele al op wachten, de give away. Droomstoffen, een
Nederlandse stoffenzaak met webshop, is hier de laatste tijd vaak
voorbij gekomen. Ik mocht in haar heerlijk voorraad snuffelen naar wat
ik jullie wilde geven. Ik koos (na lang beraad) voor een meter van deze
twee stoffen (gratis thuisbezorgd). Mocht je die willen winnen, vul dan
de rafflecopter in. Als je niet weet hoe het werkt, laat dan even een
gewoon berichtje achter. Ik zou graag willen weten of dat een rede is
voor mensen om niet deel te nemen.
In case you have a different
taste, or simply like to choose your own fabrics, you can instead choose
a 25 euro discount on your order. I love to hear what you think of my
creations. Feel free to leave a comment in the language you prefer
(although Google translate might have to assist me if you choose
something different than English, German, Dutch or Hungarian). If you
buy anything through my affiliate links (*), I get a small commission
(the price stays the same for you), I am very grateful for everything
that feeds my fabric addiction.
Mocht het nou het geval zijn dat
jij wint, maar dat je hele andere stoffen zou hebben uitgekozen, dan mag
je ook kiezen voor een tegoedbon van 25 euro op je bestelling. Ik vind
het altijd leuk om reacties te lezen. In deze post zitten enkele
affiliate linken, aangeven met een *. Mocht je het patroon aankopen
doordat je in de shop kwam via een link van mij, dan krijg ik een kleine
commissie. Het patroon wordt niet duurder voor jou, maar mijn
stoffenkast is er wel heel blij mee.
You know I love animal inspired clothing, so I was over the moon when I
heard that Big Little is releasing two Wild Things foot wear patterns.
One of them, the baby shoe version is part of the new One Thimble magazine*. One Thimble is a digital sewing magazine which contains twelve
patterns and 26 articles/tutorials. Besides the Wild Things Baby shoes*, I also tested the Poly Roly Critters* by Swoonson Says for
this One Thimble issue.The other Wild Things foot wear pattern I am
showing you today, is the Wild Things Boot in kid's and youth's sizes.
Diegene
die mijn blog volgen weten het wel, ik naai graag zaken met dieren
erop. Toen ik hoorde dat Big Little met twee dierenschoeisel zou komen,
was ik er dan ook als de kippen bij om te testen. Het eerste schoeisel
wat vandaag uitkomt is de Wild Things Baby Shoe*. Dit patroon is deel van
One Thimble 11. One Thimble is een digitaal naaimagazine dat vier keer per
jaar verschijnt. Voor het nieuwste nummer testte ik ook de Poly Roly Critters* van Swoonson Says. Het andere schoeisel dat vandaag uitkomt van
Big Little is de Wild Things Boot, in kindermaten.
Let's start
of with those cute shoes. I was part of the design testing group (fit
and sizing were already thoroughly tested. None of my kids have baby
feet, so no modelled version shoot. These little pairs will all get
gifted to new borns, arn't they great gifts? There are seven different
animals and they are all crazy cute. Check out the pattern* to see all
the different animals. I sewed all these shoes from scrap fabrics. There
were scraps from this coat, this coat and pieces of upcycled trousers.
Laten
we beginnen met die super schattig schoenen. Ik was deel van het design
test team (de maten en fit waren al uitvoerig getest). Mijn kids passen
geen van allen nog in een baby maatje, dus helaas heb ik geen foto's op
model. Alle drie zullen ze fungeren als kraamcadeau, daarvoor vind ik
ze echt ideaal. Er zijn zeven verschillende dieren en allemaal even
schattig. Het beste kijk je even naar het patroon*, dan krijg je het
beste beeld. Ik naaide alle drie de paren met stof dat ik uit mijn
restjes bak viste. Je hebt echt maar super kleine stukjes nodig. Dit
zijn dus restjes van deze jas, deze jas en een oude broek van mijn man
die al eens een tas werd (maar ongeblogt bleef).
The Poly Roly Critters ball* from Swoonson Says has four different versions, panda, fox, raccoon and
sloth. I decided to go for the raccoon. I thought the raccoon shoes and
ball combined would make an even better baby gift, but my middle
daughter did not agree. Even before the ball was finished she
confiscated it. She was treating it like a true Wilson from the movie
Cast away. The ball actually slept next to her for a few days. I made
the ball from upcycled denim (old trousers), so the fabric is indeed
very soft. I filled the ball with small fabric scraps, so the ball is
relatively heavy. Also a great scrap buster this ball!
De Poly Roly Critters* van Swoonson Says heeft vier versies, panda, vos, wasbeer en luiaard. I ging
voor de wasbeer en was van plan om er, in combinatie met die wasbeer
schoenen een geweldig kraam cadeau van te maken. Mijn middelste dochter
was het daar echter helemaal niet mee eens. Voordat de bal klaar was
eigende ze hem al toe. Ze behandelde hem als Wilson, die bal uit de film
Cast away. Hij ging mee naar bed en ze vertelde iedereen dat hij zo
zacht is. Ik maakte heb van oude gedragen spijkerbroeken, dus ik geloof
wel dat hij lekker zacht is. Ik vulde hem met kleine restjes stof, de
bal is daardoor ook lekker zwaar. Een dubbel effectief rest verwerk
project dus.
I adjusted the ear construction slightly. The
instructions call for a two layered felt ear. I wanted to use denim, but
denim frays. So, to solve the problem I used a blanket stitch in white
thread. This way the ear has two colors and it does not fray. For the
shoe ears I had used Fray check, to avoid fraying. I did not have a
official safety nose, so I just embroidered one. Coincidentally I did
have eyes, I think it would have been cute with embroidered eyes as well
though.
Ik paste de oor constructie een beetje aan. Eigenlijk
moest ik twee stukken gekleurd vilt gebruiken, ik wilde echter een
spijkerstof oor. Spijkerstof rafelt echter erg. Ik gebruikte daarom een
borduursteek om het oor van een wit randje te voorzien. Twee vliegen in 1
klap, wit randje en hij rafelt niet. Bij het schoenen patroon deed ik
een druppeltje, fray-check op de oren op rafelen te voorkomen. I had geen
veiligheidsneus, dus die borduurde ik er gewoon op. Veiligheidsogen had
ik toevallig wel, maar ik denk dat het ook super schattig zou zijn met
geborduurde ogen.
The first two projects were not made with my
kids in mind, the third definitely was. My kids had been drooling over
the baby shoes, and really wanted their own Wild Things feet. I made
this cute tiger pair for my eldest daughter. I upcycled a fleece baby
blanket and used some grey denim for the sole. This time I embroidered
the face by hand, for the shoes I did it all with my sewing machine. I
am very satisfied with my handy work, great thing to do outside on a
summer evening.
De eerste twee projecten waren dus niet voor mijn
kids bedoeld. Het derde duidelijk wel. Alle vier waren ze weg van die
baby schoentjes, dus ik wist dat het laars patroon in hun maat zeker in
de smaak zou vallen. Ik naaide deze tijgers voor mijn oudste. Ik
gebruikte een fleece dekentje voor de bovenkant en een restje grijze
denim voor de onderkant. Bij deze tijgers borduurde ik het kopje met de
hand, de schoenen deed ik volledig met de naaimachine. Ik ben super blij
met het resultaat, heerlijk project voor warme zomeravonden buiten.
The
boot pattern has (mostly) different animals than the shoes, and there
are some very cool ones. There is a snail, ladybug, frog, dino, dragon,
deer, bat, shark, lion, tiger, cat, fox and giraffe. Again, you just
have to check out the link to get an overview. The drawings are already
so pretty. The rest of my kids were understandably jealous and they
already ordered a ladybug and dragon. I have seen kids walking outside
on leather soles, does anyone have experience with that, I know my kids
would love to take them for a walk.
De dierenset is voor de laars
is heel anders dan die voor de schoen. De laars heeft bijzonder coole
dieren zoals, vleermuis, draak, haai, dino en ook slak, kikker, giraffe,
leeuw, vos en lieveheersbeestje. Ik zou weer even het patroon bekijken,
de plaatjes alleen al zijn zo super mooi. Natuurlijk was de rest van
het huishouden super jaloers op de laarzen, dus ik kreeg meteen een
lieveheersbeestje en draak bestelling. Ik zag al kinderen buiten lopen
op leren zolen, heeft iemand daar ervaring mee? Mijn kids zouden ze
super graag mee nemen naar buiten.
You can buy the entire One Thimble magazine* here for about 18 US dollar (site prices are in
Australian dollars), and you can buy the individual patterns here*. The boots are available on the Big Little site, they are discounted over the
weekend and available for just 8.40 US dollars.
Je kan het One Thimble magazine* hier kopen voor ongeveer 16 euro (voor belasting).
Daarvoor krijg je dus 12 patronen en 26 artikellen/tutorials, de bedragen op de
site zijn in Australishe dollars. Je kan de patronen ook los kopen, dan
kan je ze hier* vinden. Het laars patroon is hier, op de site van Big
Little te vinden. De laars is dit weekend met 30% korting voor ongeveer 8
euro (voor belasting).
I love to hear what you think of my creations. Feel free
to leave a comment in the language you prefer (although Google
translate might have to assist me if you choose something different than
English, German, Dutch or Hungarian). If you buy anything through my
affiliate links (*), I get a small commission (the price stays the same for
you), I am very grateful for everything that feeds my fabric addiction.
Leuk dat je er was, wat vond je van mijn creatie? Ik vind het altijd
leuk om reacties te lezen. In deze post zitten enkele affiliate linken,
aangeven met een *. Mocht je het patrron aankopen doordat je in de shop
kwam via een link van mij, dan krijg ik een kleine commissie. Het
patroon wordt niet duurder voor jou, maar mijn stoffenkast is er wel
heel blij mee.