


Griet frequently hacks patterns, she regularly comes up with a new take on her existing patterns (she wrote two inspiring sewing books), and as you might now, I also like a good hack. So, I asked permission to adjust this pattern while testing. I opted for a fuller skirt and switched the closing buttons to the front. My little one loves to dress herself, so I assumed she would love to practice with buttons.


I used a Michael Miller fabric that I bought at Modes4u. It was one of the first designer fabrics that I bought and I didn't realize the black leaves line would actually be on the fabric (I did notice them, but naively assumed that it was some sort of watermark. The fabric was on sale and very inexpensive and just put it with my other fabrics in the cart. When it arrived I just put the fabric in my stash, because I couldn't imagine a garment with the border graphic on it.

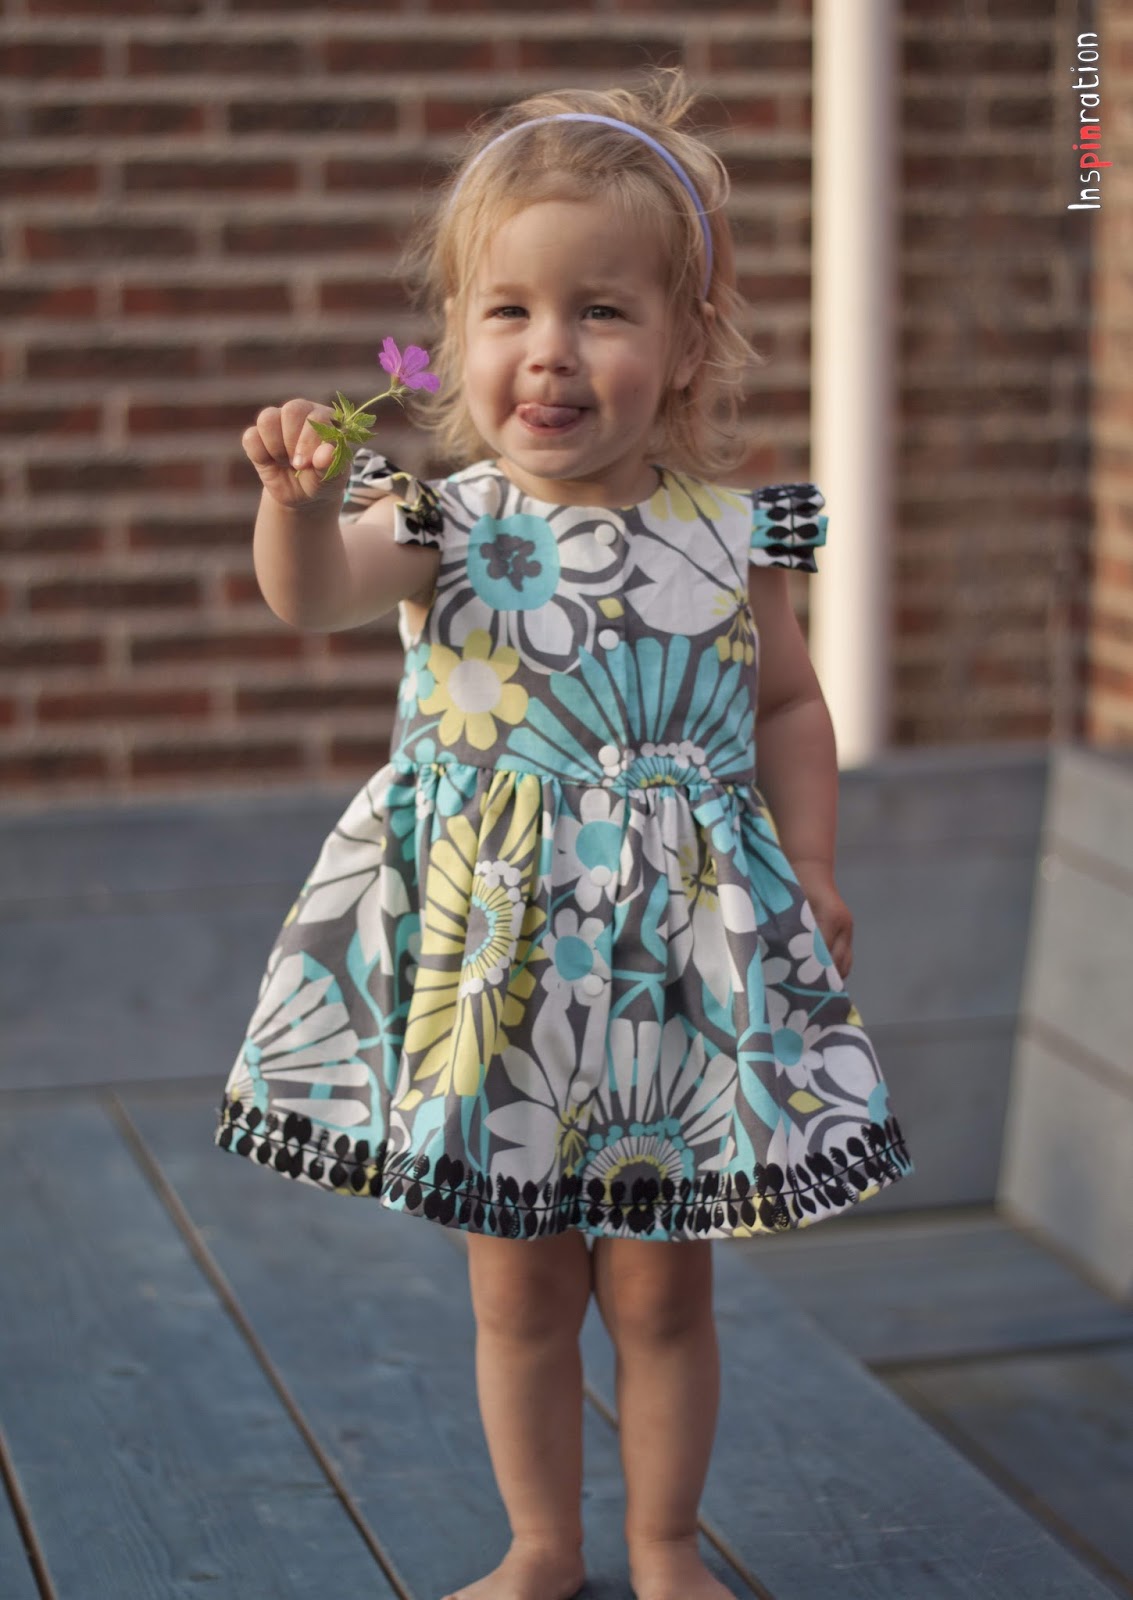
I am very much trying to decrease my stash fabric and looked through it thoroughly when I started this dress. My eye fell on the strange border fabric and I immediately saw a dress emerge before my eyes. I would use the border as the bottom of the dress and for the sleeves. I am very satisfied with how it turned out!


I was very determined this time to use true buttons and button holes (I finally got enough confidence from sewing my Domi's). But when I actually had to start my holes I realized that my youngest is used the snaps and will probably tears real buttons from the dress in her enthusiasm. Therefore, I again used snaps, the smaller T3 snaps this time. These open easier, so they lower the likelihood of tearing the fabric. This particular snaps have a small flower engraved on them.

After sewing my first blind seam on my Nina skirt, I haven't looked back and have only sewed blind seams since. I just love the look. I used black thread for this one and stitched in the leaves. The seam is totally blind this way. Speaking about neat finishing quality, did you see the continuous print on the bodice (I forgot to do the same for the skirt).

I added side seam pockets (not part of the pattern), but I forgot to show them to her before I showed the buttons. She loved the buttons and immediately undressed (this will happen often in the beginning, but I think she will keep the dress on after a few times). I didn't have much time for the shoot, because the sun was already coming over our garden fence, so I do not have any pictures of her with her hands in her pockets. I am sure she will love them to, but now she was over the moon with the buttons.


I love to hear what you think of my creations. Feel free to leave a comment in the language you prefer (although Google translate might have to assist me if you choose something different than English, German, Dutch or Hungarian).
O, wat schattig!! Bijzondere stof ook.
ReplyDeleteInderdaad, eerst kon ik er niks mee, maar soms vindt het idee je dan toch ;)
DeleteWat een leuk jurkje! Dat wordt inderdaad een perfect patroon voor kraamkadootjes als het uitkomt!
ReplyDeleteInderdaad en voor de eerste verjaardag kan hij gewoon weer!
DeleteHeel schattig!
ReplyDeleteDank je!
DeleteHandig de knopen vooraan! Tot ze m uittrekt in een winkel en dan had je ze misschien toch liever achter ;-) Leuke stof!
ReplyDeleteAch, als ze besluit zich uit te kleden dan krijgt ze knopen op haar rug ook open, zo vasthoudend is ze wel.
DeleteIk vind het stofje super met die zwarte blaadjes!
ReplyDeleteNu de jurk klaar is snap ik ook niet waarom die stof zo lang in de kaar moest liggen!
DeleteShe is adorable! I love how the dress turned out, you definitely found the perfect use for that fabric. Thank you so much for linking up at Free Pattern Friday. I'll have to add this dress to the list of free patterns to feature, because it's so cute!
ReplyDeleteIt isn't released yet, but I will let you know when it is!
Deleteleuk wat je met het patroon gedaan hebt!
ReplyDeleteDank je!
DeleteFantastisch jurkje! Welke maat heb je genomen? Ging tot 86, niet? Ik maak ondertussen een 104 voor mijn 2-jarige, dus dat zal niet meer lukken, zeker? ;)
ReplyDeleteIk maakte maatje 74 breedte en 80 qua lengte. Die van mij is super klein dus het ging prima. Maatje 104 maak je gewoon uit stof voor doe het zelvers :)
DeleteWat een goed idee, de knoopjes van voren!! Dat staat veel leuker. De andere versies zijn ook leuk maar die van jou is net iets meer casual. Schattiger voor een peutertje.
ReplyDeleteIk dacht erover om zwarte te nemen, als extra accent, maar ben blij met uiteindelijke keuze. Zo met knopen voor kan je er echt een extra accent aan geven.
DeleteSuper schattig jurkje.
ReplyDeleteEcht een klein engeltje zo!
DeleteHeel mooi! Goed idee, die kamsnaps vooraan. Mijn dochtertje vindt dat ze storen op haar rug als ze op een hardere stoel zit.
ReplyDeleteGoed om te horen, kan ik me voorstellen inderdaad, extra blij dat ze bij mij vooraan zitten dan.
DeleteWhat acute dress! Great job on the fabric its a perfect choice!
ReplyDeleteThank you!
DeleteZo schattig !
ReplyDeleteom op te eten ;)
Deletetop patroontje toch eh!
ReplyDeleteInderdaad en jij kreeg hem zelfs in tweevoud in jurk vorm las ik, boffert!
DeleteCute dress! I love how the border print works on this one!
ReplyDeleteThanks!
DeleteNu al spijt dat Tess hier te groot voor geworden is! Zo leuk!!
ReplyDeleteJe kan hetzelfde maken met het boek Stof voor Doe het zelvers, dit patroon is een soort voorloper van het boek. Ik had dus nog niet het officiele mouwpatroon, maar door de bovenkant van de mouwboog te meten en die drie maal te doen kwam ik tot bijna hetzelfde als wat later het echte patroon werd. Ik had 32 centimeter en het is 28. Ik denk als je 36 centimeter neemt voor maat 104 krijg je ook een erg leuke jurk.
Delete