Thursday, July 11, 2013

Crochet flower bouquet

When I started crocheting, I started out with a plant. The good thing about crocheted plants it that they do not need any water (although it is not a tragedy either if your 2 year old decides they do) and do not mind the lack of sun light in our livingroom. I very much like plants and flowers, but I like them outside. I somehow do not seem to be able to give plants what they need when they are not safely with their roots in the dirt. I do not like plants dying in my livingroom which also applies to flower bouquets. A flower bouquet is kind a already dead when they enter your house so I never buy (or ask/get them), I know I am strange in that.

Crocheted flower bouquets however resemble their crochet plants very much when it comes to their need of water and ability to not die. The project in the picture is actually a suggestion from my husband. He was searching for a present to a wedding and asked me if I could make a crochet flower bouquet. I thought it was a great idea and created the white bouquet. Most of the patterns I used are from the book: 100 flowers to crochet and knit. The yellow ones already flower for more than a year on our dining table, those are made using a pattern from Planet June.

Saturday, June 29, 2013

Arne and Carlos dolls

Last year I refound my knitting passion when I spotted the book: Christmas ornament knitting from Arna and Carlos. A few years earlier I took up knitting simply because I wanted to master it. My mother taught me when I was small but it never really got the hang of it. So a few years ago I knitted a few sweaters. Knitting a sweater is really a big commitment for me because it takes a lot of time! Especially because I never was really interested in my own knitted sweaters so they just remained in the closet. The Christmas ornaments seemed a perfect project to get back into the knitting game. Finishing one never took more than three evenings (my way of counting creative time) and they looked great. So Arne and Carlos's new book, knitting dolls looked like another very promising new project especially because my eldest is really in the doll playing phase. Over Easter Arne and Carlos had a nice book containing a bunny.
At that moment I was totally into crocheting and I made adjusted the pattern somewhat to make a crochet version . When I got the doll book I got the same giddy feeling as when I got the Christmas ornament book. It is just so nice to look at all the pictures. flipping through the pages was like flipping through an illustrated cookbook. You simply want to try them all immediately. Not only the dolls look amazing they come with a bunch of clothes!


Knitting a doll took me around 6 evenings and I enjoyed it a lot. If you are considering to start up knitting (again) but are wondering what to make, this is very recommendable!

Thursday, June 20, 2013

Gum drops fail

The first time I saw a "nailed it" post on Pinterest I laughed my ass of. It was the reason to start a humour board. It picture in question contained a muffin that I was actually planning to make!
I can totally get why people post their fails because, well sometimes you just need to be able to laugh about your frustration or else you will cry. I had such an experience when making gum drops!
Look at that picture how jummie do they ought to look. Imagine making them with fresh fruits juices (that is what I imagined) not containing the E numbers from the store. I even thought that it would be a great project to do with the kids. Making your own sweets how fun would that be...These are mine:

I even tried it three times (I really wanted them to work) with different recipes and procedures, but the gelatin always melted when combined with the sugar. If anyone could tell me what I did wrong it would be very happy. I simply assumed that dutch gelatin works differently than the US kin

Monday, June 3, 2013

Wrapping up pregnancy/ crochet project

When you mention crocheting many people think of granny squares. Colorful yarn blankets using up left over yarn. I also had seen some granny square projects and wanted to try it. The fun thing about grannys quares is that you whip one of them up relatively quickly. You can use them as a coaster, sew a few together as a scarf or bag. The possibilities are endless but somehow after making a few squares the endless list of possibilities could not motivate me as much.

When my due date became closer I felt the urge to create something for our new family member.
I considered knitting some clothes but decided against it. I had knitted a sweater for my son, but he never really wore it. Our babies double as lamas and drool/spit/vomit all over their clothes all the time. The drooling/spitting/vomiting behavior stopped me from putting on the sweater that took me hours to make.


Enter my unfinished granny squares. Within one and a half week I created enough squares to make up a nice baby blanket. The spitting/drooling/vomiting is usually done on the sheets under the head and not on the blankets. Now I have the perfect thing to cover my new born with love :).

And "yes" if you might be wondering if that gray blob in the right is belly. Usually when making pictures with my phone of projects on the floor or table my feet appear in the picture. I did not notice immediately but when I did I thought is was extra funny and kept it like this.

Thursday, February 7, 2013

Kids art T-shirt

I assume that most of you have experienced the addictive effect of Pinterest.

After you pin something Pinterest kindly offers you a glimpses in the boards of others that also pinned that and before you know it you are lost for hours :) During one of those digital scavenger hunts I came across embroidery. Embroidery I remembered to involve a lot of counting little X's.

It appeared I was misinformed, embroidery could be anything! After I saw some crazy quilt examples I fell crazy in love with embroidery. I really wanted to try it, but what would I make.... The projects I liked the most involved a lot of playful lines and designs and my inspiration was lacking. Fortunately Pinterest as always came to the rescue. I also stumbled upon some kids art projects and combining the two has lead to this.
I took a store bought shirt and let my eldest draw on it with her usual washable markers. When she was finished I simply embroidered over her design and washed it. It was super fun for both of us. I now fully understand why Picasso is considered to be such an artist because he could still draw as a child. Children really do have a great imagination and simply draw freely. I might not have that type of drawing imaginationanymore  but fortunately I have four kids who can help me with that ;)

Friday, December 7, 2012

Secret Santa gift

In the Netherlands we have a Dutch tradition that very much resembles Secret Santa. This year I ought to buy one of my friends, who likes bags, a gift. The budget for our Secret Santa is limited, it is the thought that counts. In the previous few years I made a tradition for myself that the gift should contain something home made. This had started when another friend had requested a hat. I could not find a nice one within my price range and knitted one. The next year I gifted Christmas decoration and this year I made a bag. I had some red dot fabric lying around and an already repurposed brown jeans. I had seen some wonderful smocking on Pinterest and wanted to try it and considered the surface of the bag to be the ideal trial size (original project was also a bag so there might be some inception at work here as wel). I love how it turned out and I will be using this smocking again.

Sunday, November 4, 2012

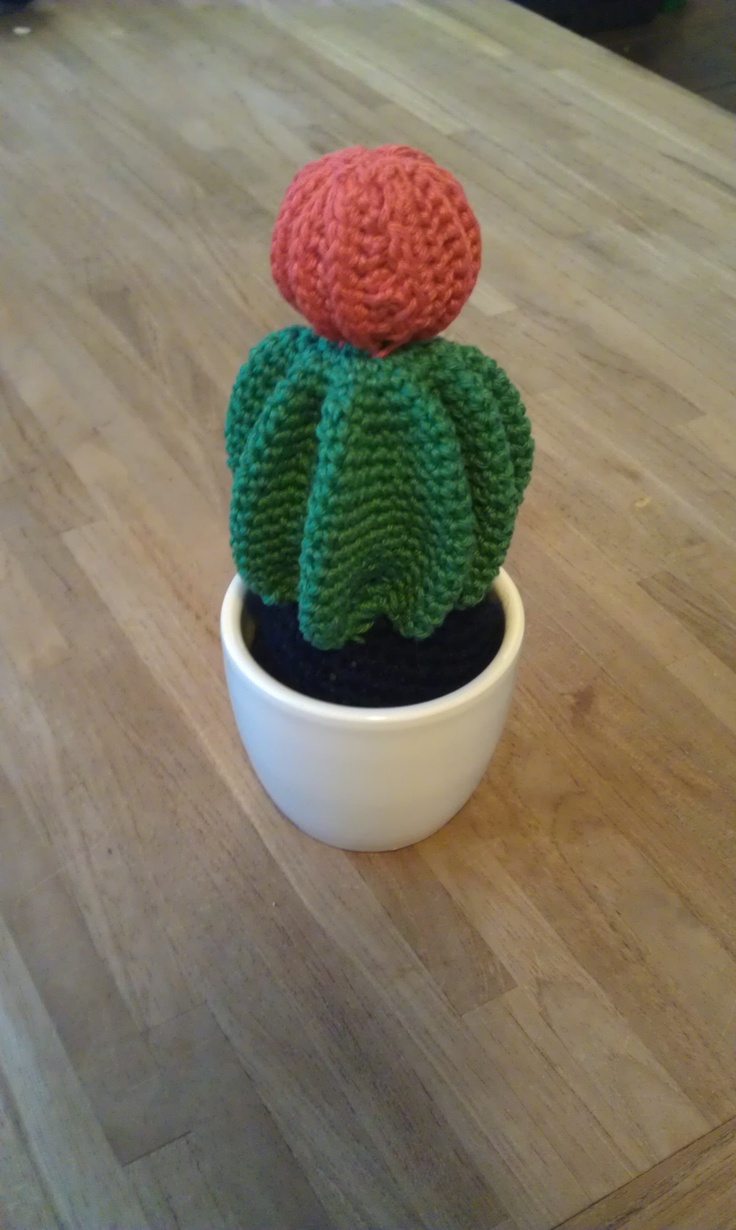
Crochet cactus tutorial (the one with the red ball on top)

 **updated May 3rd 2015 with some pictures to illustrate the tutorial**

As I mentioned earlier, I started my crocheting with a cactus garden. I correctly assumed that a cactus is a great beginners project. The shape of a cactus in real life is usually not very symmetrical and a cactus often shows all kinds of irregularities. Another good reason to crochet a cactus is that they require even less care than a real one and that you do not have to get some tweezers if one of your small children (or husband) decides to take a closer look. The cactuses have kind a stole my heart and I created several to brighten up the house and give as a gift.


Last week a friend came over and asked me for the pattern of one of the cactuses. I created the cactus in question (the one with the red ball on top) from a picture only and kind a cheated by sewing the whole thing together to keep its shape. Although the end result is much more important than the method (at least in crochet) I was not totally satisfied with this particular cactus because the whole thing gets kind a messed up if somebody touches it. I decided to create a real pattern that I would like to share with you as well.

I prefer crocheting in a spiral, not closing all the individual rounds. By crocheting in a spiral it is wise to mark the beginning of your ring with a piece of yarn or something else you have laying around. You can also simply adapt the pattern by closing every round.

round 1: make a magic loop, make 10 single crochet inside the ring and close the ring with a slip stitch.
round 2: Crochet two single crochets inside every stitch (you now have 20 stitches)
round 3: Crochet one single crochet in two stitches and two single crochets into the third stitch. Repeat this the whole round, making an extra stitch per three stitches which gives you 30 stitches at the end of the round.
You now should have a relatively flat circle (no problem if the shape is more like a bowl, this will solve itself in the end). In the next step you will create the bottom of the ribs of the cactus. After round 4 you will not make extra stitches and the 2D shape will become 3D.


Round 4: Make a chain of 4, single crochet into the second stitch from your needle. Move back to the circle by crocheting a single crochet into each of the other two stitches from your chain. Make a single stitch into the stitch next to the stitch were your made the chain in. You now have create a little "leg" which will become one rib when you make more rounds. If you want your cactus to have six ribs, you will make one leg every 30/6=5 stitches. The leg is two stitches wide which means that you now have to make 3 single crochet into the next three stitches and start your next leg.


round 5 until x Crochet a single crochet in every stitch. After a few round you can push the ribs out a bit in the bottom to really see your cactus develop. Keep on crocheting until your cactus reaches the height you prefer.


Round x: shape your cactus in such a way that you see the ribs clearly. In this round you will have to decrease 4 stitches per rib. Count 4 stitches before the most outside point of your first rib. Now 4 times a single crochet decrease ( best result by crocheting two stitches together and only stitching in de front loop).


Round x+1 now you will decrease three stitches per rib. Count three stitches before the top of the rib and make three times a single crochet decrease. The exact position of your decreases is not that important, just make sure it is distributed approximatly evenly.
Round x+2 decrease one stitch in every three stitches by making one single crochet and than crochet two together around the whole circle.
Round x+3 decrease half of the stitches by just crocheting two together over the whole circle. Cut the string and leave a relative long tail.
Use the tail and a stitching needle and sew the last stitches together to close the cactus. My cactus is not stuffed, if you prefer some stuffing do this at round x+1.

A red ball on top looks great and covers up any irregularities in your decrease. The ball on top is crocheted flat. For finishing simply close the side and weave the top and bottom together with a sewing needle. I prefer my "flower" to have vertical lines. This is created by stitching not through the top stitch but in one below. Do this backstitching on one side, the other side make normal single crochet stitches.

alternate textThe size of your earth depends on the size of your pot. Start by making a flat circle, which will be the top. Make your circle a bit smaller than the top of your pot. You make the circle by starting with for example 10 stitches in a magic ring. Increase to 20 the next round by stitching two in every stitch. The next stitch you leave 1 stitch between the increases. The next two stitches between every round etc. If the round has the size of the top of your pot stop increasing and make as much rounds as the height of the pot. The size of the earth is probably not exactly the size of your pot, but with stuffing you can correct this later. After reaching the right height start decreasing. Decrease the same way as you increased but in backward order. If in the last increase row you had 4 stitches between every increase you now start decreasing by leaving four stitches between your decreases and crochet the fifth and sixth together.