Already almost two years ago, wow where did the time go, I participated as a contestant on Project run and play. For years it had been a dream for me to participate. Even though I did not make it to the second round, participating in PR&P was a big win for me. I had wanted to participate in PR&P because from the moment that I discovered sewing blogs, PR&P made me want to hack and be extra creative. PR&P is still doing that for many beginning and experienced sewers and they want to strengthen their role by opening a pattern shop. Contestants that created a pattern based on their original PR&P look are now neatly collected there. To celebrate the new shop there is a blog tour to show off all the patterns.
Al bijna twee jaar geleden, wauw wat is die tijd voorbij gevlogen, nam ik deel als deelnemer aan Project run en play. Voor jaren waren het een droom om deel te nemen hoewel ik de tweede ronde al niet haalde, was het voorbij toch een enorme overwinning. Ik wilde deelnemen aan PR&P omdat vanaf het moment dat ik naaiblogs ontdekte, PR&P mij leerde om te durven hacken en extra creatief te zijn. PR&P heeft nog steeds die rol voor veel beginnende en ervaren naaisters en PR&P wil haar rol versterken door een patroonwinkel te openen. Deelnemers die een patroon hebben gemaakt op basis van hun oorspronkelijke PR&P-look, worden nu overzichtelijk verzameld op één plek. Om de nieuwe shop te vieren, is er een blogtour om alle patronen te laten zien.
I have the honor to show the dressage leggings by Jenuine Designs. Today's leggings are not the first dressage leggings that I sew up. I sewed them for our youngest and middle one before (the middle one's never made the blog, they were snatched up before I could make pictures). At that time I made only the plain option so for today I of course went for the color blocked as well and Iin the spirit of PR&P even squeezed out a small hack.
Ik heb de eer om de dressage leggings van Jenuine Designs te laten zien. De leggings van vandaag zijn niet de eerste l dressage leggings die ik naaide. Ik naaide ze al eerder voor onze jongste en middelste (die van middelste haalde de blog nooit, die werden gedragen voordat ik foto's kon maken). In die tijd maakte ik alleen de eenvoudige optie maar vandaag ging ik natuurlijk ook voor de color blocked versie en in het gedachtengoed van PR&P deed ik ook nog een hackje.
The dressage leggings have two options in rise type, making these leggings perfect both for diaper wearing and bigger kids. The diaper wearing period is way behind us, so we went with regular rise.The pattern comes in two more options, regular leggings and color blocked ones. The dressage leggings are a part of a line that is horse riding inspired and these leggings were created to mimic the effect op leggings that need other, more stronger material where is touches the horse to provide better saddle grip. For non-horse riders like us, it gives nice options to play with fabrics.
De dressage leggings heeft twee hoogte opties bij de heupen, waardoor deze leggings zowel goed zitten bij kinderen met en zonder luiers. De luiers liggen ver achter ons, dus maakte ik de reguliere versie. Het patroon komt daarnaast met nog twee opties, normale standaard leggings en color blocked. De dressage leggings maken deel uit van een lijn die geïnspireerd is op paardrijden. Bij paardrijkleding zijn de binnenkant van de broeken versterkt ivm beter grip op het zadel en slijtage. Voor ons als niet-paardrijders is het gewoon een leuke optie om met stoffen te spelen.
You could easily make a three way colored leggings, by giving the cut outs on both sides a different color. Our rainbow loving kids would have liked that as well, but I went a different way. In a small hack I only used the front color block and just kept the back as a whole. It is all about strategically placing both pattern pieces on each other when you cut. It really is not hard. I noticed before that our kids' leg with/waist ratio is non-standard. In our case that meant that going width height gave the leggings the best fit, instead of going with waist.
Je kan ook gemakkelijk een driekleurige legging maken door de uitsparingen aan beide zijden een andere kleur te geven. Onze regenboogliefhebbers zouden dat ook leuk gevonden hebben, maar ik deed aan een andere variatie. Ik deed een kleine hackje en gebruikte alleen de voorste color block en hield gewoon de achterkant als één geheel. Alles draait om het strategisch plaatsen van beide patroondelen op elkaar als je knipt/snijdt. Het was echt niet moeilijk. Ik merkte al eerder dat de been- / tailleverhouding van ons kinderen niet standaard is. Ik ging daarom voor maatbepaling op basis van lengte, die werkte in ons geval beter dan die van de taille.
To celebrate the shop opening there is a special discount this week on all “Separates", resulting in the pattern being 20% off, sales will ne rare, so make sure you use this opportunity! There also is a give away, filll in the raffle copter to get a chance of getting an awesome set of gifts. Giveaway ends August 1st. There will be 5 (random) winners for the following prizes:
Om de opening van de winkel te vieren is er elke weer een set van patronen met 20% korting. Deze week gaat het om de broeken en shirts, dus ook de Dressage Leggings is verkrijgbaar met korting. Vul de raffle copter in tot 1 augustus om kans te maken op een geweldige set cadeaus.
Four weeks ago, I participated in Project Run and Play, and I was out after the first
round. I work best under deadlines, so when I heard on Friday morning
that I did not have to deliver a look on Monday evening, I immediately
jumped on the next deadline. I of course had started my week two look,
but only the main piece was actually half way done. My not-yet-finished
dress, went on my to-do-pile and it would still have been there if Eleri
from The Project Sew and Tell Project would not have invited everyone that was a
contestant or sewed along to link up their PRP experience.
Vier
weken geleden deed ik mee met Project Run and Play en ik las er na de
eerste ronde meteen uit (meedoen is belangrijker dan winnen toch). Ik werk erg goed onder deadline, dus toen ik op
vrijdagochtend hoorde dat ik geen blogpost hoefde aan te leveren op
maandagavond, gingen andere deadline meteen voor. Ik was natuurlijk al
wel begonnen aan mijn outfit voor week twee, maar het hoofdstuk was voor
de helft klaar. De jurk verhuisde naar mijn to-do stapel en zou daar
nog steeds liggen als Eleri van The Project Sew and Tell Project niet voorgesteld
had om digitaal na te praten. Iedereen (deelnemers en sew along-ers) die
mee naaide dit seizoen nodigt ze uit om hun ervaringen te delen.
This
season, I actually only sewed along one and a half theme (shame on me,
my worse track record and that in the season that I was a contestant),
so there is not so much that I leaned this season, besides a
reconfirmation that I sew best under deadlines and that all of my
competitors rocked! They created amazing outfits, and are very nice people! As
an alternative to "things learned", I decided to just show you the dress that I had planned
for the "I am an autumn" look.
Dit seizoen naaide ik
maar ander half thema (slechtste score ooit, beschamend natuurlijk voor
het seizoen waar ik deelnemer was). Er is dus niet echt veel wat ik
leerde tijdens dit seizoen. Ik kreeg bevestigd dat ik erg goed werk
onder deadlines en ik kwam erachter dat mijn concurrentie stuk voor stuk
super getalenteerd en aardig zijn. Mijn invulling van de post is dus
anders geworden, ik maakte de jurk (iets anders dan gepland) af en
presenteer hem vandaag aan jullie.
A few weeks ago I already made the perfect dress for the theme of the second week. While gathering
new inspiration for week two I came across these two lovelypictures. I therefore drafted a dress
(based on the Litore*) inspired by fall leaves. The
main idea was that the dress is made from four leaves (in case you did
not recognize the idea). The dress would have been too indecent if I
only used the leave shapes, so I added dark brown triangles to create a
full handkerchief skirt. I then shirred the corners, which turned it
into a circle-like skirt. Due to its weight, this skirt twirls like
crazy.
Enkele weken geleden naaide ik an de perfecte jurk voor het thema van week twee (Ik ben een herfsttype). Tijdens mijn digitale zoektocht naar
nieuwe inspiratie kwam ik deze twee supermooie foto's tegen. Ik tekende daarom een door bladeren geïnspireerde
jurk (op basis van de Litore). Het idee is dat de jurk bestaat uit vier
bladeren (voor het geval je dat je het niet herkende). Als ik het bij de
bladeren gehouden had, dan was de jurk te bloot geweest, dus voegde ik
bruine driehoeken toe om een volledige "zakdoek rok" te vormen.
Vervolgens rimpelde ik de hoeken van Framilion waardoor het een soort
cirkel rok werd. Door het gewicht draait de rok echt geweldig goed.
My
dress likely is the most unconventional garment from all contestants. I am still trying to wrap my head around my own opinion of
the dress. My girl is fortunately totally in love with the dress, she
had to fit it a few times during construction (I do not make muslis...)
and she had been very sad I had not finished the dress. So even if Eleri
had not intervened I probably would have finished it eventually (but
not now). Originally, I had been planning a sleeveless dress, and I
would have made a jacket (and leggings), now I decided to just add
sleeves. The Aura* sleeves fitted perfectly.
Mijn jurk is waarschijnlijk het meest onconventionele stuk van week twee. Ik weet zelf eigenlijk
ook nog niet echt wat ik ervan vind. Mijn dochter vind hem gelukkig
geweldig. Ze moest hem een paar keer passen tijdens het naaien (ik maak
geen proefmodellen) en ze vond hem direct helemaal leuk. Ze was
verdrietig dat ik de jurk nog niet had afgemaakt, dus ook zonder Eleri
zou de jurk wel afgekomen zijn (ooit, zeker niet nu). Ik had
oorspronkelijk een mouwloze jurk in gedachten en om er een outfit van te
maken wilde ik hem combineren met een vestje etc. Nu, tijdens het
afmaken ging ik echter gewoon voor mouwen. De Aura* mouwen pasten er
precies in.
Originally, I had been planning an open leave vein structure on the back. I had cut a high and low V-neck, and the low
V would have been in the back. Seeing as my focus shifted from,
showing-off-my-skills, to just-finish-it, I decided to solve the
neckline differently (and much easier). I switched front and back and
used a double neck band.
Oorspronkelijk wilde ik een
soort open bladstructuur maken op de rug. Ik knipte daarom een diepe en
een minder diepe V hals. Nu is niet meer als doel had om te laten zien
wat ik allemaal in mijn mars heb, maar het uit de weg ruimen van deze
UFO, koos ik voor een andere afwerking. Ik maakte van de diepe V de
voorkant en voegde een dubbele halsboord toe. Mijn officiële outfit zou
dus een stuk complexer geweest zijn, maar toch ben ik heel blij dat hij
gewoon af is.
I would like to end this post by
again congratulating Jess with her victory. Her drive and planning gave
me nightmares (She was showing process pics on Instagram of all weeks
before I even started). What she created in these few weeks was really
amazing! I also want to thank her and and the other contestants for the
great time we had behind the scenes, I think you are all awesome and super talented!
The first week of Project Run and Play season 12 has arrived, and I am a contestant! Today, six bloggers are presenting you their take on Pokémon inspired clothing. We love Pokémon in our house. I played the
game when I was a teenager (almost in my twenties actually) and was
impressed with how fun and still accessible to small kids the game was. I
did not really watched the series, but I did have a poster with the
first 150 Pokémon in my room. Our kids do watch the show.
They had started just before the Pokémon Go app was launched and have
been binge watching ever since (they are only allowed to watch tv after 5 pm until dinner). I did not realize that they are still making the show. Officially there are over 900 episodes, but Netflix
only has the first and last seasons. The human team members of the
latest show where unknown to me until a few weeks ago, but I have grown
to love them (because I follow the show with one ear while cooking).
De
eerste week van Project run and Play, seizoen 12 is gestart en ik ben een participant! Vandaag
laten zes bloggers zien wat zij gemaakt hebben geïnspireerd door Pokémon. Bij ons thuis zijn we dol op Pokémon. Ik speelde het vroeger op
de Gameboy (niet zozeer als kind, eerder als jong volwassene). Ik was
erg onder de indruk hoe een spel zowel simpel, als intrigerend was.
Ikzelf keek niet echt naar de series, maar ik had wel een poster van de
eerste 150 Pokémon. Mijn kinderen kijken wel naar de serie. Ze waren toevallig net
begonnen toen de Pokémon Go app uit kwam. Ik had niet door dat de serie
nog steeds loopt, er zijn al meer dan 900 afleveringen gemaakt! Netflix
heeft echter alleen de eerste en laatste series. Ik kende alleen het
originele team, maar sinds een paar weken ken ik dus ook de nieuwe
karakters (want tijdens het koken luister ik met een half oor mee).
This
week's assignment was to make a Pokémon inspired outfit, so not just
copying the outfit as a costume. First, I wanted to make clothing
inspired by a Pokémon. For all our favorite Pokémon there was already
great inspiration available, so I went a different direction, and chose
one of the human characters. Serena is the first character ever to not
be shocked by Pikachu during their first meeting (totally got that one from Wikipedia),
she does not want to become a Pokémon Master and she drastically
changed her appearance during the series. The new look is really
awesome. It is both sweet and cool, and has many elements that fit my
middle daughter's style (she already has the messy hair style), Serena
therefore became the inspiration for my outfit.
Voor
deze week werden we dus uitgedaagd om een outfit te naaien die
geïnspireerd werd door Pokémon. Geen copy, zoals bij een kostuum, maar
door gebruik te maken van elementen. Eerst wilde ik iets maken op basis
van een Pokémon (zo'n diertje dus en niet een trainer). Ik zag echter
dat er al behoorlijk veel inspiratie beschikbaar was, dus koos ik een
andere weg en ging voor een van de mensen. Serena is het eerste karakter
in de serie die bij kennismaking met Pikachu geen elektrische shock
krijgt (las ik op Wikipedia), ook wil ze geen Pokémon Meester worden en
veranderde ze structureel haar hele look tijdens de serie. De nieuwe
look vind ik persoonlijk echter super leuk. Het is schattig en stoer
tegelijk, iets dat perfect past bij mijn middelste, de haarstijl heeft
ze sowieso al.
Let's start with the dress. The
pink dress Serena is wearing has a white collar (or I think it has, I
spend hours looking through pictures, but I could not really determine
how the white part looks like) and the dress is very revealing (which is
why she is wearing a black top underneath). Either the dress or the
collar seems to close with a blue ribbon. My inspired version is a pink
(with print) dress which has an asymmetrical white yoke. My daughter
isn't a collar kind of girl, so that is why the white got incorporated
in the dress itself. I wanted the dress to open on the front, such that
she can dress herself. I did not wanted visible buttons though, so I
went for a blind button placket. This way there is a separation in the
front, like with the original dress, but it is not revealing. I went for
a circle skirt, which is much longer than the original. Instead of a
blue ribbon, I went for a light blue button.
Laten we
beginnen met de jurk. Serena heeft een roze jurk met een witte kraag en
blauw lint. De jurk is volledig open aan de voorkant, het zwarte topje
dat ze eronder draagt is dus van alle kanten zichtbaar. Ik ging voor een
roze jurk met printje met een asymmetrisch rond wit detail. Mijn
dochter houd niet van kraagjes, dus daarom verwerkte ik het wit op deze
manier in de jurk. Ik wilde graag dat je jurk opent, zodat ze zichzelf
kan kleden, maar ik wilde geen zichtbare sluiting. Ik maakte daarom een
blind knopenpad, zo behield ik ook het gesplitste voorpand van het
origineel. Ik koos vervolgens voor een cirkel rok die een stuk langer
valt dan die uit de serie. Het blauwe lintje inspireerde me tot een
(licht) blauwe knoop.
Serena wears a halter cardigan which
only true function seems to be that it has pockets. I am curious if a
garment like this would work in real life. I went a different direction.
I kept the color, and the fact that it has a different length than the
dress, but I actually went shorter, instead of longer. To make the
bolero an actual practical garment, I went for long sleeves. There is no
way my daughter would wear a hat, so I went for hoodie. I
finished the bolero with black bias. I chose black due to the black
stripe on Serena's hat and the black top. The pockets where transferred
to the dress.
Serena draagt een halter vest waarvan de
functie voornamelijk de zakken lijken te zijn. Ik vraag me sterk af of
zo'n kledingstuk in het echt ook zo mooi zou blijven hangen. In mijn
versie behield ik de kleur en het feit dat de lengte anders is dan die
van de jurk. Ik ging echter voor een kort exemplaar, een bolero. Ook
voegde ik mouwen toe, want de herfst schijnt eraan te komen. Mijn
dochter zou ook nooit een hoedje dragen, dus voegde ik een kap toe aan
de bolero. Ik werkte de bolero af met zichtbare zwarte bias. De zwarte
streep op Serena's hoed en zwarte top zorgde voor mijn kleurkeuze. De
zakken verplaatste ik naar de jurk.
In the
series Serena wears over the knee socks, but with the fall coming, I
thought tights would be more practical. The last piece of the outfit is
therefore a pair of Wild and Free lounge pants, from Coffee and Thread. I slightly adjusted the knee parts, such that it could feature one of Serena's Pokémon. Pancham is a panda like animal, with a spike mohawk
and apparently always has a leave in his mouth. My kids told me he has
to have that leave or else he is not that powerful (missed that
apparently with my one ear).
In
de serie draagt Serena over-de-knie-sokken, maar ik koos voor leggings.
Het laatste stuk van de outfit is een Wild and Free lounge pants van
Coffee and Thread. Ik paste de kniestukken aan, zodat ik er een Pancham
op kon zetten. Pancham is een van Serena's favoriete Pokémon, het is een
panda-achtige soort met hanenkam. De kinderen konden mij vertellen dat
hij per se een blad in zijn mond moest hebben, anders is hij minder
sterk (toch wat gemist met dat halve oor).
For the dress, I used the pink version of See You at Six Dandelion (last week I showed you the blue version). For the white yoke, I upcycled a sleeve from a silk suit. The bolero is made from a large sweater that I bought cheaply with the goal to upcycle. The leggings where made with black jersey (bought at Joyfits).
I drafted the dress as a mix/hack of a dress from her book and
the Theo. The base for the bolero was the Aura*, which I drastically
hacked.
Voor
de jurk gebruikte ik de roze versie van de See You at Six Dandelion
(vorige week liet ik de blauwe al zien). Voor de witte neklijn gebruikte
ik de mouw van een zijde jasje dat op mijn upcycle stapel ligt. De
bolero maakte ik van een herentrui die kocht om te upcyclen, ik vind het
erg lastig om echte mooie gebreide stoffen te vinden (geen tricot
dus). De leggings maakte ik van zwarte tricot (van Joyfits). Ik tekende
de jurk op basis van een patroon uit het boek Stof voor durf het-zelf-vers en
de Theo. De bolero is een sterk aangepaste Aura*.
Be
sure to check out all the entries from this week on the Project Run and
Play page and do not forget to vote which outfit you like best. I of
course hope that I convinced you to try to keep me in the game.
Kijk
zeker even naar wat de andere naaiden, je kan een overzicht vinden op
de Project Run and Play website. Daar kan je ook stemmen op je
favoriete outfit. Ik hoop dat ik jullie overtuigd heb dat jullie gaan proberen mij
volgende week terug te zien.
The month July is traditionally "skirting the issue" month at Simpel Simon and co. Here you can read more about the beautiful idea behind it.
Project Run and Play is joining in on the fun with a blog tour on the
topic. The blog tour will feature all kind of cool skirts to get you in
the mood for skirt sewing. I personally am more of a dress sewer, than
skirt sewer, the project I made is the perfect compromise.
De
maand Juli is traditioneel "skirting the issue" maand bij Simpel Simon and co. Hier kan je meer lezen over de mooie gedachte die er achter het
thema zit. Project run and play organiseert een blogtour om het thema
heen. Er komen allemaal leuke ideeën langs om je in de stemming te
laten komen voor het naaien van rokken. Ikzelf ben meer een jurken
naaister dan een rokken naaister en maakte voor de post een leuk
compromis.
In March, I made a funny picture of my girl in a maxi
skirt tied on her like a dress (pre-picture for an upcycle). The skirt
had draw strings and those became the halter strings. There was a huge
amount of fabric hidden on her back, but I was intrigued by the idea.
For this post I therefore drafted a multi functional garment, maxi skirt
and dress (earlier this week I showed you another multi functional type of clothing).
In maart maakte ik een grappige foto van mijn oudste
in een maxi rok, die was opgeknoopt als jurk. Ik maakte de foto als
voor-foto voor een upcycle en er hing heel veel extra stof op haar rug.
Ik was echter geïntrigeerd door het idee om echt zo'n multifunctioneel
kledingstuk te maken (eerder deze week maakte ik al een andere soort mutlifunctioneel kledingstuk).
The two ways you can wear this garment is either as a
maxi skirt with a double folded waistband, or as a halter dress. The
neck bands are hidden between the waistband layers if it functions as a
skirt. The neckband is fastened with two snaps. This way the ties did
not have to be very long. I first experimented with the ties immediately
going around her neck, like I did in the original pre-picture. That way
the buttonholes started gaping a bit. By crossing the straps on the
front that problem disappeared. If I would have angled the button holes, made them a bit smaller
or used grommets the gaping would not have been a problem I assume, I do
like the front cross, so it was a happy mistake.
Deze outfit is
dus weer op meer manieren te dragen. Het is of een maxi rok met dubbel
gevouwen tailleband, or een halterjurk. De halterbanden zitten verstopt
tussen dubbel gevouwen taillaband als het kledingstuk als rok wordt
gebruikt. Je kan de halter dichtdoen met twee kam snaps, op die manier
hoefde de banden niet zo lang te zijn. Ik probeerde de bandjes eerst
direct over haar schouder te doen, maar dan wijkte de knoopsgaten erg.
Als ik de knoopsgaten verticaal had gemaakt, kleiner had genomen of met nestelogen had
gewerkt had ik dat probleem waarschijnlijk niet gehad. Ik loste het op
door de banden op de borst te kruisen. Ik vind het effect erg leuk, dus
het was een fijne fout.
I used the Litore* from Sofilantjes* to
make my dress. I started with the maxi skirt pattern piece, you could
also use this tutorial from earlier on the blog tour that explains how
to draw an A line skirt. Then I cut a wide jersey band with the height
of two times the bodice (without the straps). The band will be folded to
create the bodice, that is why you need the Litore height two times.
The width of the jersey band was the total chest width of the finished Litore dress (that was laying next to me on the floor while cutting). If
you are drawing the pattern from scratch you just determine how high
you would like the double folded waistband to be. That height times four is
the needed height for the jersey band (plus 2 times seam allowence).
For the length you measure the circumference of your child's body where
you want the band to be (my girl is a just-above-the-hip wearer, so that
is another measure then her waist. I eyeballed the length of the
straps. You can fold your tape measure around your child to get an estimation, jersey stretches, so you have to keep that in mind.
Ik maakte de jurk/rok op basis van de Litore* van Sofilantjes*. Ik begon met het maxi rok deel (je kan ook je eigen versie
tekenen op basis van een tutorial die eerder in deze blogtour zat).
Vervolgens knipte ik een brede tricot band met de hoogte van twee maal
het Litore lijfje en de lengte gelijk aan de totale omtrek van de Litore
jurk op borst hoogte. Het komt niet zo nauw qua hoogte, dus je kan ook
bedenken hoe hoog je de dubbel gevouwen tailleband wil en dan doe je die
hoogte maal 4. Voor de breedte kan je ook de omtrek van je kind meten
op de plek waar de rok moet blijven hangen en die breedte gebruik je als
lengtemaat. I meette net iets boven de heup, want mijn dochter draagt
haar rokken erg laag. De lengte en breedte van de halter bepaalde ik op
goed geluk, je kan je meetlint even rond je kind vouwen (dus via de rug en omhoog naar de nek, houd er rekening dat tricot, in tegenstelling tot je meetlint rekt) voor een
indicatie.
The construction is very straight forward. Sew the
two skirt pieces together. Create the strap that will form the halter.
Determine the location of the button holes, they should be around the
middle of the jersey band both width and length wise. I drew two marks
on the back side of the fabric. Make button holes and pull the strap
through the holes, close the waistband piece by sewing the short sides
together and sew the band to the skirt. I tagged the neck band in place
with a few stitches at the back, I already have too many strings
floating around the house. Hem or leave the bottom unfinished.
De contructie is vervolgens behoorlijk
eenvoudig. Naai de zijnaden van de rok. Naai de halterstrip. Bepaal de
positie van de knoopgaten (ongeveer in het midden van zowel lengte als
breedte van de tricot band. Ik vouwde hem dubbel en markeerde de gaten
op de achterkant van de stof. Creëer knoopsgaten en haal het haltertouw
er doorheen (je kan hem ook aan het einde erdoor heenrijgen). Naai
vervolgens de band aan de rok. Ik naaide het halterkoord vast in de
tailleband/lijfje met een paar steken op de achterkant. Ik heb al veel
zwevende koorden in huis. Als laatste zoom je de onderkant van de rok.
Although I still love my blind hem stitch, I am also still experimenting with possible better ways to hem (still
trying to avoid buying a coverlock). This time, I hemmed the dress
with a decorative honeycomb stitch, I was very satisfied with the
result. The fabric are from Joyfits, I bought the last piece of the candy stripes fabric, but there are many more very dicounted fabric where this one came from.
Hoewel ik nog steeds erg fan ben van de blindzoom steek,
probeer ik nog regelmatig iets nieuws (ik word nog steeds erg verleid
door een coverlock en doe erg mijn best hem niet te kopen). Deze keer
gebruikte ik een decoratieve honingraat steek, ik was heel tevreden. De stoffen komen van Joyfits, hoewel ik het laatste restje van de strepen kocht (met een zeer aantrekkelijk korting), is er nog keuze genoeg in het "lage prijzen"segment.
Feel free to leave a comment in the language you prefer (although Google
translate might have to assist me if you choose something different
than English, German, Dutch or Hungarian). If you buy anything through
my affiliate links (*), I get a small commission (the price stays the
same for you), I am very grateful for everything that feeds my fabric
addiction.
Ik vind het altijd super leuk om reacties te lezen op mijn creaties. In
deze post zitten enkele affiliate linken, aangeven met een *. Mocht je
het patroon aankopen doordat je in de shop kwam via een link van mij,
dan krijg ik een kleine commissie. Het patroon wordt niet duurder voor
jou, maar mijn stoffenkast is er wel heel blij mee.
Every month, I try to participate in this year's format of Project Run and Play. The previous two months I skipped due to an overcrowded sewing
agenda, but for August I was game. This month's designers are the
sisters behind Frances & Suzanne and they came up with a fun
challenge, incorporate a truly hand made part in the garment. They
suggested embroidery and smock, but I presume they are flexible judges.
Usually, I find it hard to play by the rules, but this time it somehow
all just came together.
We were on holiday last week and during
the week I tried out some modern (non-traditional) smocking
techniques like the one I used for the pockets of my Ishi dress. I didn't know
smocking would be this month's challenge, I simply was trying to pass the time
without my sewing machine. On the Frances & Suzanne blog they posted
a few posts on smocking (with foresight of course) and I though that
such a time consuming technique would be perfect for holiday evenings. I
didn't find a (free) English style smock pattern that I loved and I
didn't really understand how much fixation a smock would need on the
back side, so I didn't try an English smock. But then, like a sign, my
parents-in-law gave me the A to Z smocking book last Friday. I decided
to keep my modern smocking ideas on ice, and make an English smocked dress.
While
flipping through the pages of the book I decided to go for an easy
raster pattern. I wouldn't know where they pre-pleat fabric around here, so I
pleated by hand as well. To make the pleating and smocking as easy as possible,
I chose a fabric with a small repeated square and dot pattern. This
fabric is Wicky Pikes from Soft Cactus and really perfect for smocking. The fabric
is very light and due to the repeated pattern it was very easy to
determine the position of the stitches. Smocking this piece took me a few hours (pleating included), by far not as long as I had expected.
I decorated the
raster with some small flowers. The flower pattern is from the book. It
looked very easy, but I had a hard time with pulling my needle through
20 loops. I decided that these five flowers were enough. I put a small
bead on them (following the book's example).
This is my first
smocking piece and I wasn't following a garment pattern, so I had no clue
how wide the end result would be. When pleated, the hole thing was very
narrow, but I knew smock is supposed to give a nice elasticized piece.
When I took out the supporting threads, and saw everything remained
together nicely, the next phase could start. What would it become and
for whom?
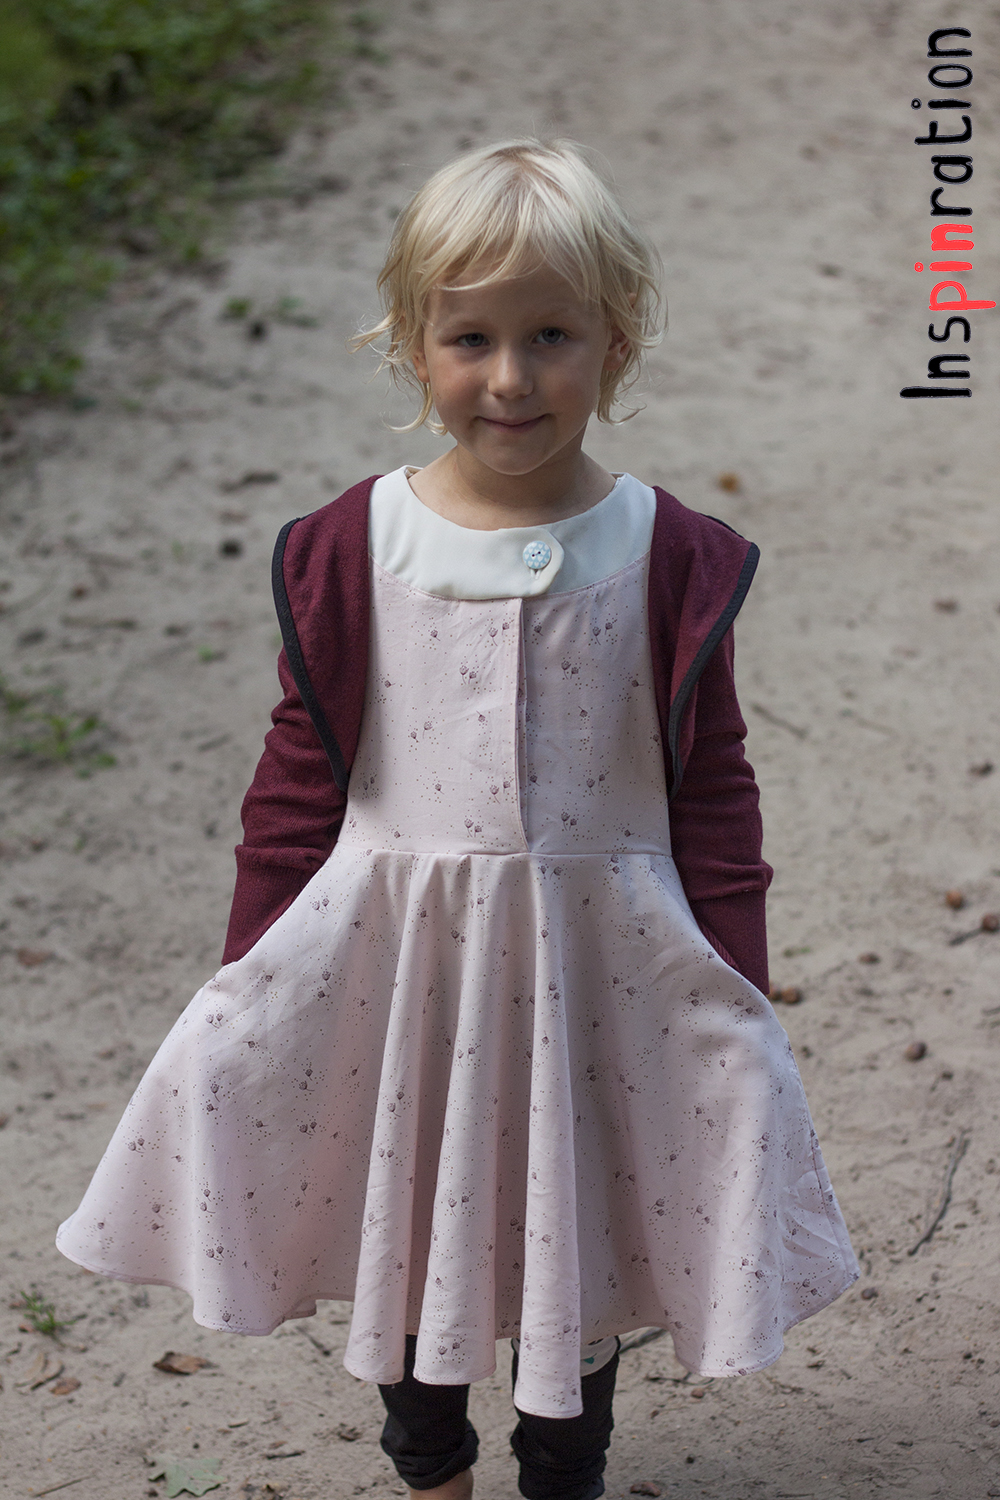
The stretch of the smock was big enough to make a dress
for my eldest. I drafted a dress pattern based on an existing dress
and a sleeves set from an Ottobre pattern. I am satisfied with the dress but I am considering creating one or two extra lines of smocking. The bodice is now relatively short.
The
smocked fabric was a (large) scrap piece, I used it earlier here, and I
didn't have enough to make the back of a dress from the same fabric. I
also feared that the dress would become too sweet for a seven year old
that way, the light pink smocked fabric needed a more spicy accent. I
looked through my stash and found a knit piece that had a similar vibe
as my smock (bought as a coupon without a brand name). That reddish fabric combines great with the little accents
on the main pink fabric. I sewed a little piece of pink jersey at the
top of my smocked panel to be able to cut a full front dress piece. I created the small curve intentionally.
The
front is the best side of this dress. The back is a bit strange, the
front is wider and is visible from the back. I have to get used to it a
bit, but my daughter immediately liked the dress (she never sees the back anyway). Of course, the dress
has pockets, my daughter really wanted to show them to you.
I love to hear what you think of my creations. Feel free to leave a comment in the language you prefer (although Google translate might have to assist me if you choose something different than English, German, Dutch or Hungarian).


