I presume we all have sewing plans that somehow never make it into reality. One of such plans that I had was making plush animals. When I started this blog, I was crocheting and making stuffed animals was the top one thing that I made with my yarn. When I discovered sewing, I quickly fell in love with making clothes from jersey, and my stuffed animal days seemed behind me. But sometimes the soft cuteness factor still pulls me in the toy direction. When I first saw her animal pattern line I immediate was intrigued. I wanted to make them, I wanted to make them all.
Ik neem aan dat we allemaal naaiplannen hebben die op de een of andere manier nooit werkelijkheid worden. Een van zulke plannen die ik had was het naaien van knuffelbeesten. Toen ik begon te bloggen haakte ik voornamelijk en knuffeldieren haken was het liefste wat ik deed. Toen ik naaien ontdekte, werd ik snel verliefd op het maken van kleding van tricot, en werden knuffelbeesten vergeten. Maar soms krijg ik zin om eens knuffeldieren te naaien door hun hoge schattigheidsfactor. Toen ik haar dieren patronen voor het eerst zag, was ik meteen geïntrigeerd. Ik wilde ze maken, ik wilde ze allemaal maken.
What I actually made were clothes. The stuffed toy plans remained on my Pinterest boards and then she showed this beaver, and I could not resist anymore. I tried, but the middle daughter that has a beaver obsession and that I showed the cutie to, reminded me every week. So a few weeks ago I decided to finally use that super soft fabric that I bought and cut myself a beaver. I bought the fabric at Textielstad and it is called flex soft fleece. It is super soft and fluffy, the only problem is that it comes in just three colors.
Wat ik daadwerkelijk naaide was meer kleding. De knuffel ideeën bleven op mijn Pinterest-borden. Maar toen liet ze deze bever zien, en ik kon het niet meer tegenhouden. Ik heb het geprobeerd, maar de middelste dochter met een beversobsessie die ik de bever had laten zien, herinnerde me er elke week aan. Dus een paar weken geleden besloot ik om eindelijk die super zachte stof te gebruiken die ik toch al reeds gekocht had. Ik kocht de stof bij Textielstad en hij heet flex soft fleece. Het is super zacht en donzig, het enige probleem is dat het in slechts drie kleuren verkrijgbaar zijn.
As you might have read in the beaver blog post, the beaver is not out yet, but she reassures her readers that you can make the adjustments yourself, and so I did. I actually used this awesome free version and hacked myself a beaver. I printed the pattern half the size of the original pattern pieces to make the beaver about the same size as our daughter's own beaver that has been at her side since her birth. That beaver has a little cross on his belly, so of course her new beaver had to have one to. This is not my first beaver inspired sew, this coat was also modeled after her best friend.
Zoals je misschien al hebt gelezen in de bever-blogpost, is het patroon nog niet uit, maar ze stelt haar lezers gerust dat je de aanpassingen zelf kunt doen, en dat deed ik ook. Ik heb deze geweldige gratis versie gebruikt als basis patroon en mezelf een bever gehackt. Ik heb het patroon half zo groot als de originele patroondelen afgedrukt om de bever ongeveer even groot te maken als de bever van onze dochter die ze al sinds haar geboorte aan haar zijde heeft. Die bever heeft een klein kruis op zijn buik, dus haar nieuwe bever moest er natuurlijk ook een hebben. Dit is niet mijn eerste bever-geïnspireerde naaisel, deze jas is ook gebaseerd op haar beste vriend, inclusief navel.
The "original" beaver has more actual beaver inspired back feet, but our daughter preferred "regular" feet like her own stuffie. The most surprising thing (at least for me) about this beaver is that I sewed the whole thing by hand. I sewed once before with this lovely fluffy stuff and I noticed that the serged seams tend to open afterwards. After resewing the sixth splitted seam by hand I wondered if sewing the whole thing by hand was maybe a better idea, and it was. It sews up surprisingly quick. From cutting to finish it took me about 4 hours and hand sewing can be done behind the tv.
De "originele" voorbeeldbever van Ikatbag heeft zwemvliezen, maar onze dochter verkoos "gewone" voeten zoals haar eigen knuffel. Het meest verrassende ding (althans voor mij) over deze bever is dat ik het hele ding met de hand heb genaaid. Ik naaide al een keer eerder met dit mooie, pluizige spul en ik zag dat de naden die ik met mijn lock naaide vrij vaak weer open barstte. Nadat ik de zesde gespleten naad met de hand opnieuw had genaaid, vroeg ik me af of het met de hand naaien van het geheel misschien geen beter idee was, en dat was het inderdaad. Hij naait verrassend snel. Van het knippen tot het afwerken kostte het me ongeveer 4 uur en naaien met de hand kan achter de tv.
As you can imagine, our new family member was a huge hit and I immediately received three more orders. Our son was first and of course he wanted a bear, to match his best friend. Last week we went by train to a museum and were sitting in the train for more than three hours in total and I managed to sew almost the entire thing (by hand again). These cuties really sew up quickly. This one is a little bit less obvious a bear than the other is a beaver, but he is loved anyway.
Zoals je je wel kunt voorstellen, was ons nieuwe familielid een grote hit en ontving ik onmiddellijk drie nieuwe bestellingen. Onze zoon was de eerste en natuurlijk wilde hij een beer, net als zijn beste vriend. Vorige week gingen we met de trein naar een museum en zaten in totaal meer dan drie uur in de trein en het lukte me om bijna alles te naaien ( opnieuw met de hand ). Deze schatjes naaien echt snel. Deze is een beetje minder duidelijk een beer dan de ander een bever is, maar hij is hoe dan ook geliefd.
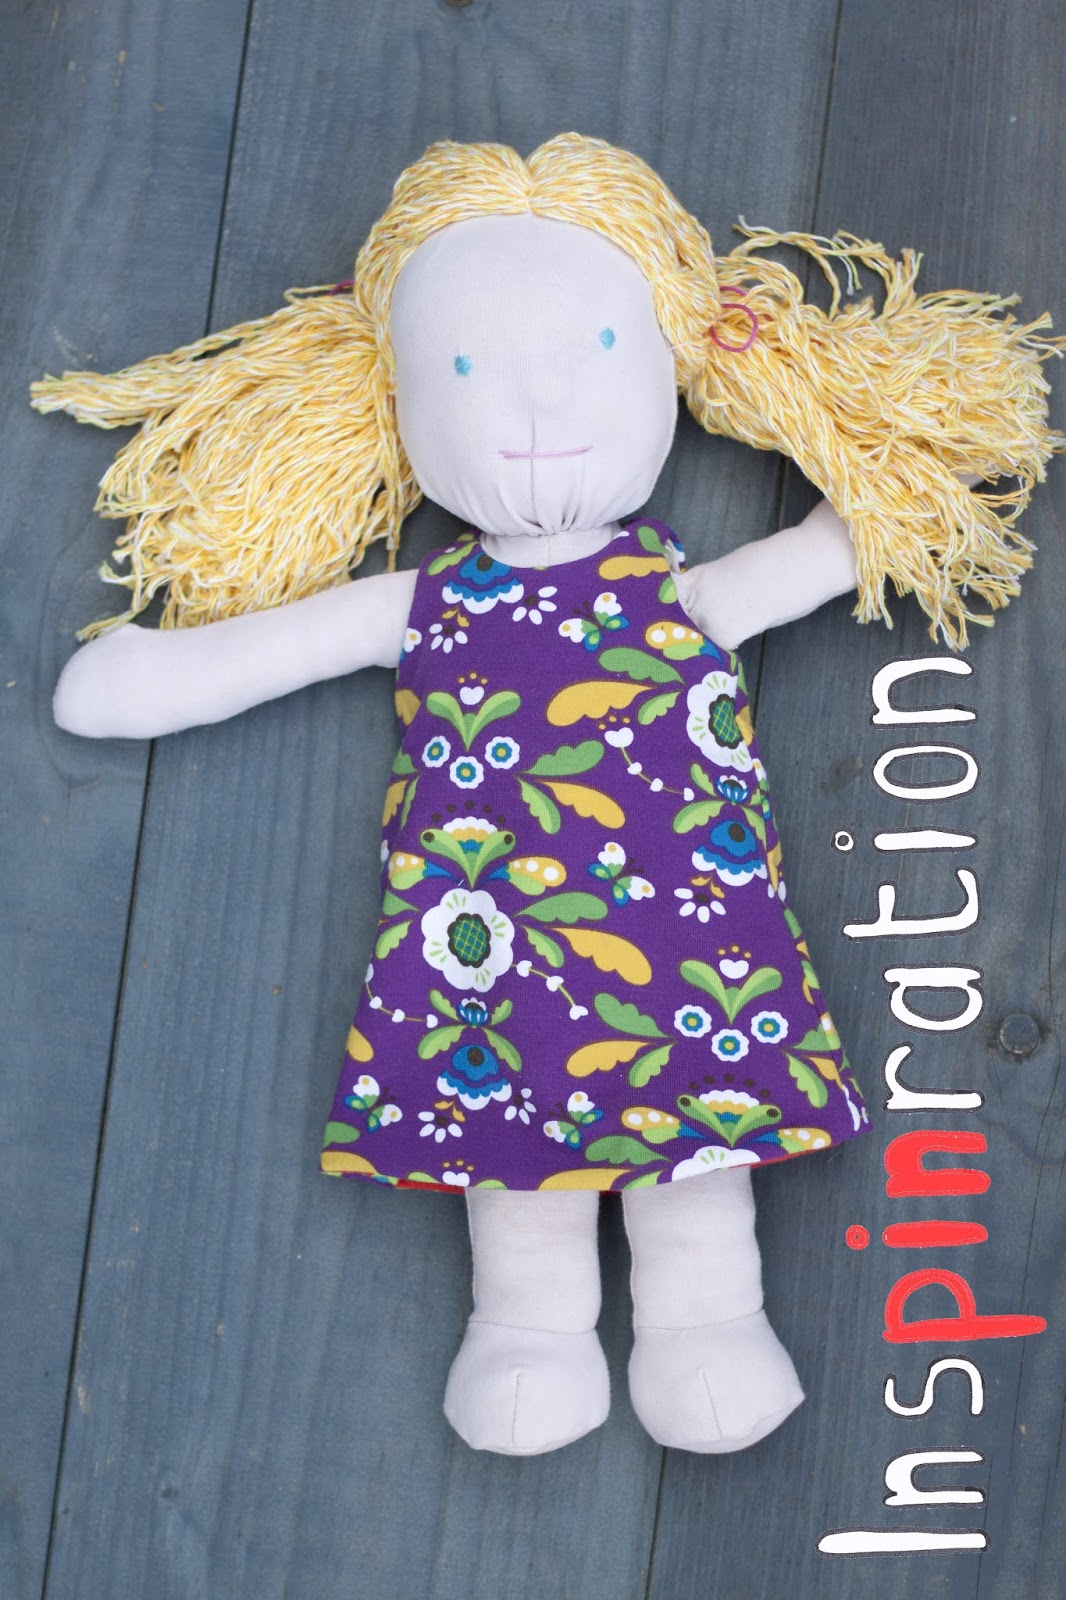
Sewmamasew is organizing the six weeks of love for softies. At the start
of the six weeks they featured a Bamoletta doll. I checked up on it and
loved it. The faces are extremely inviting. I was intrigued by the
nose, where did that shape come from. I found out the doll is a Waldorf
type of doll and the head is first shaped and later covered with jersey.
Bambolettadolls has uploaded a few YouTube movies showing how such
dolls are made and the internet has many other resources as well, so I wanted to give making one myself a try.
I tried to make
it work with materials I had at home, I own a lot of everything. I dyed
some jersey from a plain white shirt with tea to make the jersey skin
colored. I used the book My own rag doll to create the body.
Earlier, I made a doll from the book and the result was not that great. I
didn't do a satisfactory job om embroidering the face and I didn't
understand how to to the hair. Sewing the filled limps on the body is a
challenge. When I did that step for this doll, I had learned that the
best result is reached if you leave the back almost totally open (the
bottom should be sewed for two centimeter, the rest up to the neck has to
be open).
For the head you should use wool, but I just used
pillow filling. I took a stocking and filled it with a round ball of
filling and created a size which I thought that would work. The next step is tying some thread to create the eye line and nose. I sewed a
head shaped jersey sack and pushed the head in there. Following the
Bomboletta instructions I embroidered eyes and mouth. The hair instructions from Bamboletta are also great. I used plain yarn for the
hair and I tied the hair in two ponytails.
Due to the fact that
wool has more body and recovery, my doll is missing a chin. But even
without chin, I am still satisfied, especially because my kids love her.
If I make another, and my eldest would love me to do that, I will also
tie some thread at the bottom of the face to shape a chin.
An
important part of playing with a doll are the clothes. A good doll has a great
wardrobe. I looked through my never ending pile of jersey scraps and at
random choose a few. To make my life easier I decided to go for
reversible dresses. In reversible clothes it unnecessary to separately
bind the neckline, arms and bottom hem, which can be a pain for these
small clothes! I made two dresses but these count as four dresses. The
drew the pattern for these dresses based on the dolls body template.
Ivy and Kim you were both interested in the kam snaps, please send me an email (inspinration (at) gmail.com) and we will discuss how to make you both happy.
I love to hear what you think of my creations. Feel free to leave a
comment in the language you prefer (although Google translate might have
to assist me if you choose something different than English, German,
Dutch or Hungarian).
Lets make this a series, here you can find the first one. In these posts I will discuss a collection of gifts (made over a undefined period) which didn't justify (I have a personal fuzzy standard) a post but I still want to show them.
I made a friend a weighted pillow to be part of the sensomotoric therapy
for her son. She asked a simple pillow/blanket but due to the age of
the boy (five) I wanted to make a fun one. I enlarged a pattern from La Maison Victors' plush animal book. The arms measure 42 cm across, so it
really is a big animal and it is filled with four kilo rice. The wolf is
a washable cover for a simple bag filled with rice.
My
niece requested baby groot. I had no clue what she meant, but when I
googled it I found a free tutorial. It turns out to be a character from a
movie (that I had to watch of course and liked a lot). I love how he
turned out.
One of my friends are going to have a second
child and they asked around if somebody knew somebody who could crochet
them a monkey. I kind a jump up and started waving my arms (over
facebook), me me me, I can do that. I slightly adapted an existing pattern.
I created this blog over two years ago but I have not been very actively
posting much. Among the most early posts, the ones that are floating on
the internet for more than two years, the cactus crochet tutorial has
been clearly the most popular. This post pulls in a steady 20+ views per
week (which is huge for me because most of my posts have not been
viewed for more than 10 times in total).
Since I made my
resolution to post more (first of September this year) I have only been
posting sewing projects. Although I sew a lot I also still crochet, but
I have not posted about it. I hereby show you all my crochet
accomplishments of the last one and a half month together.
In
August I bought the book Edward's menagerie and I have been crocheting
from it ever since. I love the book so much! I now have created six
animals from it (the average amount of projects I make from a book is
below one) and I will make more for sure. I did not post about them
because my animals are not new, or different compared to the ones from
the book. Sewing posts are different that way because you usually, at
least, have some new type of fabric compared to all the other ones
floating around on the web. Your sewing project is original if you
consider the whole package even if you followed the pattern to the
letter. Keeping that in mind I feel that I can post my six animals
together, as a unique inspirational package (and one of them is actually
different from the book).
The middle animal that has a head
resembling a squirrel is actually a beaver. The favorite plush animal
of my middle daughter is a beaver and she really wanted a crocheted
version. I had to come up with a tail (which is the thing that sets a
beaver aside from a squirrel),
which would would have been relatively straight forward if the tail did
not had to have different color on each side. When I started the beaver
I tried to get away with a brown belly, but after six rows of brown
belly my three year old pointed out to me that the white belly was
missing. Her beaver has one, and she doesn't care that the ones in the
wild do not. I therefor did not dare to make a one colored tail. In the
spirit of the pattern I tried to make a continuous tail (not making two
separate and sewing them together). This resulted in some color leaking
on the sides. By adding an extra row of singles I could hide them quite
well. If you are trying a beaver I do recommend to either choose one
color or have two halves. Either way my daughter loves her extra friend.
The
other part of this post is a recycling project. I cut up one of my
husbands old white shirts and turned it into t-shirt yard and crocheted a
potholder. I had seen these great coaster, but neither me nor most of
my friends use coasters. But the idea does work great for a potholder I
think. The snowman melting down due to the heat of the pot id much more
logical right than being squashed by a soda, am I right?
If you have a certain experience with any crafting skill you might not
actually need more crafting books, from the pictures you can make an
estimated guess on how to make it. But we all know the difference
between needing a new toothbrush and needing chocolate. In the
strictest sense the toothbrush is probably more useful and responsible
to buy but who wouldn't go for the chocolate if they had to choose...
I
need crafting books the way I need chocolate (and crafting supplies for
that matter). A few months ago I came across this book online and
bought it as a gift (because I already own a lot of cute crochet pattern
books that are still waiting for their first use). The person I bought
it for had not announced her birthday party yet but I assumed it would
come. The friend in question decided not to celebrate her birthday that
year and the book staid on in my shelves. It had been screaming out to
me since I received it and after a few months I caved in and used the
book myself.
I had created two Arne and Carlos dolls in the
past which took me a bit under a week to make. This doll is super quick
compared to those. The day I started I went to an indoor playground with
my kids and when we went home a few hours later I had created the head,
legs, body and an arm! At first I was a bit sceptical, especially the
body seemed very weird, but after I joint all limps he/she became very
cute.
When I was finalizing the first doll the son of a
friend saw the book and loved the "superman" picture. He asked his
mother if she could crochet but she couldn't neither did his 7 year old
sister he found out. My kids have too much already so I decided he could
have the doll. When he doll was ready to fly from our house my kids
were actually sad that he would go which is why I created two others
that would stay.
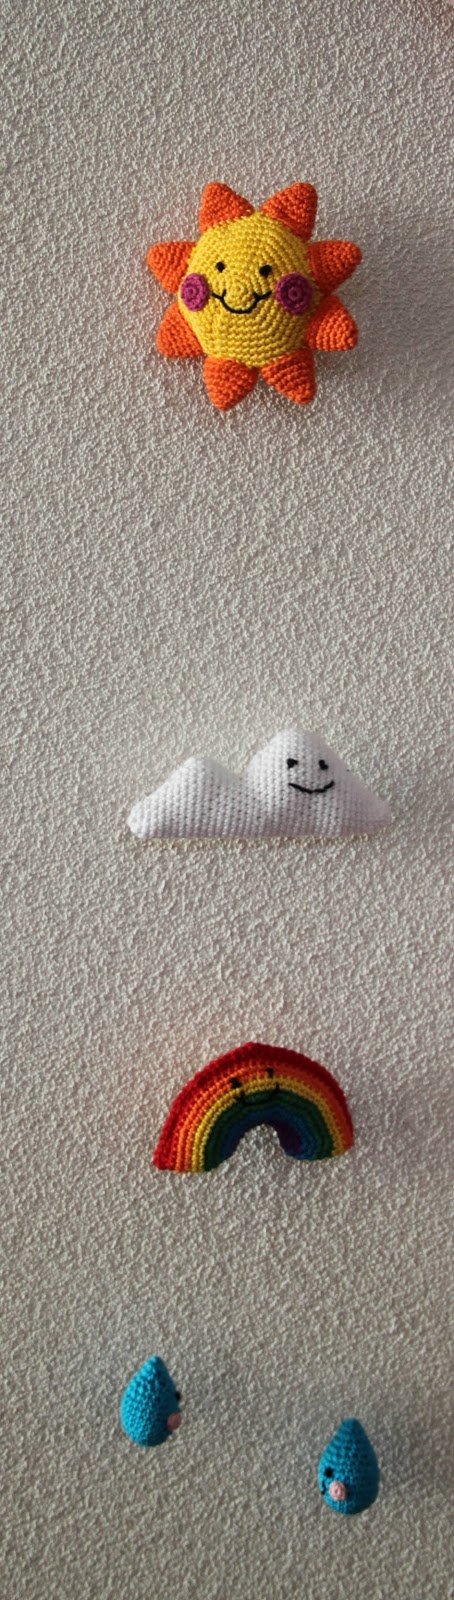
I guess that all of you that like Pinterest and crochet have seen the mobile of a sun, rainbow, clouds and raindrops. The usual pins state that this is a free tutorial. I also had seen and pinned it but when I decided to make one as a gift I could not find the free tutorial anywhere. I did found a website that wanted a subscription but I was not in the mood for that. I simply eyeballed the design and created a 3D rainbow to mix better with the sun. I kind a messed up the amount of increases but with a bit of creative sewing all worked out fine.
The mobile was a gift without occasion due to a post I shared on
Facebook at the beginning of the year. One of my friends was sharing a
"pay it forward" creativity post. The first five people that would react
on her post by sharing it on their timeline would receive a home made
gift (if they would also make 5 home made gifts for people that would
react on their message). I loved the idea and shared the message but
omitted the condition that people has to get creative themselves. My
Facebook crowd it not that into creating hand made gifts but I was
positively surprised which people were delighted to receive those type
of gifts. I did not create all the gifts yet but I will (once).
Did anyone else also join this nice alternative home made swap movement?
Last year I refound my knitting passion when I spotted the book:
Christmas ornament knitting from Arna and Carlos. A few years earlier I
took up knitting simply because I wanted to master it. My mother taught
me when I was small but it never really got the hang of it. So a few
years ago I knitted a few sweaters. Knitting a sweater is really a big
commitment for me because it takes a lot of time! Especially because I
never was really interested in my own knitted sweaters so they just
remained in the closet. The Christmas ornaments seemed a perfect project
to get back into the knitting game. Finishing one never took more than
three evenings (my way of counting creative time) and they looked great.
So Arne and Carlos's new book, knitting dolls looked like another very
promising new project especially because my eldest is really in the doll
playing phase. Over Easter Arne and Carlos had a nice book containing a
bunny.
At that moment I was totally into crocheting and I made adjusted
the pattern somewhat to make a crochet version . When I got the doll
book I got the same giddy feeling as when I got the Christmas ornament
book. It is just so nice to look at all the pictures. flipping through
the pages was like flipping through an illustrated cookbook. You simply
want to try them all immediately. Not only the dolls look amazing they
come with a bunch of clothes!
Knitting a doll took me around 6
evenings and I enjoyed it a lot. If you are considering to start up
knitting (again) but are wondering what to make, this is very
recommendable!
When you mention crocheting many people think of granny squares.
Colorful yarn blankets using up left over yarn. I also had seen some
granny square projects and wanted to try it. The fun thing about grannys
quares is that you whip one of them up relatively quickly. You can use
them as a coaster, sew a few together as a scarf or bag. The
possibilities are endless but somehow after making a few squares the
endless list of possibilities could not motivate me as much.
When
my due date became closer I felt the urge to create something for our
new family member.
I considered knitting some clothes but decided
against it. I had knitted a sweater for my son, but he never really wore
it. Our babies double as lamas and drool/spit/vomit all over their
clothes all the time. The drooling/spitting/vomiting behavior stopped me
from putting on the sweater that took me hours to make.
Enter
my unfinished granny squares. Within one and a half week I created
enough squares to make up a nice baby blanket. The
spitting/drooling/vomiting is usually done on the sheets under the head
and not on the blankets. Now I have the perfect thing to cover my new
born with love :).
And "yes" if you might be wondering if that gray blob in the right is
belly. Usually when making pictures with my phone of projects on the
floor or table my feet appear in the picture. I did not notice
immediately but when I did I thought is was extra funny and kept it like
this.
I have some trouble with buying gifts now a days. In the past when I was
still a student my friends (and me) cloud not simply buy every (small)
thing that we liked. Now that we are all working it is harder to find a
good present because all the "good" small things we simply buy when we
realize we like them. In such a case a personalized hand made gift is
ideal! My first hand made gift was to my sister, I made her a crocheted cactus and loved it.
After that I decided to give the option of a hand made gift whenever I ask what somebody would like to get as a present.
My niece was creating a "very hungry caterpillar" room for her son and
could use another caterpillar. This was a very easy project, I created
the caterpillar by increasing and decreasing like if making a round
shape. I added some wire to be able to fake crawling position. A friend
of mine pointed out that I reversed the leg amount (oops), well lets
call it creative expression.