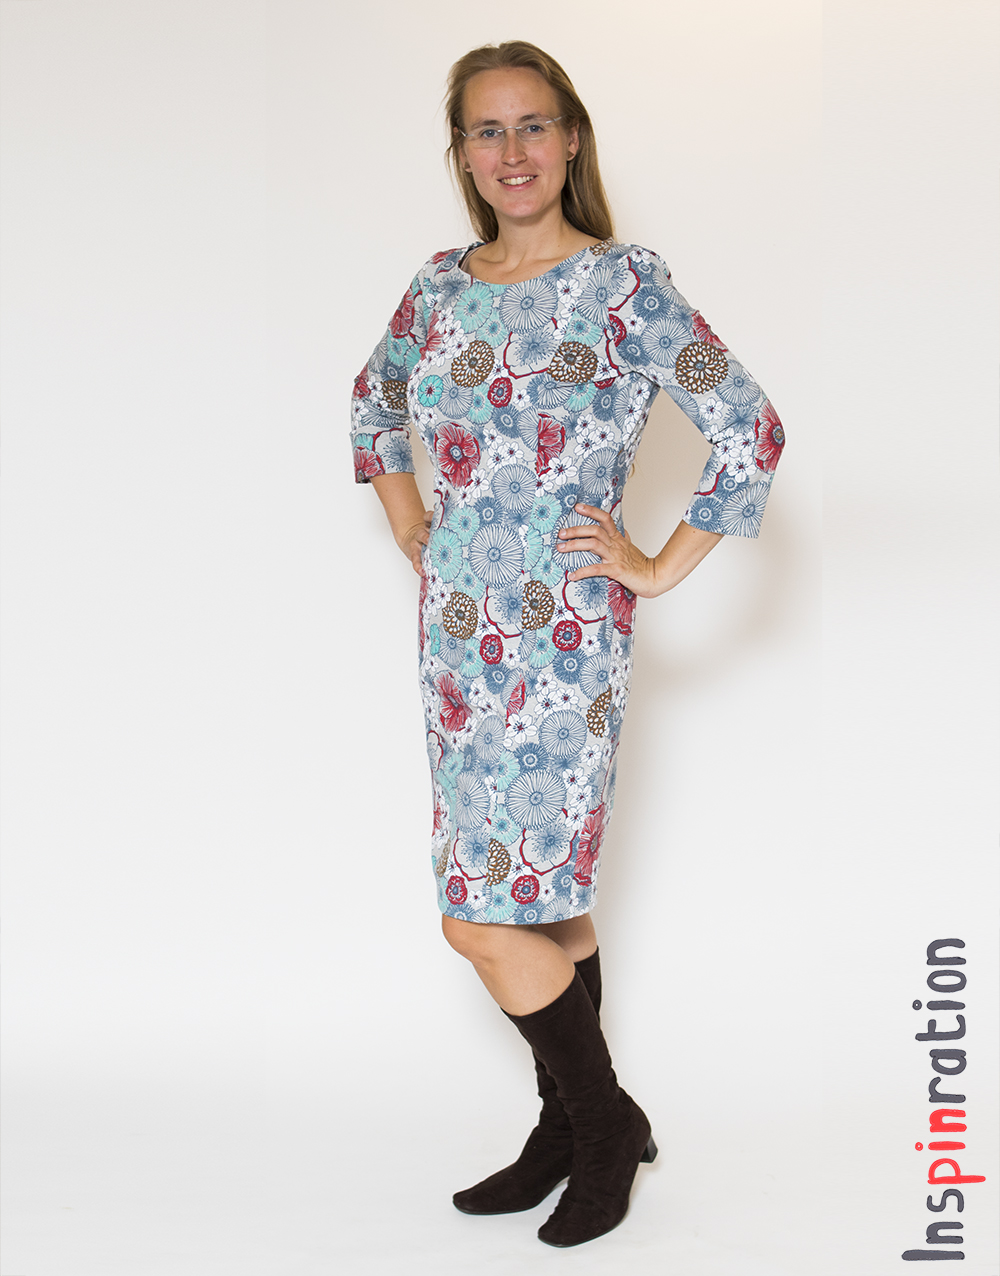
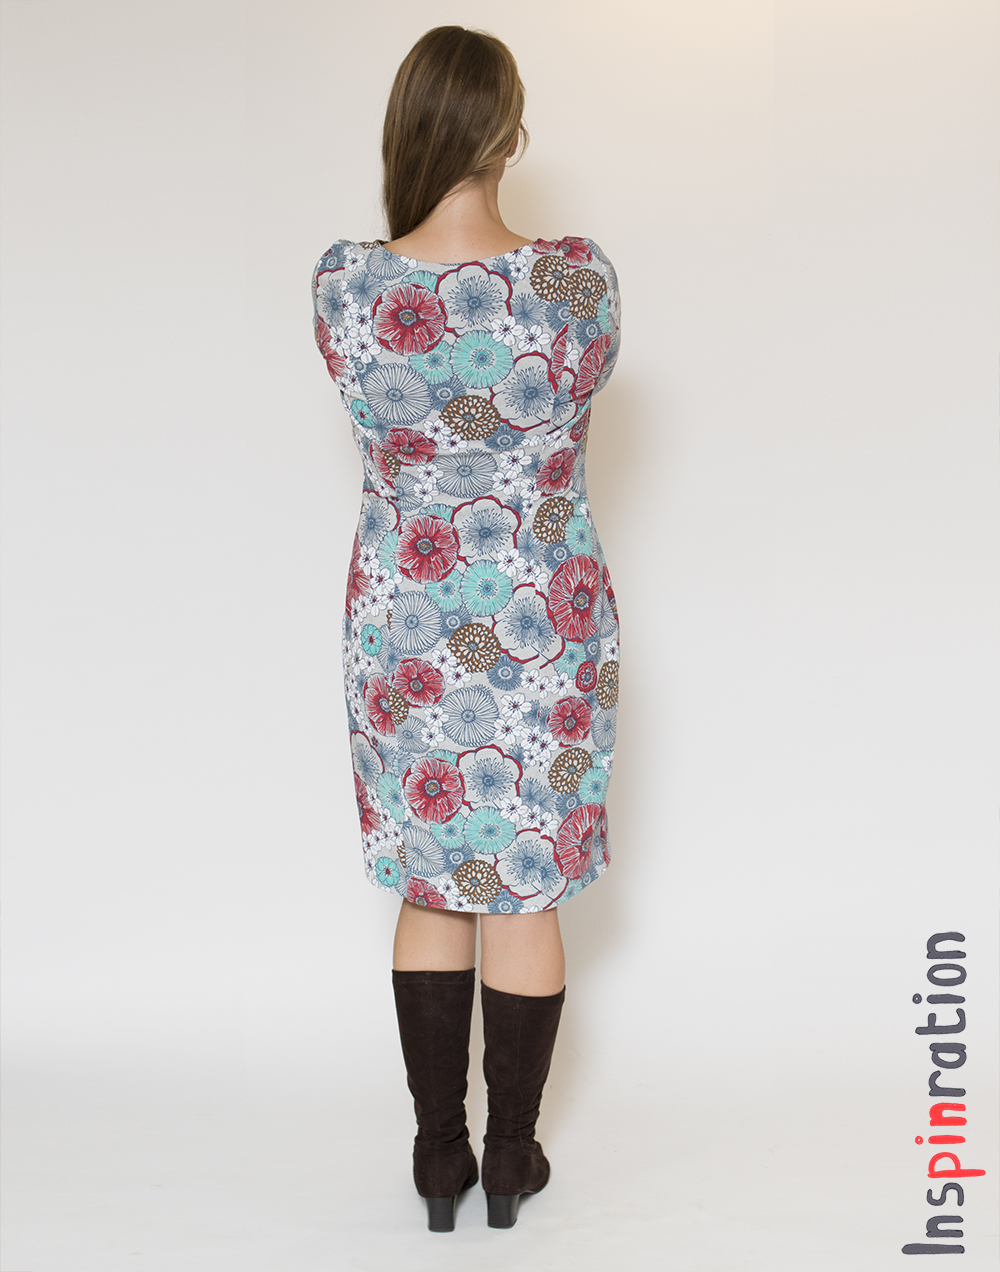
I love trying new things, but some patterns I do make over and over again. For selfish sewing, the Martini dress from La Maison Victor is a clear winner in that category. Although I only made the original dress only once, today's dress is the fifth of this pattern in my wardrobe. I still wear all of them regularly. For today's dress, I used my standard adjustment, which is to double the front and draw a new neckline. I still use the same pieces as the first time, so this is with the FBA adjustment that I made years ago.
Ik houd ervan om nieuwe patronen te proberen, maar soms zijn er patronen die ik steeds weeropnieuw gebruik. De Martini van La Maison Victor is er zo een. Hoewel ik de originele jurk maar eenmaal maakte, is dit nu de vijfde jurk van dit patroon in mijn kast. Alle vijf komen hier regelmatig uit de kast. Voor de jurk van vandaag maakte ik mijn gebruikelijke aanpassingen, dus ik knipte middenvoor ook op de vouw en tekende daarvoor een nieuwe neklijn. Ik gebruik nog steeds dezelfde patroondelen als de eerste keer dus dat is met aanpassing aan de boezem.
I have cut Martini's with short sleeves from one meter of undirectional print. The fact that this pattern needs a minimum amount of fabric definitely contributes to me loving this pattern so much. From this lovely Lillestof fabric I had about one and a half meter and I could add two small remnants to my scraps collection. The fabric is so pretty, the white flowers are printed in a thicker paint, and they give a lovely 3D effect.
Een Martini met korte mouw krijg ik uit een tricot lap van een meter (als de stof geen boven of onderkant heeft). Het feit dat dit patroon relatief weinig stof nodig heeft draagt zeker bij aan mijn gevoel van waardering. Van deze schitterende Lillestof had ik anderhalve meter stof, dus hoewel ik driekwart mouwen knipte breidde mijn restjes voorraad ook weer met twee lapjes uit. De stof is echt heel erg mooi, de witte bloemen zijn er met dikkere verf opgedrukt en dat geeft een 3D effect.
This time, I did not use a bias finish for the neckline, I just folded tone and a half centimeter to the inside and stitched it down with a stretch stitch. I learned from the Simple dress that this is an easy and pretty solution if you have good quality knit. This time I left the dress rather long, making it extra decent.
Deze keer gebruikte ik geen bias afwerking voor de hals, maar vouwde ik een ander halve centimeter naar binnen en stikte ik die vast met een stretch steek. Dat deed ik voor het eerst bij de Simple dress en als je met een mooie kwaliteit tricot werkt geeft dat een snelle en mooie afwerking. Deze keer hield ik de jurk op een echt degelijke lengte.
This September, my youngest started kindergarten, now all our kids go to school in the morning. A lovely occasion to join the Sewing for Kindergarten blog tour which is hosted by Jennuine Designs this year. Seeing that I have trouble closing her dress drawer, she clearly does not need new dresses. A non-need for dresses never stopped me in the past, but I decided to do it differently this time. I actually sewed basic clothing pieces such that she can remain wearing the summer dresses that she loves so much. Besides those basic pieces, I also sewed a backpack, mostly because I wanted to try if I could.
Sinds september gaan ze hier alle vier naar school. Onze jongste van vier is dus begonnen aan de kleuterschool. De perfecte gelegenheid om mee te doen aan de blogtour, "naaien voor de kleuterschool" (sewing for kindergarten). De blog tour wordt dit jaar georganiseerd door Jennuine Designs. Aangezien ik de jurken la van deze dame bijna niet meer dicht krijg, besloot ik voor de verandering eens geen jurk te naaien. Ik ging nu juist eens voor echte basics, hierdoor kunnen de veel geliefde zomerjurken gewoon het hele jaar aan. Naast de basics ging ik ook voor een speciaal stuk, een echte rugtas, gewoon omdat ik het eens wilde proberen.
A good basic is a pair of leggings. In the Netherlands your legs can be bare in June until August, but for most of the year, those legs have to be covered. I have sewed leggings in the past, but never as many in one week as I did now. I realized I had the Dressage leggings pattern* in my stash from a long long time ago, and tried it for my middle daughter. The fit was perfect, so I cut four more and cut three pair for my youngest as well. Yes, I sewed eight of these this week, and they are the perfect sewing shot. They are quick, and easy. You can actually make them more sophisticated by choosing a color block. My kids will be colorful enough already, so I only made the straight option.
De eerste benodigde basic van leggings. Die werden door de zus boven haar afgedragen tot de gaten erin zaten, dus leggings in haar maat waren echt nodig. Ik naaide al eerder een of twee paar, maar nu ging ik voor echt bandwerk. Ik naaide er acht in een week. Ik ontdekte het patroon van de Dressage leggings* in mijn voorraad. Ik probeerde hem uit voor onze middelste dochter en zag dat het goed was. Ik knipte nog vier paar voor haar in effen kleuren en knipte dus drie kleinere voor de dame die vandaag in de schijnwerpers staat. Leggings zijn echt heerlijke tussendoor projectjes, snel resultaat en zeer geliefd. de dressage leggings hebben ook een leuke color block optie, maar ik ging juist voor relatief simpel in deze batch, de gehele outfits zijn als kleurrijk genoeg.
I addressed the lack of sleeves on the summer dresses by sewed three Aura's from Sofilantjes*. I was not in the mood to search for buttons in my stash and I chose to figure out the optimal (for me) snap closure. I ended up with three slightly different options, but I think I like the one with the dino fabric the best. It actually was a mistake, I sewed it exactly the same as the kitten version, but sewed the inners piece inside out to the outer piece. This way the loop is on the inside and I love it! Another example of why it is good to (sometimes) make mistakes.
Het gebrek aan mouwen ging ik te lijf met de Aura bolero*. Ik heb nog steeds geen degelijke grote knopen in mijn voorraad, dus ging ik voor kamsnaps. Ik ging op zoek naar de optimale kamsnap sluiting voor de bolero en vond die per ongeluk. De dino bolero is mijn favoriet, maar die zou hetzelfde zijn geweest als de katten versie als ik niet per ongeluk de voering aan de buitenkant had genaaid. Maar dit laat maar weer eens zien dat je echt van je fouten kan leren.
The middle color bomb in my overview picture is the Bazinga Backpack from Flosstyle. I have been longing to sew a backpack for long, but I never really dared. I did not feel like buying all the hardware and stabilizers that can make a handmade bag very expensive. The blog tour motivated me to sew at east one really interesting piece and I did it frugally. Instead of stabilizing my fabric, I actually used canvas as the lining, this way the combination of main and lining is sturdy enough. I did not buy anything for this bag. I used scraps of woven fabric, zippers from my stash and upcycled the hardware from an old back pack.
De middelste kleurenbom in de overzichtsfoto is de Bazinga rugzak van Flosstyle. Ik heb al jaren plannen om eens een rugzak te naaien, maar ik durfde er nooit echt aan. Ook zag ik op tegen de relatief hoge kosten van tassen naaien, zoals die hardware en versteviging. Recentelijk naaide ik echter verschillende tassen zonder dure middelen en ik probeerde het dus met wat ik had. In plaats van het verstevigen van de buitenstoffen, gebruikte ik canvas als voering, waardoor het geheel behoorlijk wat body kreeg. Ik gebruikte stoffen resten voor de buitenkant en recykleerde gespen van een oude rugtas. De tassenband kocht ik vorig jaar eens bij K-Bas.
I really love the color block on this bag, it was a joy to mix and match. The bag has a high level of pretty finish. All the inside seams are enclosed with bias tape. This is something that I normally would never do, but I was so smitten with the front, that I felt I had to try to make the inside as pretty as possible. The bag is actually a bit too big for my teeny tiny kindergarter, but I am sure the bag will get a lot of wear any way. All the kids love the bag and I seem to be forced to make a few more, and for now the bag will be used by a bigger sibling until she is big enough.
Ik ben helemaal weg van de color block van deze tas, het mixen en matchen van stoffen was een feestje. De tas is aan de binnenkant overal met bias tape afgewerkt. Helemaal zoals in de beschrijving, normaal gezien, niks voor mij. Ik was echter zo weg van de voorkant dat ik gewoon extra mijn best moest doen op de binnenkant. De tas is eigenlijk te groot voor mijn piep kleine kleutertje, maar hij zal zeker veel gedragen worden. Iedereen in huis is er namelijk weg van en er werden er meteen drie bij besteld. Tot dat ze groot genoeg is, zal één van de zusters hem wel gebruiken.
I choose grey/white as the main color for the legging-bolero sets. I feel that those color fit with almost everything. I could have gone with uni pink, that would have matched will all her favorites for sure, but I wanted to give her some print as well. I had not planned to combine the kitten bolero with the earlier made kitten dresss, I thought it would be too much. My daughter insisted and I have to agree with her, it looks surpirsingly cute. She actually whore the cat ensamble, including the leggings to school today. It was a bit much for my taste, but she was over the moon with the combi. I also wanted to snap some pictures with my middle one wearing her leggings, but this was the only one she was in for.
Ik ging voor leggings-bolero's in wit/grijs, sobere kleuren die naar mij idee overal bijpassen. Ik had ook voor uni roze kunnen gaan, dat had ook bij alles gepast, maar ik wilde graag een printje voor haar. Ik was niet van plan om de poezen bolero met de poezenjurk te combineren, maar daar dacht mijn dochter anders over. Ze haalde hem uit de kast en het moest samen aan. Ik geef haar achteraf gelijk, het staat verrassend snoezig twee keer dezelfde stof. Het ensemble, zelf met legging ging vandaag dus ook aan naar school. Beetje too much voor mijn smaak, maar zij was helemaal gelukkig. Ik probeerde ook nog even een foto te maken van grotere zus in een van de leggings, maar dit was het maximaal haalbare.
Feel free to leave a comment in the language you prefer (although Google
translate might have to assist me if you choose something different
than English, German, Dutch or Hungarian). If you buy anything through
my affiliate links (*), I get a small commission (the price stays the
same for you), I am very grateful for everything that feeds my fabric
addiction.
Ik vind het altijd super leuk om reacties te lezen op mijn creaties. In
deze post zitten enkele affiliate linken, aangeven met een *. Mocht je
het patroon aankopen doordat je in de shop kwam via een link van mij,
dan krijg ik een kleine commissie. Het patroon wordt niet duurder voor
jou, maar mijn stoffenkast is er wel heel blij mee.
I am a bit behind on my blogging, which you might have noticed. I also have been sewing, but those things I can not show you yet, so today, I have another "oldie" for you. In July, Sofilantjes released the Montis*, and I showed you two dresses that I sewed over testing. I actually sewed three other variations, which I am showing today. The weather here is horrible now, but they were worn a lot over the summer and still leave the closet with a jacket.
Ik loop achter met bloggen, ik heb zelfs nog wat zaken van een half jaar geleden die ik hier nog graag een keer laat zien. Ik ben weer fijn aan het naaien, maar wat ik creëerde kan ik nog niet laten zien, dus vandaag weer eentje uit de oude doos. In juli lanceerde Sofilantjes de Montis* en ik liet jullie toen al twee jurken zien. Ik naaide er echter nog drie die ik vandaag dus tevoorschijn tover. Het weer is nu niet typisch zomerjurken weer, maar ze komen nog steeds uit de kast met een vestje erop.
The waist of the Montis perfectly matched that of the Solis and the Litore which opens up a lot of easy mix and match possibilities. The pink dress, worn by my middle daughter is a mash up of the Litore bodice and the Litore high low skirt. I have wrote it before, that probably is my favorite skirt ever.
De taille van de Montis past perfect op de Solis en op die van de Litore, waardoor er een berg rokken opties zijn. De roze jurk is een Mashup met de Litore hoog/laag rok. Ik schreef het al eerder de Litore, rok is waarschijnlijk mijn favoriete rok ooit.
If you come here often, you know that I like to push the boundaries a bit. I gladly mashup all kind of patterns, even if they officially do not line up. The Mantica is officially not a waist match for the Montis, but the gathered skirt is easy peasy transferred (you just gather is to the right width). If you only used the skirt (and omit the band), you do not have to change a thing (although the skirt will be slightly shorter than on the Mantica), but I also wanted a contrasting band. To create the same look, just take the band of the Mantica and cut it as wide as the bottom of the Montis top.I only used a one layer band because I did not use a cord.
Als je hier vaker komt, dan weet je dat ik ervan houd om de de grenzen een beetje op te rekken. Anne vroeg on om te mashen met de bestaande patronen, de Mantica past officieel niet, maar de gerimpelde rok is natuurlijk altijd passend te maken zonder aanpassingen in de hoeveelheid stof die je moet knipppen. Als je alleen de rimpel rok overzet hoef je dus helemaal niks te veranderen maar dan komt de rok wel iets korter dan bij de Mantica. Ik zette ook de tailleband over, die knipte ik daarvoor even breed als de onderkant van de Montis. Ook nam ik hem niet dubbel, want ik deed er geen koordje in.
Besides these two easy mashes, I also went for a slightly bigger "hack". Anne designed the Montis to be sewn with a double or a single layer bodice. Besides in thickness, the bodice options differ in view on the back. The single layered bodice has two straps and the double layered has three. I especially love the three strap option because it looks different than the front. I know that many people like single layered because it is less warm in the summer, so I mixed those two option in this dress. I wrote small tutorial for the Sofilantjes blog to get the same look. The skirt of this dress is narrower than the Montis one, because my fabric remnant was not big enough.
Naast de twee makkelijke mashups naaide ik ook nog een hackje. Anne ontwierp de Montis zodat er twee opties zijn voor het lijfje, het ene heeft een enkele laag stof en de andere een dubbele laag. De lijfjes verschillen ook in hoe de achterkant eruit zien. De enkele laag stof heeft twee bandjes en de dubbele heeft er drie. Ik vind de versie met drie bandjes het meest interessant omdat die er dan anders uitziet dan de voorkant. Ik weet dat er vele zijn die graag een enkel laags lijfje hebben omdat dubbele stof warm kan worden in de zomer, dus combineerde ik beide opties. Ik schreef een korte handleiding voor de Sofilantjes blog. De rok op deze jurk is trouwens een stuk minder wijd, omdat mijn stof rest geen bredere toeliet.
Feel free to leave a comment in the language you prefer (although Google
translate might have to assist me if you choose something different
than English, German, Dutch or Hungarian). If you buy anything through
my affiliate links (*), I get a small commission (the price stays the
same for you), I am very grateful for everything that feeds my fabric
addiction
Ik vind het altijd super leuk om reacties te lezen op mijn creaties. In
deze post zitten enkele affiliate linken, aangeven met een *. Mocht je
het patroon aankopen doordat je in de shop kwam via een link van mij,
dan krijg ik een kleine commissie. Het patroon wordt niet duurder voor
jou, maar mijn stoffenkast is er wel heel blij mee.
In my previous post, I already told you that I contributed a teeny tiny bit to one Thimble 16. Besides patterns, One thimble also has articles and tutorials, and in issue 16 there is an inspirational piece on how to sew costumes. The most important thing for sewing a costume is your imagination, and the article shows that with one base pattern you can make an unlimited amount of different costumes. The base pattern that was used was the One Romper* pattern by Filles a Mamán (from issue 13*) and I turned it into a panda costume for my son.
In mijn vorige blogpost vertelde ik dat ik een piep klein beetje bij droeg aan One Thimble 16. Naast patronen zitten er namelijk ook artikelen en tutorials in het digitale blad. In issue 16 zit een inspirerend stuk over het maken van verkleedkostuums. Het belangrijkste ingrediënt van een goed kostuum is je eigen fantasie. One Thimble 16 laat daarom zien dat je op basis van 1 basis patroon een oneindige hoeveelheid verschillende kostuums kan creëren. Alle kostuums uit het artikel zijn gemaakt op basis van het One Romper* patroon van Filles a Mamán (uit issue 13*) en ik maakte er een panda kostuum van.
My kids love hoods (although they hate the fact that they are not allowed to wear them up during school). A hood is a perfect element to show the details of a costume, so it was clear that my costume romper need a hood. I took the hood from the Marty hoodie from issue 11* which fitted perfectly without any adjustments. The hood is designed NOT to cross/ meet in the middle, so it will fit many neck lines. The hood is designed to have a smaller lining piece, but I turned the pieces around. I actually put the lining pieces on the outside. This way I had a seam to put the panda ears in. I cut the ears from scaled ear pieces from the baby shoe pattern from the same One Thimble issue* as the Marty hoodie.
Mijn kinderen zijn weg van kappen (alleen vinden ze het erg flauw dat hij op school niet op mag). Een kap is vaak een ideale plek om kostuumdetails aan te brengen, dus wist ik dat mijn versie van het kostuum zeker een kap moest krijgen. Ik gebruikte de kap van de Marty hoodie uit issue 11*. Deze kap paste perfect zonder dat ik iets hoefde aan te passen. De kap is namelijk zo gemaakt dat hij aan de voorkant niet raakt/overlapt, dus hij past op heel veel neklijnen. De kap is ontworpen met een kleinere voering (waardoor die niet komt piepen), maar ik draaide delen expres om. Nu had ik een naad op de buitenkant waar ik perfect de oren tussen kon steken. De oren zijn de pandaoren van de baby schoenen, ook uit issue 11*, maar dan een stuk vergroot.
Instead of cutting the front on the fold, I just cut two separate front halves because I wanted to add a zipper. I cut the regular neck band, but instead of closing it to a loop, I immediately sewed it to the neckline. Than I sewed the zipper on both fronts and top stitched the zipper. I kept the actual hacking to a minimum to make recreation easy. A real panda has black arms and legs, so I simply cut black sleeves and I color blocked the romper by cutting the pattern on the "shorts" line (and added seam allowance to both side of the cut). I omitted the anatomically correct black line on the back (the one connected the arms, and made full white back.
In plaats van de voorkant op de vouw te knippen, knipte ik twee losse delen. Ik wilde namelijk een rits. Ik knipte de standaard nekband, maar in plaats van het eerst rond dicht te naaien, naaide ik hem direct zo aan de halslijn. Vervolgens naaide ik de rits aan beide zijdes en stikte ik er een topstiksel op. Ik wilde het hacken tot een minimum beperken zodat het makkelijk na te maken zou zijn. De zwarte armen van de panda maakte dus door gewoon de mouwen zwart te knippen en de zwarte benen door het patroon door te knippen op de lijn voor korte pijpen (voeg wel naadwaarde toe aan beide kanten van die knip). Ik liet de anatomisch correcte zwarte streep op de rug daarom achterwege.
In nature a panda has a white tail, and I felt that is would add sitting discomfort more than that it would add "wow" to the suit, so I left it out. With hindsight, I should have gone with a black tail. Although it is not like nature designed it, it would have added to the idea of the costume (as it does in the pillow on the picture). In most cases your costume will not be lifelike, and that is not important. The main thing is that you and your kid have fun, so if your kid asks for a tail, although the actual animal does not have one, or you only have the wrong shade of fabric, just let it go. Enjoy the adventure with your kid, there is always next for an even better costume.
In de natuur heeft een panda een witte staart, maar ik vreesde dat die voornamelijk het zitcomfort in de weg zou zitten en niet echt zichtbaar zou zijn. Achteraf gezien had ik er gewoon een zwarte staart op moeten zetten. Het is niet zoals de natuur bedacht heeft, maar dat zou wel een leuk detail in het kostuum geweest zijn (net als bij het kussen op de foto). In de meeste gevallen zal het kostuum dat je maakt nooit levensecht zijn. Het belangrijkste is dat je kind en jij plezier hebben. Mocht je dus niet exact de juiste kleur hebben, of je kind wil een staart aan een dier dat eigenlijk geen staart heeft, doe het gewoon. Volgend jaar maak je gewoon een nog beter kostuum.
Before I sewed the panda, I used the pattern to make summer pj's for my son. I had the perfect fabric in my stash for a super cool version. I have been adding side seam pockets to everything lately, and I am starting to rethink the way I sew them in. The pockets often end up like my son is showing here, like little wings. My son totally does not care, but in the future I will sew the pocket opening smaller than the actual pocket, that should keep them in place better.
Voordat ik de panda naaide, naaide ik ook nog een zomer pyjama met het patroon. Deze superhonden van Joyfits waren daar duidelijk voor gemaakt! Tegenwoordig naai ik overal zijzakken in. Het nadeel is wel dat die er vaak als vleugels weer uitkomen, net als zoonlief demonstreert op deze foto. In het vervolg stik ik de zak nog wat extra dicht, dan blijven ze hopelijk beter zitten.
Feel free to leave a comment in the language you prefer (although Google
translate might have to assist me if you choose something different
than English, German, Dutch or Hungarian). If you buy anything through
my affiliate links (*), I get a small commission (the price stays the
same for you), I am very grateful for everything that feeds my fabric
addiction.
Ik vind het altijd super leuk om reacties te lezen om mijn creaties. In
deze post zitten enkele affiliate linken, aangeven met een *. Mocht je
het patroon aankopen doordat je in de shop kwam via een link van mij,
dan krijg ik een kleine commissie. Het patroon wordt niet duurder voor
jou, maar mijn stoffenkast is er wel heel blij mee.
For almost six weeks, I did not sew... We were on two holiday's got a new kitchen and assembled a new room for our middle daughter. Earlier this week I finally had time and space to sew again, but I just felt like watching tv. I had totally lost my sewing groove. I know that sewing is actually my way to relax, but because I was out of it for long, I needed a kick start. This project was just what I needed. An assignment with a deadline, a new pattern, a hack, and beautiful fabric.
Tijdens de afgelopen zes weken naaide ik niet. We waren op twee vakantie, kregen een nieuwe keuken en zette een nieuwe kinderkamer in elkaar. Begin deze week was er eindelijk tijd en ruimte om te naaien, maar geen zin. In plaats daarvan keek ik alleen tv. Naaien is mijn manier om tot rust te komen, maar omdat ik zolang niet naaide was ik het helemaal ontwent. Ik had duidelijk een fijn project nodig om het geheel weer aan te zwengelen. Een deadline, een nieuwe patroon, een hack en kwaliteitsstof waren dus precies wat ik nodig had.
Project Run and Play is having a mini season with previous winners and ofcourse they have a themed link up. The theme this time is "Inspired by Art Gallery". I love Art Gallery designs and I love that they have wide knit fabrics. I bought the fabric for this dress a year ago together with this other Art Gallery fabric. I bought it with selfish sewing in mind, but as usual I changed my plans.
Project Run and Play heeft op dit moment een mini seizoen met met winnaars van vorige seizoenen en natuurlijk is er ook een link up met thema. Het thema is deze keer "geïnspireerd door Art Gallery". Ik ben grote fan van Art Gallery stoffen en van de gebruikelijke brede tricot stoffen. Ik kocht de stof van dezejurk een jaar geleden samen met deze andere Art Gallery tricot bij de Stoffenmadam. Ik kocht hem eigenlijk voor mezelf, maar ik kan me nu niet voorstellen dat hij mij beter gestaan zou hebben.
For me Art Gallery fabric equals quality fabric and timeless designs. This particular fabric has a very nice combination of on one hand simple lines and on the other complex color elements. The Pearlie dress* from the new Peach designs seemed a perfect match for the fabric. The pattern is an easy to sew but stylish dress and by hacking it into a long sleeved dress I created an extra element to play with the lines of the fabric.
Art Gallery stoffen staat bij mij gelijk aan kwaliteit en mooi lijnenspel. Deze stof is een prachtige combinatie van simpele strepen en complexere elementen. De Pearlie jurk* sloot voor mij mooi aan bij de stof. Een simpel te naaien jurk met mooie stijlvolle elementen erin. Ik voegde er lange mouwen aan toe om de lijnen uit de stof nog eens extra interessant uit te laten komen.
The dress has two fit options ( relaxed or tight fit). I made the tight fitting for my narrow chested nine year old, and the fit is perfect. Not having to blend is a very rare event. The pattern only comes with short sleeves, but this long sleeved hack is easily implemented. I did a long sleeved hack before on a dress for me, so I knew it would work.
Het patroon heeft twee maatvoeringen, een smalle en wijdere versie. Daar werd ik erg blij van, mijn slanke negen jarige kon zo in de smalle 9 jaar van het patroon. Dat een patroon bij haar leeftijd en breedte aansluit zonder maten te combineren gebeurd eigenlijk nooit. Ik naaide al eens eerder zulke mouwen aan een patroon met aangeknipte mouwen, dus ik wist dat het prima zou lukken.
The Pearlie dress is part of One Thimble 16*. Another lovely issue for which I actually contributed a teeny tiny piece by hacking a romper into a costume, but that is a blog post for another time. For now I am happy to get my sewing groove back.
Het Pearlie patroon is deel van One Thimble 16*. Ik droeg een piep piep kleine stukje bij aan dit nummer, ik naaide een kostuum variatie ter inspiratie. Daar zal ik zeker nog een blog post over schrijven, maar nu even niet. Nu even genieten van mijn terug gekeerde naaizin.
Feel free to leave a comment in the language you prefer (although Google
translate might have to assist me if you choose something different
than English, German, Dutch or Hungarian). If you buy anything through
my affiliate links (*), I get a small commission (the price stays the
same for you), I am very grateful for everything that feeds my fabric
addiction.
Ik vind het altijd super leuk om reacties te lezen om mijn creaties. In
deze post zitten enkele affiliate linken, aangeven met een *. Mocht je
het patroon aankopen doordat je in de shop kwam via een link van mij,
dan krijg ik een kleine commissie. Het patroon wordt niet duurder voor
jou, maar mijn stoffenkast is er wel heel blij mee.