Now that winter is really coming, the wardrobe of our two eldest kids clearly needed some new pieces. The younger two can simply use the stuff from the older two, but the girl and boy that have nobody above them and are growing in record speed needed some quick and versatile pieces. For our daughter I decided to make two very different garments with the Nivalis pattern. Although very different, both I hope will last more than a year.
Nu de winter echt is aangekomen, had de kast van onze twee oudste kinderen duidelijk wat nieuwe stukken nodig. De jongste twee kunnen gewoon de spullen van de oudere twee gebruiken, maar het meisje en de jongen die niemand boven zich hebben en in recordsnelheid groeien, hadden een aantal snelle en veelzijdige stukken nodig. Voor onze dochter heb ik besloten om twee heel verschillende kledingstukken te maken met het Nivalis-patroon. Hoewel zeer verschillend hoop ik dat beide meer dan een jaar meegaan.
Our eldest loves long dresses and because long dresses means more wearing time, I love them too. I therefore made her a calf length Nivalis, this is longer than the original dress idea, but this way she will be able to wear it the entire winter/ spring and with some whishfull thinking she might actually wear it next fall and winter too, but then with a more traditional dress length ofcourse.
Onze oudste houdt van lange jurken en omdat lange jurken een langere draagtijd betekenen, ben ik ook fan. Daarom heb ik van haar een kuitlengte Nivalis gemaakt, dit is langer dan het originele jurkidee, maar op deze manier kan ze het sowieso de hele winter / lente dragen en met een beetje geluk haalt die ook de volgende herfst en winter, maar dan ondertussen met een meer traditionele jurklengte natuurlijk.
The other thing that I made with the good old Nivalis pattern is an extremely cropped top. I used the upper color block piece, the sleeves and the hood of the Follis (but this totally works with the Nivalis own hood as well) to make the perfect winter accessory. This way she can wear her favorite summer dresses all year round. In the pictures she is wearing the Vallis, her favorite dress hands down, but this hood and sleeve combi fits on many more of her summer pieces.
Het andere project dat ik met het oude vertrouwde Nivalis patroon maakte een extreem korte top. Ik heb het bovenste color block, de mouwen en de capuchon van de Follis gebruikt (maar dit werkt ook volledig met de Nivalis-kap) om het perfecte winteraccessoire te maken. Op deze manier kan ze het hele jaar door haar favoriete zomerkleding dragen. Op de foto's draagt ze de Vallis, haar favoriete jurk, maar deze capuchon en mouw combi past op veel meer van haar zomerse stukken.
I made the Follis hood because I love how it sits on the back, but it might be a bit on the heavy side for this specific project, so next time I will simply use the Nivalis hood. I raised the neckline a bit such that the Follis hood would fit, I will probably do that as well next time, because I do not want a summer dress itself to be visible at the neckline.
Ik heb de Follis-capuchon gebruikt omdat ik dol ben op hoe die op de achterkant valt, maar het is misschien een beetje aan de zware kant voor dit specifieke project, dus de volgende keer zal ik gewoon de Nivalis-kap gebruiken. Ik verhoogde de halslijn een beetje zodat de Follis-capuchon zou passen, dat zal ik waarschijnlijk ook de volgende keer doen, omdat ik niet wil dat een zomerjurk zelf zichtbaar is bij de halslijn.
In the week that I sewed this dress on request, I also sewed a coat on request. I hacked the Cicero jacket, a Sofilantjes' pattern for knit fabrics into a true fall/winter coat from Soft Shell. In this blog post I will give you some tips and tricks in case you want to go on a similar endeavour.
In de week dat ik deze jurk naaide, naaide ik ook een jas op aanvraag. Ik hackte de Cicero, een Sofilantjes patroon voor rekbaer stoffen, in een echte herfst / winterjas van Soft Shell. In deze blogpost zal ik je wat tips en tricks geven voor het geval je een soortgelijk project wilt doen.
The Cicero is intended as a jacket to be worn over a thinner long sleeve, not as an outside layer over a thick sweater. I therefore measured the chest of our daughter while she was wearing a sweater, this way I automatically took into account the fact that her chest would be wider. I decided to size up one size above the measured size with sweater because Soft Shell does not stretch. In our case that meant that I sized up two sizes in total. I only sized up width wise. I did make her regular length, because she would not become taller by wearing a sweater. I also decided to use the neckline of the size that she usually wears, which also meant that I could use the hood of her regular size.
De Cicero is bedoeld als een vest die dus over een relatief dun shirt wordt gedragen, niet als een extra buitenlaag over een dikke trui. Ik meette daarom de borst van onze dochter voor de maatbepaling terwijl ze een trui droeg. Op deze manier hield ik automatisch rekening met het feit dat haar borst breder zou zijn. Ik besloot om een maat groter te maken dan de gemeten maat met trui omdat Soft Shell niet uitrekt. In ons geval betekende dat dat ik in totaal twee maten groter maakte. Ik heb alleen in de breedte vergoot. Ik maakte wel haar reguliere lengte aat, omdat ze niet groter zou worden door een trui te dragen. Ik besloot ook om de halslijn van haar reguliere maat te gebruiken, wat ook betekende dat ik de capuchon van haar normale maat kon gebruiken.
Sizing up a jacket is of course not the same as using a coat pattern. I expected that especially the sleeves might cause some problems. It is important that a coat gives you enough freedom of movement, so I decided to widen the sleeves. The Cicero sleeves are cut on the fold and I widened half of the sleeve by making a vertical cut (at about the middle of the pattern piece) and spreading the sleeve pieces such that the extra line that you have to drew at the top was one centimeter long. If you remember your geometry that means that you actually put slightly less than one centimeter between your sleeve pieces. To make sure the bigger sleeve would fit I drew the arm whole one centimeter lower. Setting in a non stretching sleeve is harder than setting a stretching sleeve. You need to pin and go slow to avoid puckers. The sleeves on our coat are wide enough for sure, a slightly narrower sleeve would also have worked, but I do not feel that they seem too wide.
Het twee maten groter tekenen van een vest is natuurlijk niet hetzelfde als een echt jaspatroon gebruiken. Ik verwachtte dat vooral de mouwen problemen zouden kunnen veroorzaken. Het is belangrijk dat een jas voldoende bewegingsvrijheid biedt, dus besloot ik de mouwen te verbreden. De Cicero mouw wordt op de vouw geknipt en ik verbreedde de helft van de mouw door een verticale snede te maken (ongeveer in het midden van het patroondeel) en de mouwdelen zodanig te spreiden dat de extra lijn die ik aan de bovenkant moest tekenen, één centimeter lang was. Als je je Pythagoras herinnert, betekent dat dat je eigenlijk iets minder dan een centimeter tussen je mouwstukken deed. Om ervoor te zorgen dat de grotere mouw zou passen, tekende ik het armsgat ook een centimeter lager. het inzetten van een niet-rekkende mouw is moeilijker dan het plaatsen van een rekkende mouw. Je moet spelden en langzaam gaan om te voorkomen dat je rimpels krijgt. De mouwen op onze jas zijn nu zeker breed genoeg, een iets smallere mouw zou ook gewerkt hebben, maar ik heb niet het idee dat ze te wijd zijn.
I lined the jacket, so I cut all my outer pieces both in Soft Shell and in my lining fabric. Except for the pockets (those I only cut in lining pieces) and also all pieces out of ribbing were cut only as often has the regular pattern prescribes. I lined the coat with jersey. Sewing jersey to a non stretching fabric is not the easiest thing, but again, if you pin and make sure that you are pushing the jersey a bit faster than you woven, it is totally doable. If you have not done it before, I do recommend choosing a non stretching lining. I lined the sleeves with a silky lining fabric such that she easily slides into her coat.
Ik voerde de jas, dus sneed ik al mijn buitenste stukken in zowel Soft Shell als in mijn voeringstof. Behalve de zakken (die ik alleen in voeringstof sneed) en ook alle stukken uit boordstof knipte ik alleen zovaak als het standaard Cicero patroon voorschrijft. Ik heb de jas gevoerd met jersey. Het naaien van jersey aan een niet-rekbare stof is niet het gemakkelijkste werk, maar nogmaals, met spelden/clipje en voorzichtig naaien is het wel te doen. Als je dit nog niet eerder hebt gedaan, raad ik aan een niet-uitrekbare voering te kiezen. Ik voerde de mouwen met een gladde voeringstof zodat ze gemakkelijk in haar jas glijd.
I wanted both a hood and a collar, Anne had shown us that it can be done. I had made a different type of hack before because I feared a lot of bulky seams, but this turned out to not be an issues. If you sew a collar and a hood, this trick is to change the construction a bit. First finish the hood (without needing a turning whole) expect for the bottom of the hood. Then you place the outside coat (the one that I sewed in Soft shell) on the table in front of you with the outside of the coat up. Then you place the hood with the outside of the hood facing the outside of the coat. You align the necklines. Because Soft Shell does not stretch, your hood will be slightly shorter than the neckline. This is not a problem, just center it nicely, with a bit of open space on the side where the zipper will come. Now place the collar on top of the neckline, on top of the hood. The wrong side of your ribbing should be face up, meaning that the right side of your ribbing is facing the lining of the hood. Keep the collar open, do not fold it. Now sew all three items together, outside coat, hood (already completed with lining) and collar (unfolded). I then sewed the lining coat to the other side of the collar, the one that remained unsewn in the previous step. Now you can also sew the bottom waist band first to the outside of the coat and then to the lining. Make sure that you always put the pieces that you are sewing together such that the good sides of the fabric are facing each other and that nothing is twisted.
Ik wilde zowel een capuchon als een kraag, Anne zelf had me eens laten zien dat het kan. Ik had eerder een ander type hack gemaakt omdat ik dikke naden vreesde, maar dit bleek geen probleem te zijn. Als je een kraag en een capuchon naait, moet je de constructie volgorde een beetje veranderen. Maak eerst de kap af (keergat is niet nodig) alleen de onderkant van de kap is dan nog open. Vervolgens plaats je de buitenste laag (degene die ik in Soft shell heb genaaid) op de tafel voor je met de buitenkant van de jas omhoog. Plaats vervolgens de kap met de buitenkant van de kap naar de buitenkant van de jas gericht. Leg de halslijnen netjes aan elkaar. Omdat Soft Shell niet rekt, is je capuchon iets korter dan de halslijn. Dit is geen probleem, centreer het mooi, met een beetje open ruimte aan de kant waar de rits zal komen. Plaats nu de kraag bovenop de hals, en daarme ook bovenop de kap. De verkeerde kant van je boordstof moet naar boven gericht zijn, wat betekent dat de goede kant van je boordstof naar de voering van de kap wijst. Houd de kraag open, vouw hem niet. Naai nu alle drie de items samen, de buitenjas, capuchon (al voltooid met voering) en kraag (ongevouwen). Daarna naaide ik de voeringjas aan de andere kant van de kraag, de kraag die in de vorige stap niet was genaaid. Daarna kan je de tailleband eerst aan de buitenkant van de jas en vervolgens aan de voering naaien. Zorg ervoor dat je de stukken die u aan elkaar naait altijd zo plaatst dat de goede kanten van de stof naar elkaar toe zijn gekeerd en dat er niets is gedraaid.
The most complicated step of sewing a fully lines garment is sewing the sleeves. There are several tutorials out there on the web that can explain how to strangely interlock the sleeves together to create the end result that you want. If you pin it correctly the garment will end up looking like strange octopus. I always forget how to do that exactly, so I use a different method. I just put the sleeves in each other the way that they have to end up and pin the layers how they should be sewn. I pin only a small piece, just 2 centimeter (you will not be able to pin the the entire top anyway from the right side). Then I put my hand through a turning hole somewhere in a side seam and grab those 2 centimeter that I pinned in place. I then pull the top of the sleeve through the turning hole and once that it is through that hole you can relatively easy pin the rest. I use the same, pull through the turning hole trick when I have to sew in zipper in a lined garment. It goes beyond the scope of this blog post to create pictures on how to sew the lining pieces, so I hope my simple trick will totally make you just see the light.
De meest gecompliceerde stap van het naaien van een volledig gevoerd kledingstuk is het naaien van de mouwen. Er zijn verschillende tutorials op het internet die kunnen uitleggen hoe je de mouwen op een vreemde manier met elkaar kunt verbinden om het eindresultaat te creëren dat je wilt. Als je het goed spelt, ziet het kledingstuk er uit als een vreemde octopus. Ik vergeet altijd hoe ik dat precies moet doen, dus ik gebruik een andere methode. Ik steek gewoon de mouwen in elkaar zoals ze moeten eindigen en spelt de lagen vast hoe ze moeten worden genaaid. Ik maak slechts een klein stukje vast, slechts 2 centimeter (je kunt de hele top toch niet vanaf de goede kant vastspelden). Daarna steek ik mijn hand door een keergat ergens in een zijnaad en pak die 2 centimeter die ik op zijn plaats heb gepeld. Ik trek dan de bovenkant van de mouw door het keergat en zodra het door dat gat is, kun je de rest relatief eenvoudig vastspelden. Ik gebruik hetzelfde, trek-door-keergat de truc als ik de rits in een gevoerd kledingstuk moet naaien. Foto's of illustraties van die stappen maken vraagt te veel voor een blogpost, dus ik hoop dat mijn eenvoudige truc jou net zo helpt als mij.
The Hibernis is one of my most favorite shirt patterns and for more than a year I had been planning to lengthen it into a dress. Last week, I finally did it, and I am totally in love with the result. The fabric that I used for the dress had been on my "fell out of love with this fabric but I have to use it" pile, and as usual I again totally see why I had to buy it in the first place.
De Hibernis is een van mijn meest favoriete shirtpatronen en al meer dan een jaar ben ik van plan om hem tot een jurk te verlengen. Vorige week deed ik het dan eindelijk en ik ben helemaal verliefd op het resultaat. De stof die ik gebruikte voor de jurk was op mijn "de liefde is over, maar ik moet het gebruiken" stapel, en zoals gewoonlijk zie ik weer helemaal waarom ik de stof in de eerste plaats wilde kopen.
There are several ways to hack the Hibernis into a dress but I chose to simply lengthen all the pattern pieces. This way the pocket is very long, but I knew my daughter would not mind. She usually only uses pockets to stash her hands and they will not get lost in deep pockets. I determined the length that I needed by subtracting the Hibernis length from the Vivax length and lengthen the pieces with the difference in length between the two patterns.
Er zijn verschillende manieren om de Hibernis in een jurk te hacken, en ik koos ervoor om gewoon alle patroondelen te verlengen. Op deze manier is de zak erg lang, maar ik wist dat mijn dochter het niet erg zou vinden. Ze gebruikt de zakken alleen om haar handen in te steken en haar handen zullen zeker niet verdwalen in diepe zakken. Ik bepaalde de lengte die ik nodig had door de Hibernis-lengte van de Vivax-lengte af te trekken en de stukken te verlengen met het verschil in lengte tussen de twee patronen.
Our kids always loved to wear hoods, and now that it becomes colder weather they are rediscovering this love. Someone in the Sofilantjes group asked last week for a Hibernis with hood hack and I assumed that the Nivalis hood would totally work. I was right, the Nivalis hood works perfectly on the Hibernis.
Onze kinderen droegen altijd graag capuchons, en nu het kouder weer wordt, herontdekken ze deze liefde. Iemand in de Sofilantjes-groep vroeg vorige week om een Hibernis met kap-hack en ik ging ervan uit dat de Nivalis-kap prima zou moeten werken. Ik had gelijk, de Nivalis kap kan perfect op de Hibernis worden gezet.
I bought the cat fabric two years ago, when I I was in awe of digitally printed animal fabrics. But somehow I fell even quicker out of love with those fabrics than usual. That is alos why I am buying more uni colored fabrics now and just print my own print on them. With this dress I did manage to use the kitten fabric to its fullest. I had to make an extra seam in the sleeve and hood and add a band, but it is almost invisible due to the busy print, even though there was no attempt at print matching at all. I still have a horse fabric on the pile, that one will probably be next for a Sofilantjes hack.
Ik kocht de katten stofl twee jaar geleden, toen ik enkele weken helemaal weg was van digitaal bedrukte dieren print stoffen. Maar op de een of andere manier was de liefde voor de stoffen nog sneller over dan normaal en bleven de meeste in de voorraad liggen. Dat is ook waarom ik nu meer effen stoffen koop en gewoon mijn eigen print erop druk. Met deze jurk heb ik de poezenstof optimaal weten te gebruiken. Ik moest een extra naad in de mouw en capuchon maken en een band toevoegen aan de voorkant van de capuchon. De extra naden zijn bijna onzichtbaar vanwege de drukke druk, hoewel ik echt totaal geen poging deed om te stof aan te laten sluiten qua print. Ik heb nog steeds een paardenstof op de stapel liggen, die zal waarschijnlijk de volgende aan de beurt is voor een Sofilantjes-hack.
A few days ago the Freekin' sewing challenge blog tour started. This means four weeks filled with inspiration on how to use the FREE patterns from Misusu. I have sewed a paid few patterns by Misusu, the Dia, the Louise and the Origami sweater, but I did not sew one of the free ones yet. To make up for this "bad" behavior I sewed up five garments while using three free patterns and one of them got hacked.
Een paar dagen geleden begon de Freekin' sewing challenge blogtour. Dit betekent vier weken vol inspiratie omtrend het gebruik van de GRATIS patronen van Misusu. Ik heb een paar betaalde patronen genaaid van Misusu, de Dia, de Louise en de Origami-trui, maar ik heb nog geen van de gratis patronen genaaid. Om dit "slechte" gedrag goed te maken, naaide ik vijf kledingstukken terwijl ik drie gratis patronen gebruikte en een van hen werd gehackt.
The most straight forward forward and quickest sew that I did was the just released bigger Rowan shirt. This is an oversized unisex shirt which you can download from the Misusu Sew and Tell group. I made one for our eldest and it is clearly a very relaxed fit, but that is fine with the extremely warm weather that we are experiencing now. To make the shirt into an outfit I combined it with a culottes.
Het meest rechttoe rechtaan stuk dat ik naaide was het net gelanceerde grotere Rowan shirt. Dit is een oversized unisex-shirt dat je kan downloaden in de Misusu Sew and Tell group. Ik heb er een gemaakt voor onze oudste en het heeft duidelijk een heel relaxte pasvorm, maar dat is prima met het extreem warme weer dat we nu hebben. Om het shirt tot een outfit te maken, combineerde ik het met cullotes.
The culottes are not a pre-drawn pattern, you make it based on your own measurements. I have to admit that it scared me a bit. I had been planning to sew one when I sewed this Dia, but I chickened out. I somehow seem to have that more often with Misusu patterns, but after sewing them my fear turns out to have no ground. It really was not complicated to draw the culottes and like this I could make exactly the length and size that I wanted. I sewed the culottes with a linen type of fabric that I took from the free for all pile on our latest sewing weekend. The linen is a bit stiff which gives the culottes a lot of volume. I of course added pockets.
De culottes zijn geen vooraf getekend patroon, je maakt het op basis van je eigen metingen. Ik moet toegeven dat het me een beetje angst aanjaagde. Ik was van plan om er een te naaien toen ik deze Dia naaide, maar ik zag er toen toch vanaf. Zulk koudwatervrees lijk ik op de een of andere manier vaker met Misusu-patronen te hebben, maar na het naaien blijkt mijn angst volledig overbodig. Het was ook echt niet ingewikkeld om de cullotes te tekenen en zo kon ik precies de lengte en de maat maken die ik wilde. Ik naaide de culottes met een linnen soort stof dat ik uit het gratis voor alle stapel nam tijdens ons laatste naai weekend. Het linnen is een beetje stijf waardoor de culottes veel volume krijgen. Natuurlijk voegde ik een setje zakken toe.
After sewing a standard culottes I hacked the pattern to support a full circle "skirt" in jersey. This was actually a super easy hack. The main thing that you change is the distance between 1 and 2 (as mentioned in the instructions). You use 1/4 of the measured waist instead of what the instructions tell you to use. You also use this adjusted distance between 1 and 2 for the waistband. Now, follow all the other steps until you reach the "modify the shape" step. Instead of cutting five strips, you cut strips of one centimeter wide (it does not have to be perfect, just make it rather narrow), and yes those might end up to be many strips, do not loose them. Now rearrange the strips such that the first strip is turned in a 90 degree angle from the base of the skirt and that the strips meet at the top (and still form a line which is 1/4 of the waist). The distribution does not have to be perfect, that is just to give you a sense of the curve. The waist length is important though. Draw the new skirt and continue with the rest of the tutorial.
Na het naaien van een standaard culottes heb ik het patroon gehackt tot een volledige cirkel "rok" in tricot. Dit was eigenlijk een super gemakkelijke hack. Het belangrijkste dat je verandert, is de afstand tussen 1 en 2 (zoals vermeld in de instructies). Je gebruikt 1/4 van de gemeten taille in plaats van wat de instructies vermeld. Je gebruikt deze aangepaste afstand tussen 1 en 2 ook voor de tailleband. Volg nu alle andere stappen totdat je de stap " modify the shape" hebt bereikt. In plaats van vijf stroken te knippen, knip je stroken van één centimeter breed (het hoeft niet precies te zijn, maar maak wel smalle strokenl), en ja, het kunnen uiteindelijk veel stroken worden. Herschik nu de stroken zo dat de eerste strook in een hoek van 90 graden ten opzichte van de basis van de rok wordt gedraaid en dat de stroken elkaar aan de bovenkant raken (en nog steeds een lijn vormen die 1/4 van de taille is). De distributie hoeft niet perfect te zijn, dat is gewoon om een idee van de curve te geven. De lengte van de taille is echter wel belangrijk. Teken de nieuwe rok en ga verder met de rest van de tutorial.
With this hack I made the orange skirt for our youngest. I made a short sleeved Max to finish that outfit. I also made the Max because I wanted to check if our youngest could step through the neckline into the shirt, and she could! I decided to just add one button instead of three. This does mean that sometimes the neckline opens a bit, but it does not bother me.
Met deze hack heb ik de oranje rok voor onze jongste gemaakt. Ik heb een Max met korte mouwen gemaakt om die outfit af te maken. Ik maakte ook de Max omdat ik wilde controleren of onze jongste door de hals het shirt in kon stappen en dat kon ze! Ik besloot om gewoon één knop toe te voegen in plaats van drie. Dit betekent wel dat de hals soms een beetje openstaat, maar het stoort me niet.
The last garment that I made is a jumpsuit of a circle culottes and the Max, which is why I wanted to know if our little one could fit through the neckline. I cut off the Max pattern piece at the waist (just measure it on your child, the pattern itself does not have a visible waist). In my case the Max bottom width and the waist of the circle skirt were almost identical, and I did not have to make any adjustments to sew them together. If you would like to make something similar but would end up with a big difference between the Max and the culottes waist (because your daughter is for example much bigger and actually has a waist), than you can draw the Max a bit narrower towards the waist such that it will fit the top of the culottes.
Het laatste kledingstuk dat ik maakte is een jumpsuit van een cirkel culottes en de Max, daarom wilde ik dus weten of onze kleine door de hals zou kunnen passen. Ik heb het Max-patroon rond de taille afgeknipt (meet de afstand tot de taille op je kind, het patroon zelf heeft geen zichtbare taille). In mijn geval waren de Max bodembreedte en de taille van de cirkelrok bijna identiek en hoefde ik geen aanpassingen te maken om ze aan elkaar te naaien. Als je iets soortgelijks wilt maken maar een groot verschil hebt tussen de Max en de culottes taille (omdat je dochter bijvoorbeeld veel groter is en daadwerkelijk een taille heeft), dan kun je de Max iets smaller naar de taille tekenen zodat die op de bovenkant van de culottes past.
If after reading my post, and browsing all the free Misusu patterns you feel inspired, than you are probably happy to hear that there is also a challenge for you. If you sew up a free Misusu patterns and share it on Instagram or Facebook (the Misusu Sew & Tell facebook group totally counts) before August the 18 with the hashtag #misususewingchallenge you might win one of the three very cool prices. Visit the announcement blog post to read all the details about the competition. For the duration of the total challenge, you also get 15% off your total purchase with the code MISUSU15. If you want to win a Misusu pattern to complete your look, than visit my Instagram post!
Als je na het lezen van mijn bericht en het bekijken van alle gratis Misusu-patronen je geïnspireerd voelt, dan ben je waarschijnlijk blij om te horen dat er ook een wedstrijd aan de blogtour verbonden is. Als je een gratis Misusu-patroon naait en deze deelt op Instagram of Facebook (de Misusu Sew & Tell facebook-groep telt ook) vóór augustus 18 met de hashtag #misususewingchallenge, maak je kans op een van drie gave prijzen. Ga naar de Misusu blogpost om alle details over de competitie te lezen. Tot 18 augustus krijg je 15% korting op je totale aankoop met de code MISUSU15. Als je een Misusu-patroon wilt winnen om je look voor de wedstrijd compleet te maken, bezoek dan mijn Instagram.
You know I love to hack patterns, so when Jessica from Flossystyle asked
who wanted to write a hack post for the new Zoo Collection, I kind of
waved my arm off. Today, I will show you how to adjust the front of the
Stork to have an exposed bounded zipper closure instead of a snap one.
This method will work for both the Monkey and Koala bottom. The tutorial
is also suitable for other types of patterns in which you would like to
put a decorative front zipper.
You might have seen these
decorative zippers. They are beautiful, but a bit expensive as well. To
mimic the effect you can bind an inexpensive zipper's sides and just sew
the whole thing on the garment, like you would do with the official
decorative zipper. I am sure someone else had the same idea already, but
I have not seen it yet, so I thought you might like a tutorial on it.
The
Zoo Collection pattern has two cutting lines. One cutting line for using the placket
and one for the Turtle option (full front - when you cut the pattern
piece on the fold). For this tutorial you need the fold cutting line. Cut one
half front on the fold cutting line (do not actually fold the fabric)
and cut the other (mirror image) with 1.5 cm extra width (just place it 1.5 cm
from the side of your fabric). This extra piece will become your zipper
guard. Mark the middle line on the wider front with an aqua trick
marker (or other washable marker). Use your serger or sewing machine to
finish the inner sides.
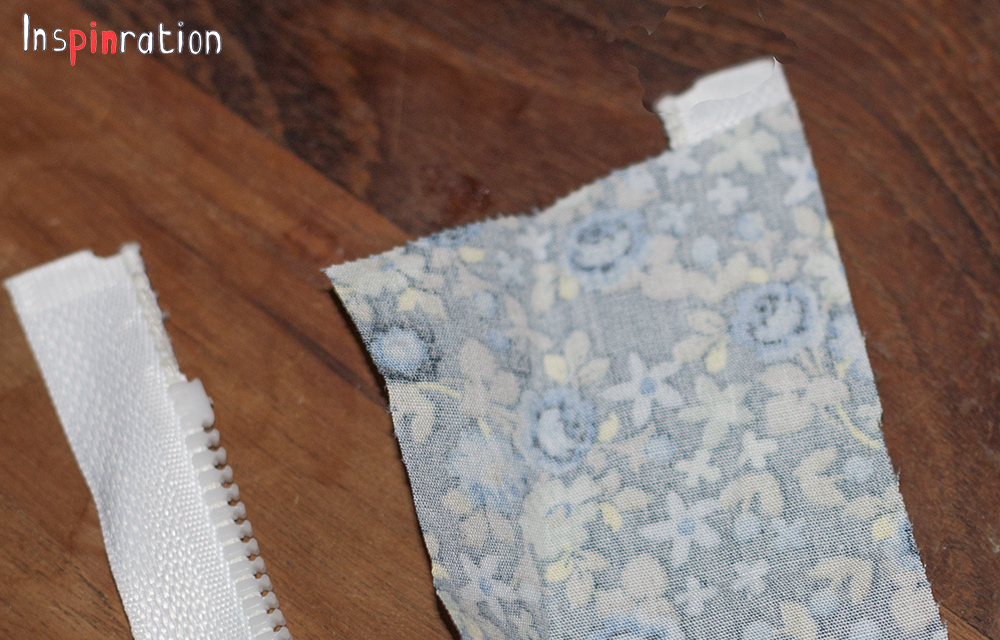
Cut two strips of 2.5 cm wide times the
length of the garment plus 2 cm (these will be the pieces that will be on
the side of your zipper and you will have to fold it over the top of the zipper). These
strips will not have to stretch so you do not have to cut on the bias.
Sew the shoulders such that both fronts are connected to the back. Note that this will be an unlined garment. So you also have to cut a
piece of bias to bind the neckline. Also cut two strips of bias to bind the
armholes (these pieces will bind a curve so they have to be cut on the
bias). For how to finish neckline and armholes use the pattern's
explanation on how to finish the legs. Just measure the length of the
neckline after finishing the shoulders to determine the necessary length
of the bias, do the same for the armholes. Finish the neckline and
armholes.
Take the zipper, turn one of the strips bad side up
and align the right side of the fabric with the right side of the right
zipper half. Use your zipper foot to sew as close to the teeth as
possible. Now fold the fabric back, over the side of the zipper and you
will see the side of the zipper is covered.
Fold over the top
of the fabric such that the top of the zipper is also nicely wrapped.
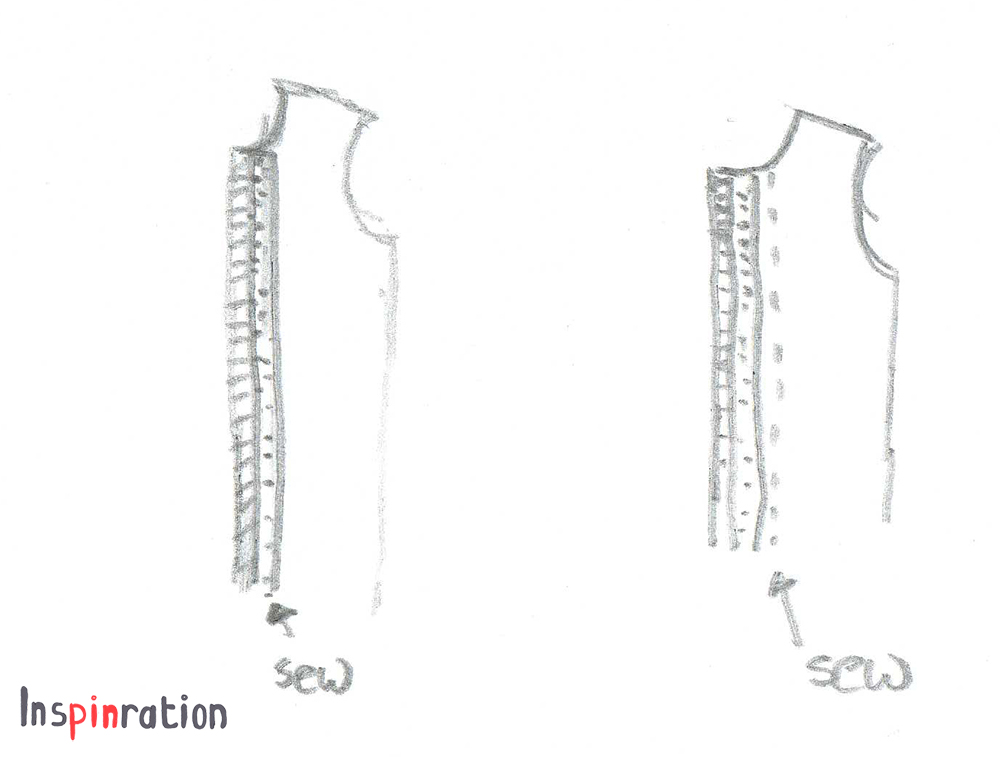
Place the zipper on the piece that was cut to the fold cutting line, such that
the teeth are lined up with the side of the fabric. The teeth should hang slightly over the fabric's edge (about one millimeter). The zipper halves will become one. The exact middle of the zipper, while closed, should align with the front line. For this step it is important that the the strip on the
zipper does not obscure your view of the front line. If the piece is a
bit too wide, just cut is back slightly. Now sew close to the right side
of the edge of your bounded zipper (but still on it). Now finish the
zipper strip with a narrow zigzag (you could do this beforehand, but
because everybody will use slightly different zipper width, in this
order you will not have to cut off the finished side if the strip turns
out too wide). Fold both the main fabric and the zipper strip back
towards the outer side. Stitch both the folded side of the main fabric and the zipper strip to the main fabric, just off the zipper edge.
Now sew the other fabric strip on the
other zipper side, in mirror image of what you just did. So, align the left side of
the fabric with the left side of the zipper. Fold under the strip, both under the side and under the top. Now place the zipper teeth on the line you
made with the aqua trick marker (or any other washable marker). Stitch
again close to the edge of the zipper, but still on the zipper. Now, cut
back the zipper strip seam allowance to 3 millimeter. The next stitch
line is close to the zipper teeth (for the other side you sewed on the
main fabric to fixate). The stitching of the two sides is not
symmetrical, but if you use matching thread it does not show.
Now just finish the garment as usual.
For
this tutorial I made an unlined garment, you can of course also make a
zipper front with a lined garment. In that case you sandwich the zipper
between main and lining (like you usually do with the placket option).
You will have to subtract half the width of the zipper from the fabric
pieces in that case.
If you want the zipper guard to be a double layer, you could make the left front 3.5 cm wider instead of 1.5 cm wider. Then, fold it
backwards just before the last stitch line, this will secure it under
the zipper. If you do not need a zipper guard, you could cut two pieces
the width of the fold line. In that case finish the left side of the
garment the same as right (so finish the rest piece of your binding, to
avoid fraying).
The fabrics are both from Eline Pellinkhof. I used some home made bias I had laying around from earlier projects and as you can see, I just did not have enough for both legs, this is not visible usually though.
I love to hear what you think of my creations. Feel free
to leave a comment in the language you prefer (although Google
translate might have to assist me if you choose something different than
English, German, Dutch or Hungarian).