First things first, happy new year! I hope that all the good things from last year will continue and that the bad ones will quickly only be memories. I usually do not make resolutions, but this year I have at least one. My life became very busy the last months and especially in December, I simply did not have time to blog. For this year, I will continue taking up less sewing deadlines (tests and tours) such that I have more time to freestyle. My blogging and sewing relaxes me, and I will go back to regular weekly blogging. I have several backlogged projects and today I am starting with a special one. Today, I am showing you my first clothing piece within years created from yarn, the Dadirri cardigan* from Compagnie M.
Allereerst, de beste wensen voor het nieuwe jaar! Ik hoop dat de fijne dingen van 2017 blijven voortduren en dat de nare zaken snel alleen een herinnering zullen zijn. Ik maak meestal geen voornemens, maar dit jaar dan toch wel minimaal één. Het was druk de afgelopen maanden en zeker in december dus zakte mijn blog ritme in. Voor komend jaar ga ik daarom verder met het zeer kritisch selecteren van naaideadlines zoals testen en tours. Ik ga voor een constante stroom van (wekelijkse) blogberichten, omdat ik daardoor ontspan. Vandaag begin ik meteen goed met een project van een paar weken terug. Het is een bijzondere, want het is het eerst gebreide kleding project sinds jaren, het Dadirri* vest van Compagnie M.
When I started this blog, sewing was not my main hobby. I had sewn a few things, but I mostly crafted with yarn. Knitting and crochet were the two things that kept me busy. Since I discovered sewing with knits (already four and a half year ago), those yarn related crafts just seemed to take so much time. But there is a huge advantage of yarn crafts, you can do them wherever you are. You can take them with you or just do them in front of the tv. Sometimes I feel like "doing nothing"in the evening and just want to watch tv, and then crocheting or knitting is perfect. Therefore, I usually have a yarn project laying around (which often do not reach the blog when finished). Through the years I have made a few blankets and toys, but not clothing.
Toen ik de blog startte naaide ik niet tot weinig. Ik haakte vooral en daarvoor breidde ik. Toen ik echter het naaien met tricot ontdekte gingen alle remmen los en leken haak en brei projecten zo vreselijk veel tijd in beslag te nemen. Hoewel dat soort projecten inderdaad qua uren langer duren, zijn ze wel heel makkelijk mee te nemen. Ook kunnen ze prima voor de tv, dus heb ik altijd wel zo'n projectje liggen. Ik creëerde door de jaren speelgoed en dekens, maar niet zozeer kleding.
I have often sewed with Compagnie M* patterns, I love the unique twist that Marte has in all her patterns. When I heard that she was going into knitting patterns, I was intrigued. The thing that make the Compganie M knitting patterns stand out, is that you are free to choose your own yarn and needles. For every pattern there is a special calculator that creates a pattern based on your personal gauge. You make a test square per stitch type and than you sit back and just follow schedule especially created for you.
Ik naaide al regelmatig met Compagnie M* patronen. Ik vind de unieke "Marte" details die al haar patronen hebben echt super leuk. Toen ik van haar hoorde dat ze brei patronen ging maken was ik meteen nieuwsgierig. Zeker gezien het feit dat ze van plan was om haar patronen zo in te steken, dat het gepersonaliseerd is op jouw wol en spanning. Het patroon is voorzien van een speciale rekentool die op basis van jouw proeflapjes berekend hoeveel steken je nodig hebt. Het patroon schrijft dus geen wol voor, je kan helemaal zelf kiezen.
The Dadirri *cardigan front is knitted in a coin stitch, and has regular knitted sleeves and back. The yarn that I used is recommended for needle size 4-5 (I knit rather loose, so I knitted it on 3.5). You can make the front dots very obvious by using a contrasting color, but I went for a rather subtle gray. On my version, the shoulders became a bit too wide. In the test pattern (the one I used) the shoulders were wider than in the final and I had even widened the front a bit because I knew my daughter would wear it over long sleeves. I am not bothered my the slightly wide shoulders, but in case you were, than it is important to know that this should not happen in your version.
De voorkant van de Dadirri sweater* is in de "coin"steek en de mouwen en achterkant in tricot steek. Ik gebruikte wol voor pennen 4-5, maar aangezien ik los brei, gebruikte ik pennen 3.5. Ik ging voor vrij subtiele stippen door grijs als contrast kleur te gebruiken. In mijn versie zijn de schouders iets te breed. In de testversie (die ik maakte) waren de schouders nog wat breder dan in het finale versie en daarnaast maakte ik het gehele voorkant iets breder omdat ze haar vest over kleding met mouwen gaat dragen. Ik heb totaal geen last van de bredere schouders, maar mocht het jou opgevallen zijn, wees dan gerust in jouw toekomstige versie zal dat niet zo zijn.
I am a craft material horder and besides a big fabric pile, I also own quite some yarn. I am a big fan of cotton, and I bought this lovely blue yarn with the plan to once knit a cardigan. In blog and Instagram land I often envious look at all the perfectly matching knitted projects, so I always have plans. I also have the yarn in red, in that color I even once started a cardigan, but after knitting the back and a sleeve the project stagnated for a year, and I pulled it all out. I turned the pulled out yarn into this squirrel.
Ik heb een grote verzameling van allerlei knutsel materialen, naast stof heb ik ook behoorlijk wat wol. Deze blauwe en grijze wol kwamen gewoon uit mijn voorraad. Ik kocht het ooit jaren geleden omdat ik net als al die mooie Instagramen en blogger plaatjes ook zelf gemaakte vestjes wilde. Het bleef echter voornamelijk bij plannen. Ik begon ooit aan een rode versie, maar nadat die een jaar lag, haalde ik alles uit en haakte van wat ik uithaalde deze eekhoorn.
The biggest challenge with knitted cardigans is probably finding the perfect button. I almost never use buttons on my sewing projects am very loving the kam snap option and so do my kids. I have a very small collection of buttons and almost all buttons are tiny. I therefore decided to try making my own buttons from Fimo clay (which I also just happen to have in my craft collection). I had no clue how much clay I would need, so in the end I ended up with about 20 buttons...
De grootste uitdaging van breien is mogelijk het vinden van de juiste knopen. Hoewel ik knopen op voorraad heb zijn het voornamelijk hele kleintjes. Ik ga normaal gezien voor kamsnaps in mijn naaiwerk. Dat was nu geen optie, dus gebruikte ik iets anders uit mijn voorraad, ik kleide de perfecte knoop met Fimo klei. Volgens internet kan je ze prima wassen. Ik had geen idee hoeveel klei ik nodig had voor vijf knopen, en ik eindigde uiteindelijk met 20 knopen te veel....
For the shoot I decided to sew a dress and I hacked the Nore for kids* into to be like option B in the Nore for women. I only had half a meter from the blue tree fabric, because I bought it so long ago (I started out with buying half a meter pieces, but now I buy at least a meter). My eldest really liked the fabric, so I squeezed a dress out of it. I had to make an extra seam in the skirt. I even had to put the trees diagonal there (due to not having enough fabric), but I still feel it either looks intentional or does not show.
Voor de fotoshoot naaide ik ook nog een Compganie M jurk. Ik hackte Nore voor kinderen* geïnspireerd door optie B van de Nore voor vrouwen. Van de bomenstof had ik maar een halve meter. Ik kocht het al zo lang geleden (vroeger kocht ik halve meters, nu minimaal een meter). Ik had eigenlijk geen plannen meer voor het lapje, maar toen liet mijn oudste haar oog erop vallen. Dus perste ik er een jurkje uit. Ik moest een extra naad maken op de voorkant, de bomen staan zelfs diagonaal daar. Toch heb ik het idee dat het aan de ene kant niet pvalt en aan de andere kant lijkt of het zo hoort.
When I started this blog, I mostly crocheted, now sewing has taken over
my life. Once in a while I still do some yarn stuff though. Last year, I
participated/ crocheted along with the CAL (Crochet ALong) 2015 of
Jolanda and Tertia. I did not finish in September, the moment the last
rows became available, but I finished it within a year after starting.
On January 1st I made my last row (new year's resolutions and all).
The
pattern is free and available in Dutch and English. I crocheted the
afghan with a random selection of cotton yarns. I had/have a big
selection of cotton yarn that I bought inexpensively because those
particular lines had been discontinued. I paid around one euro per 50
grams ball, mostly from Phildar but also some other quality brands. At
the end of 2014, I realized my stash had become very big, and I did not
have any ideas how to attack it in the near future. I coincidentally
came across the plans for the afghan and decided to participate it.
I
decided to crochet the blanker for two reasons. The first one because
it is a great opportunity to use 40+ knots and the other because I was
curious if I had the persistence to finish such a huge project. I went through my stash and found an unconventional mix of colors that I thought was going to work well together, and I would have enough from for sure. When the
blanket was about 80% finished my resolve got tested. I started to run
out of yarn for several colors and the 300+ double crochet per side
became boring. Coincidentally my family in law delivered me some old
pink cotton (left over from a grand mother), right at the moment when I
was debating either to just let the blanket as it was, or to continue
with different color set. Although the color was slightly different than
the one that I had been using, it was similar enough to continue the
color mix that I had been using.
The afghan does not have
a purpose. It is just laying around the living room, and the kids play
with it. For me it is my persistence reward, I am also a bit proud of
the fact that I actually followed the pattern. In sewing I am almost
incapable of following the guidelines, with crocheting I do not really
feel the urge. The blanket ate a lot of yarn, but I somehow still seem
to have enough to create another blanket. Like I already said, the mix of colors is in line with my usual unconventional color combi's. I have seen many well balanced combinations, the fun thing is though that if you work on it for a year, after a while it starts to grow on you.
The blanket
took a lot of time, the hat was done in a few hours. The pattern is from
this book (also available in Dutch). Besides crocheting the eyes instead of using buttons, I did
not change anything. I even knitted on the needle sizes that were
required and used similar color of yarn as the example (bought at the
Zeeman). It is just as cute as the one in the book.
I love to hear what you think of my creations. Feel free
to leave a comment in the language you prefer (although Google
translate might have to assist me if you choose something different than
English, German, Dutch or Hungarian).
Although my blog is now filled with sewing projects, I do still crochet as well.
My
mother-in-law showed me some pictures of crocheted bracelets she had
come across on the web and they looked amazing. This one I considered to
be be the prettiest, if you search "freeform crochet bracelet" you see
many more examples. I decided to copy the one I liked best as a gift to
my mother-in-law.
I didn't have a pattern and just winged
it, based on the picture. This year, I am crocheting along the
crochet-along-2015 (which is being translated to English) and I used some stitches I came across in that
blanket into the bracelet. At the top of the bracelet for example is week 9's pearl stitch.
When the bracelet lies flat, the sides
curl up, but when worn, this does not create a problem. I used two
perfectly matching (both theme and color wise) flower buttons from my
stash to close the bracelet.
I crocheted the bracelet with very
thin cotton and my 1.5 crochet hook. The little beads are also from my
stash, I once bought two boxes of assorted beads. As a child I dreamed
of having such nice beads, I remember them to be very expensive. Now
they are just a few euros.
I like the result a lot and might
make one for myself as well. I normally do not wear jewelry, but this is
something I see myself wearing.
I love to hear what you think of my creations.
Feel free to leave a comment in the language you prefer (although Google
translate might have to assist me if you choose something different
than English, German, Dutch or Hungarian).
Summer holiday has started for our kids, which equals end-of-year gifts.
This year, I felt confident enough to hand make them (my earlier gifts
part 1 and part 2 were well received). I was triggered by my eldest
daughter's teacher. She was planning a gifts for somebody that helped
her class a lot, but was now retiring that help. During the year the teacher had seen my
daughter appear in many new dresses and we discussed my sewing hobby on a
few occasions. She asked me if I could sew a pillow case without zipper
that she could decorate with the kids. I was very willing to help and
said that I could do a bit more than a pillow case without zipper. I
proposed to mash up this and this idea from pinterest. The teacher liked
the idea a lot and she decided we would make two, one for the
Tuesday's-teacher as well. The teacher pre-cut the small "pieces" and
the kids sewed them (by hand) together. In one hour 29 kids created 43
flaps, the kids loved it. I helped, which meant non-stop putting thread
through needle eyes.
I drew the owls by hand, I was on a
strict schedule and rushed this process a bit. I hand stitched the upper
flaps, the rest was fixated by the sewing machine and I did add a blind
zipper. The end-result is fine, it is not as nice as the originals
(but not such a pinterest fail as this one). The fact that the kids
contributed and loved to do it, makes the pillows wonderful in my eyes.
Another
pinterest idea that I had been planning to use for a while was this bracelet tutorial. I loved the idea but I do not wear bracelets. I thought they
would be perfect teacher gifts. I made two, experimenting with the
buttons, colors and broomstick size.
For my son's teacher I
made a gift for his class. I adapted this wonderful felt fire into an
idea in which my kids could participate. The fire has three sides and my
eldest (who was his student two years ago), my son (who has been his
student the last two years) and my middle daughter (who will be his
student the coming two years) all decorated a side with textile paint.
My son learned in class this year
that a flame can be blue, so we had to
incorporate that color as well. The base of the fire is red jersey with my heaviest interfacing.
I made the stones from an
upcycled vest and I filled them with small fabric scraps that I have
been hoarding. The scraps give the stones a good firmness and the stones
are heavier than if I would have filled them with pillow filling. The
branches are also filled with scraps.
I love to hear what you think of my creations.
Feel free to leave a comment in the language you prefer (although Google
translate might have to assist me if you choose something different
than English, German, Dutch or Hungarian).
Lets make this a series, here you can find the first one. In these posts I will discuss a collection of gifts (made over a undefined period) which didn't justify (I have a personal fuzzy standard) a post but I still want to show them.
I made a friend a weighted pillow to be part of the sensomotoric therapy
for her son. She asked a simple pillow/blanket but due to the age of
the boy (five) I wanted to make a fun one. I enlarged a pattern from La Maison Victors' plush animal book. The arms measure 42 cm across, so it
really is a big animal and it is filled with four kilo rice. The wolf is
a washable cover for a simple bag filled with rice.
My
niece requested baby groot. I had no clue what she meant, but when I
googled it I found a free tutorial. It turns out to be a character from a
movie (that I had to watch of course and liked a lot). I love how he
turned out.
One of my friends are going to have a second
child and they asked around if somebody knew somebody who could crochet
them a monkey. I kind a jump up and started waving my arms (over
facebook), me me me, I can do that. I slightly adapted an existing pattern.
In an earlier posts I mentioned that my son loves colorful cloths and he
loves his twovery happy trousers. He apparently is not the only one,
because one of his friends placed an order for such a pair of trousers.
The fifth birthday of my sons friend is this week and I therefore
created another pair of Small Fry Jeans. The friend is similarly build
as my son. I hope that both the friend and his mother will like it.
I
have made more gifts this year which I did not blog about yet. Some of
the pictures are from before I made my resolution to make better
pictures.
From this girly skirted onesie I actually made two,
for two different girls. I used an Ottobre pattern for the onesie and I
based the skirt part on an exiting skirted onesie I received when our
youngest was born.
One of my friends liked the (regular)
onesies I sewed my youghest and when she gave birth to her second child,
I gave her this one.
This dino I made for a small boy. It was a very easy and quick gift, you find the tutorial here.
Besides
sewing I crocheted a moos/deer. You can see the other animals I made
earlier this year here. This moos/deer is not from the Edward's Managerie book, but
from a pdf pattern set that I received because I bought the book
directly through Toft.
In my previous post I already said
that I used my recently acquired Silhouette for multiple types of
projects. When a loved daycare lady stopped working at our location I
made her a mug. With my Silhouette I cut two pictures of our youngest
girls (the ones she took care of) and peeled the "negative part". Then I
glued them on a mug and colored the cut-out pieces with a porcelain
pen. After half an hour in the oven the mug is dishwasher proof.
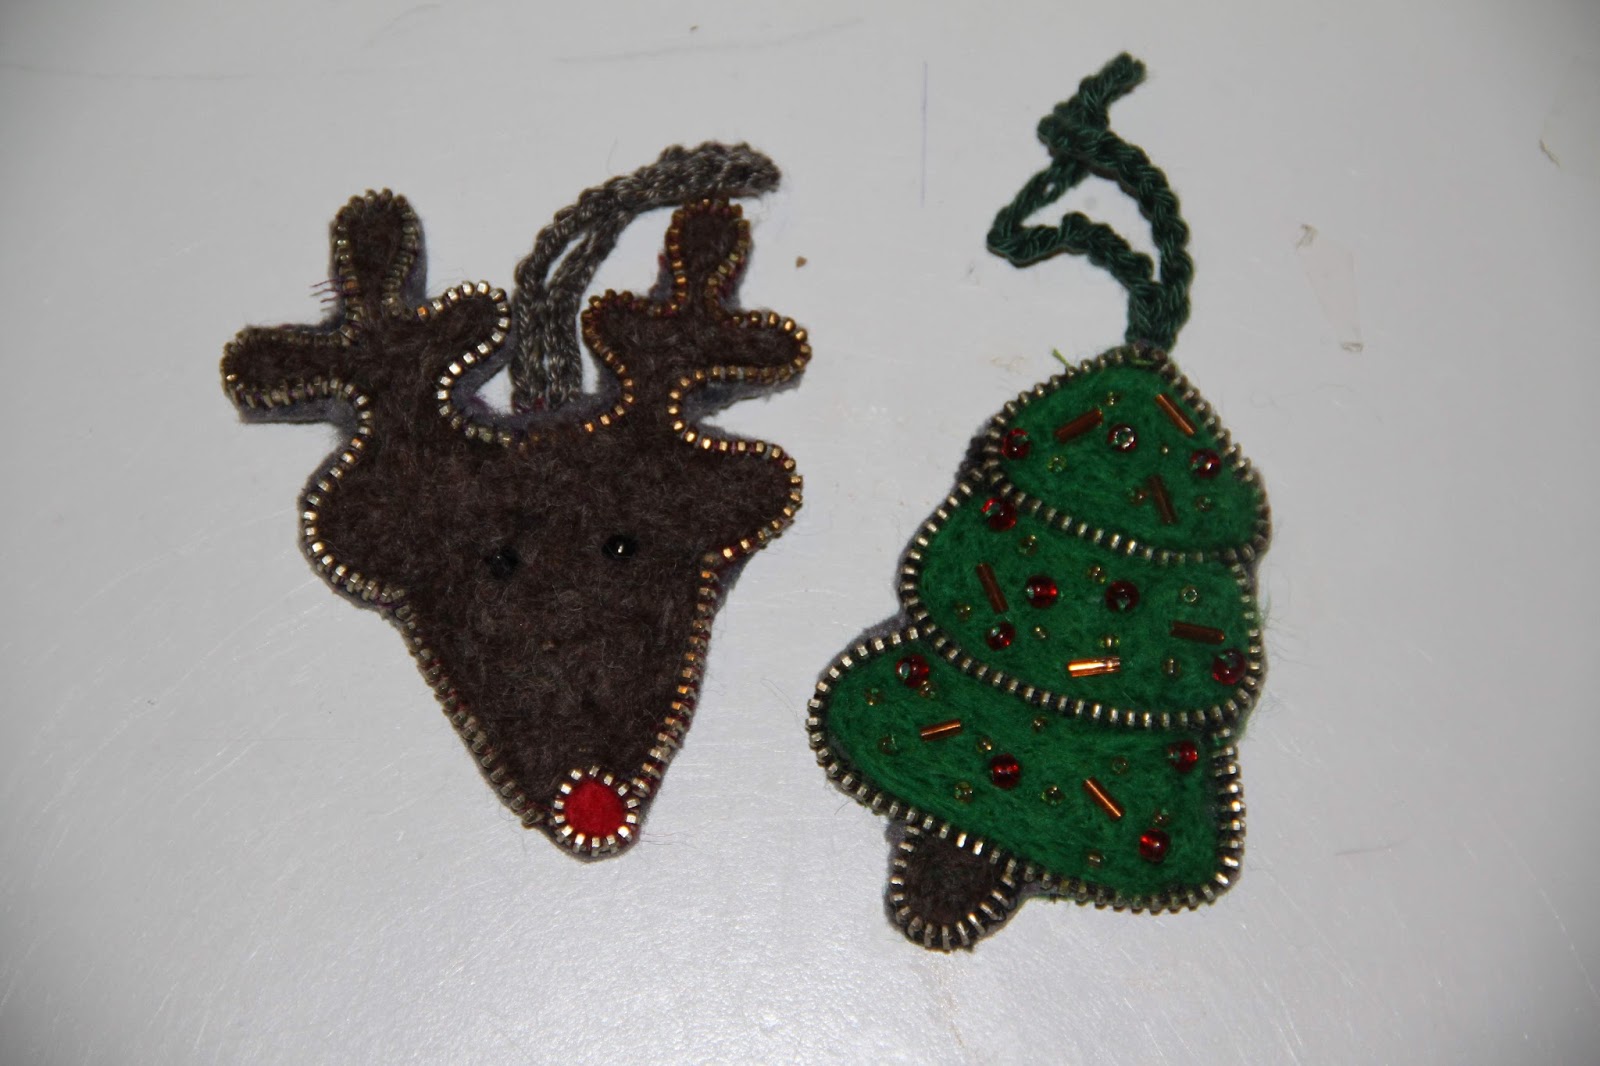
The
last set of pictures shows another recently made gift. I came across a
technique that I had never seen. With zippers a frame is created and the
spaces between the zipper parts are filled with needle felting. I
simply had to try it (I have a big pile of jeans zippers waiting to be
re-purposed). It took me a relatively long time to fixate the zippers, I
hand stitched all the teeth individually, but this can easily be done
in front of the television.
Feel free to leave a comment in the language you prefer (although Google
translate might have to assist me if you choose something different
than English, German, Dutch or Hungarian).