In the week that I sewed this dress on request, I also sewed a coat on request. I hacked the Cicero jacket, a Sofilantjes' pattern for knit fabrics into a true fall/winter coat from Soft Shell. In this blog post I will give you some tips and tricks in case you want to go on a similar endeavour.
In de week dat ik deze jurk naaide, naaide ik ook een jas op aanvraag. Ik hackte de Cicero, een Sofilantjes patroon voor rekbaer stoffen, in een echte herfst / winterjas van Soft Shell. In deze blogpost zal ik je wat tips en tricks geven voor het geval je een soortgelijk project wilt doen.
The Cicero is intended as a jacket to be worn over a thinner long sleeve, not as an outside layer over a thick sweater. I therefore measured the chest of our daughter while she was wearing a sweater, this way I automatically took into account the fact that her chest would be wider. I decided to size up one size above the measured size with sweater because Soft Shell does not stretch. In our case that meant that I sized up two sizes in total. I only sized up width wise. I did make her regular length, because she would not become taller by wearing a sweater. I also decided to use the neckline of the size that she usually wears, which also meant that I could use the hood of her regular size.
De Cicero is bedoeld als een vest die dus over een relatief dun shirt wordt gedragen, niet als een extra buitenlaag over een dikke trui. Ik meette daarom de borst van onze dochter voor de maatbepaling terwijl ze een trui droeg. Op deze manier hield ik automatisch rekening met het feit dat haar borst breder zou zijn. Ik besloot om een maat groter te maken dan de gemeten maat met trui omdat Soft Shell niet uitrekt. In ons geval betekende dat dat ik in totaal twee maten groter maakte. Ik heb alleen in de breedte vergoot. Ik maakte wel haar reguliere lengte aat, omdat ze niet groter zou worden door een trui te dragen. Ik besloot ook om de halslijn van haar reguliere maat te gebruiken, wat ook betekende dat ik de capuchon van haar normale maat kon gebruiken.
Sizing up a jacket is of course not the same as using a coat pattern. I expected that especially the sleeves might cause some problems. It is important that a coat gives you enough freedom of movement, so I decided to widen the sleeves. The Cicero sleeves are cut on the fold and I widened half of the sleeve by making a vertical cut (at about the middle of the pattern piece) and spreading the sleeve pieces such that the extra line that you have to drew at the top was one centimeter long. If you remember your geometry that means that you actually put slightly less than one centimeter between your sleeve pieces. To make sure the bigger sleeve would fit I drew the arm whole one centimeter lower. Setting in a non stretching sleeve is harder than setting a stretching sleeve. You need to pin and go slow to avoid puckers. The sleeves on our coat are wide enough for sure, a slightly narrower sleeve would also have worked, but I do not feel that they seem too wide.
Het twee maten groter tekenen van een vest is natuurlijk niet hetzelfde als een echt jaspatroon gebruiken. Ik verwachtte dat vooral de mouwen problemen zouden kunnen veroorzaken. Het is belangrijk dat een jas voldoende bewegingsvrijheid biedt, dus besloot ik de mouwen te verbreden. De Cicero mouw wordt op de vouw geknipt en ik verbreedde de helft van de mouw door een verticale snede te maken (ongeveer in het midden van het patroondeel) en de mouwdelen zodanig te spreiden dat de extra lijn die ik aan de bovenkant moest tekenen, één centimeter lang was. Als je je Pythagoras herinnert, betekent dat dat je eigenlijk iets minder dan een centimeter tussen je mouwstukken deed. Om ervoor te zorgen dat de grotere mouw zou passen, tekende ik het armsgat ook een centimeter lager. het inzetten van een niet-rekkende mouw is moeilijker dan het plaatsen van een rekkende mouw. Je moet spelden en langzaam gaan om te voorkomen dat je rimpels krijgt. De mouwen op onze jas zijn nu zeker breed genoeg, een iets smallere mouw zou ook gewerkt hebben, maar ik heb niet het idee dat ze te wijd zijn.
I lined the jacket, so I cut all my outer pieces both in Soft Shell and in my lining fabric. Except for the pockets (those I only cut in lining pieces) and also all pieces out of ribbing were cut only as often has the regular pattern prescribes. I lined the coat with jersey. Sewing jersey to a non stretching fabric is not the easiest thing, but again, if you pin and make sure that you are pushing the jersey a bit faster than you woven, it is totally doable. If you have not done it before, I do recommend choosing a non stretching lining. I lined the sleeves with a silky lining fabric such that she easily slides into her coat.
Ik voerde de jas, dus sneed ik al mijn buitenste stukken in zowel Soft Shell als in mijn voeringstof. Behalve de zakken (die ik alleen in voeringstof sneed) en ook alle stukken uit boordstof knipte ik alleen zovaak als het standaard Cicero patroon voorschrijft. Ik heb de jas gevoerd met jersey. Het naaien van jersey aan een niet-rekbare stof is niet het gemakkelijkste werk, maar nogmaals, met spelden/clipje en voorzichtig naaien is het wel te doen. Als je dit nog niet eerder hebt gedaan, raad ik aan een niet-uitrekbare voering te kiezen. Ik voerde de mouwen met een gladde voeringstof zodat ze gemakkelijk in haar jas glijd.
I wanted both a hood and a collar, Anne had shown us that it can be done. I had made a different type of hack before because I feared a lot of bulky seams, but this turned out to not be an issues. If you sew a collar and a hood, this trick is to change the construction a bit. First finish the hood (without needing a turning whole) expect for the bottom of the hood. Then you place the outside coat (the one that I sewed in Soft shell) on the table in front of you with the outside of the coat up. Then you place the hood with the outside of the hood facing the outside of the coat. You align the necklines. Because Soft Shell does not stretch, your hood will be slightly shorter than the neckline. This is not a problem, just center it nicely, with a bit of open space on the side where the zipper will come. Now place the collar on top of the neckline, on top of the hood. The wrong side of your ribbing should be face up, meaning that the right side of your ribbing is facing the lining of the hood. Keep the collar open, do not fold it. Now sew all three items together, outside coat, hood (already completed with lining) and collar (unfolded). I then sewed the lining coat to the other side of the collar, the one that remained unsewn in the previous step. Now you can also sew the bottom waist band first to the outside of the coat and then to the lining. Make sure that you always put the pieces that you are sewing together such that the good sides of the fabric are facing each other and that nothing is twisted.
Ik wilde zowel een capuchon als een kraag, Anne zelf had me eens laten zien dat het kan. Ik had eerder een ander type hack gemaakt omdat ik dikke naden vreesde, maar dit bleek geen probleem te zijn. Als je een kraag en een capuchon naait, moet je de constructie volgorde een beetje veranderen. Maak eerst de kap af (keergat is niet nodig) alleen de onderkant van de kap is dan nog open. Vervolgens plaats je de buitenste laag (degene die ik in Soft shell heb genaaid) op de tafel voor je met de buitenkant van de jas omhoog. Plaats vervolgens de kap met de buitenkant van de kap naar de buitenkant van de jas gericht. Leg de halslijnen netjes aan elkaar. Omdat Soft Shell niet rekt, is je capuchon iets korter dan de halslijn. Dit is geen probleem, centreer het mooi, met een beetje open ruimte aan de kant waar de rits zal komen. Plaats nu de kraag bovenop de hals, en daarme ook bovenop de kap. De verkeerde kant van je boordstof moet naar boven gericht zijn, wat betekent dat de goede kant van je boordstof naar de voering van de kap wijst. Houd de kraag open, vouw hem niet. Naai nu alle drie de items samen, de buitenjas, capuchon (al voltooid met voering) en kraag (ongevouwen). Daarna naaide ik de voeringjas aan de andere kant van de kraag, de kraag die in de vorige stap niet was genaaid. Daarna kan je de tailleband eerst aan de buitenkant van de jas en vervolgens aan de voering naaien. Zorg ervoor dat je de stukken die u aan elkaar naait altijd zo plaatst dat de goede kanten van de stof naar elkaar toe zijn gekeerd en dat er niets is gedraaid.
The most complicated step of sewing a fully lines garment is sewing the sleeves. There are several tutorials out there on the web that can explain how to strangely interlock the sleeves together to create the end result that you want. If you pin it correctly the garment will end up looking like strange octopus. I always forget how to do that exactly, so I use a different method. I just put the sleeves in each other the way that they have to end up and pin the layers how they should be sewn. I pin only a small piece, just 2 centimeter (you will not be able to pin the the entire top anyway from the right side). Then I put my hand through a turning hole somewhere in a side seam and grab those 2 centimeter that I pinned in place. I then pull the top of the sleeve through the turning hole and once that it is through that hole you can relatively easy pin the rest. I use the same, pull through the turning hole trick when I have to sew in zipper in a lined garment. It goes beyond the scope of this blog post to create pictures on how to sew the lining pieces, so I hope my simple trick will totally make you just see the light.
De meest gecompliceerde stap van het naaien van een volledig gevoerd kledingstuk is het naaien van de mouwen. Er zijn verschillende tutorials op het internet die kunnen uitleggen hoe je de mouwen op een vreemde manier met elkaar kunt verbinden om het eindresultaat te creëren dat je wilt. Als je het goed spelt, ziet het kledingstuk er uit als een vreemde octopus. Ik vergeet altijd hoe ik dat precies moet doen, dus ik gebruik een andere methode. Ik steek gewoon de mouwen in elkaar zoals ze moeten eindigen en spelt de lagen vast hoe ze moeten worden genaaid. Ik maak slechts een klein stukje vast, slechts 2 centimeter (je kunt de hele top toch niet vanaf de goede kant vastspelden). Daarna steek ik mijn hand door een keergat ergens in een zijnaad en pak die 2 centimeter die ik op zijn plaats heb gepeld. Ik trek dan de bovenkant van de mouw door het keergat en zodra het door dat gat is, kun je de rest relatief eenvoudig vastspelden. Ik gebruik hetzelfde, trek-door-keergat de truc als ik de rits in een gevoerd kledingstuk moet naaien. Foto's of illustraties van die stappen maken vraagt te veel voor een blogpost, dus ik hoop dat mijn eenvoudige truc jou net zo helpt als mij.
Last week, I mentioned One Thimble issue 14* already. This weekend, it
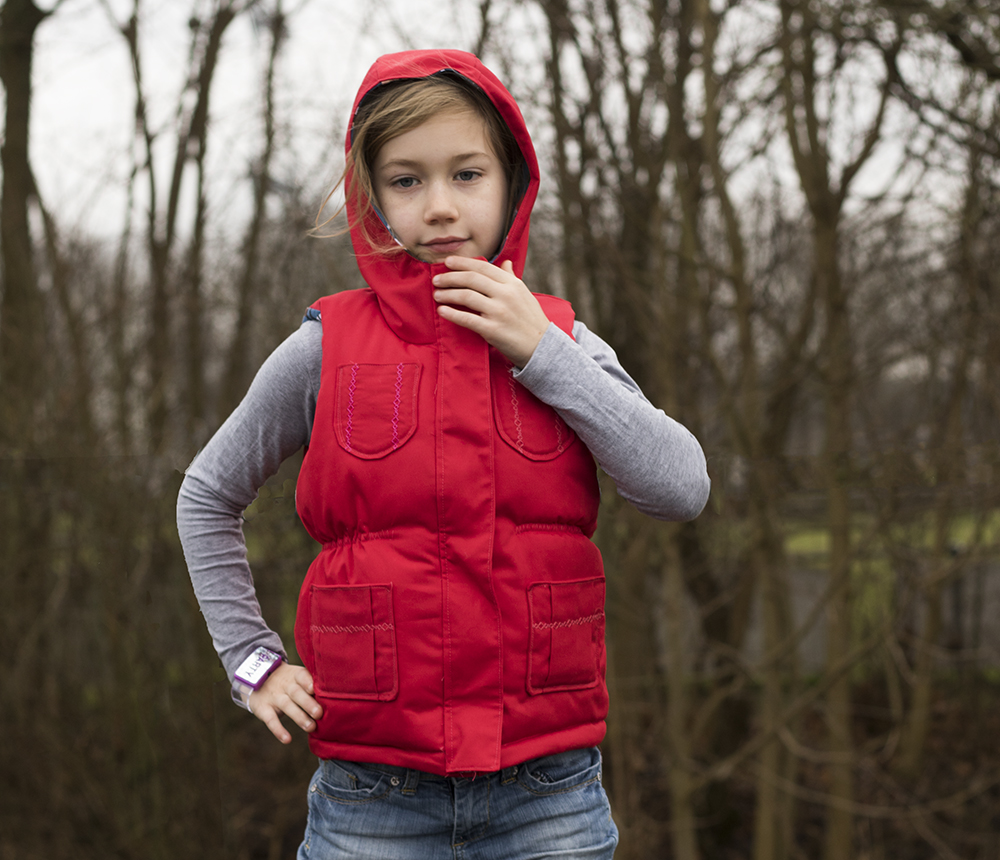
got released and I tested one of the patterns, the Thyme vest* my Paisley Roots. This is supposed to be a layering, an in between seasons garment.
My kids love to have freedom of arm movement, so I thought it would be
ideal with some batting as a truely in-between coat, I might have overdone it a bit though.
Vorige
week sprak ik al over One Thimble issue 14*. Afgelopen weekend kwam het
digitale magazine weer uit en ik mocht een van de patronen, het Thyme vest* van Paisley Roots testen. Het hoort een tussenlaag kledingstuk te
zijn, maar aangezien mijn kids van bodywarmers houden, deed ik er een
laag wattering tussen. Ik overdreef echter lichtelijk...
This
vest has all the features to make it your kids favorite, a hood, lots
of pockets and elastic in the waist to avoid that wind blowing up inside
it. The vest is fully lined, so there is a very pretty finish
(there even is a facing for the bottom of the vest, to avoid a slipping
lining) and you can use some of your bigger scraps of a treasured fabric
to make a
nice pop. I used some Snow white jersey from Lillestoff (bought years
ago at Joyfits) that matched
perfectly with the red outer fabric (that I bought at Textielstad as a
coupon).
Het vest heeft alle eigenschappen die mijn kids fijn
vinden, een kap, veel zakken en elastiek in de taille zodat de wind er
niet onderdoor blaast. Het vest is volledig gevoerd en heeft daardoor
een hele mooie afwerking. Er is zelfs zo'n extra stukje aan de onderkant
van van de binnenkant zodat je voering echt niet zichtbaar is. Voor de
voering kan je mooi een leuk stofje gebruiken, altijd een leuke
verrassing als de jas open gaat. Deze Sneeuwwitje Lillestoff tricot met
rode details paste er perfect bij vond ik (kocht ik jaren geleden bij
Joyfits). De buitenkant van het vest kocht ik bij Textielstad as een
coupon.
The pattern instructs to sew some decorative
lines on the pockets. I used the pockets to practice one of the fancy
stitches on my sewing machine. I personally love the fact that the
pattern has snaps and a zipper. In my version there are no buttons
though, somehow my girl voted against them. The vest stays closed
without them as well, but they do provide some extra wind protection.
The front flap can not blow open if it is closed with the snaps. If I
would have to guess, I think my girl voted against the buttons because
she just wanted to wear the vest immediately.
Het patroon
schrijft voor om enkele rechte lijnen te stikken op de zakken. Ik ging
echter voor een van de siersteken op mijn naaimachine, ik gebruik die
eigenlijk nooit, dus leek me een ideaal moment. Ik persoonlijk vind het
super fijn dat het patroon met rits en drukknopen komt. Mijn dochter was
echter tegen de drukknopen (ik denk omdat ze hem gewoon meteen aan
wilde). De jas blijft prima dicht zonder de knopen, maar ze geven wel
wat meer windbescherming. Met drukknopen kan de flap namelijk niet
openwaaien.
Okay,
about that batting. I upcycled an old pen play blanket, and like I
already mentioned, it might have been (insert a very sarcastic face
here) a bit too thick. I had a horrible
time sewing in the elastic (think similar situation of having 10 meter
of tule under your machine). In the end I just went for a zigzag, and
not
the pretty stitch lines the pattern prescribes. Yes, you are right, I
was not being the perfect tester this time. Karly did say, she now could
write an advice against using too much batting in the instructions and
if
you use batting, to quilt it to the lining pieces (I quilted it to the
main,
which also created some trouble). I do promise to be a better tester
next time Karly ;).
Okay, over die wattering dan. Ik gebruikte een
oud boxkleed, lekker warm leek mij. Maar zoals ik al zei, overdreef ik
natuurlijk. Het naaien van het elastiek in de taille was een DRAMA
(vergelijkbaar met het rimpelen van 10 meter tule). Uiteindelijk ging ik
dus maar voor een gewoon zizagstiksel en niet het mooie rechthoekige
stiksel uit het patroon. Ik was dus verre van de perfecte tester deze
keer. Karly (de designer) zei wel dat ze nu in ieder geval ook schrijven
dat je geen wattering gebruikt of anders in ieder geval dunne en dat je
die aan je voering vastmaakt (ik naaide hem aan de buitenkant vast en
dat gaf ook allerlei problemen). Ik beloofde Karly volgende keer braver
te zijn.
Feel free to leave a comment in the language you prefer (although Google
translate might have to assist me if you choose something different
than English, German, Dutch or Hungarian). If you buy anything through
my affiliate links (*), I get a small commission (the price stays the
same for you), I am very grateful for everything that feeds my fabric
addiction.
Ik vind het altijd super leuk om reacties te lezen om mijn creaties. In
deze post zitten enkele affiliate linken, aangeven met een *. Mocht je
het patroon aankopen doordat je in de shop kwam via een link van mij,
dan krijg ik een kleine commissie. Het patroon wordt niet duurder voor
jou, maar mijn stoffenkast is er wel heel blij mee
A winter coat might be
the daunting sew for some (especially beginners), it is one of the most
fulfilling sews. Your kid will be wearing their winter coat everyday for
a few months and if you are lucky, for two years. It will be not be
covered by other clothes, but will be in plain view for you to enjoy
everyday. When Marte from Compagnie M*. wrote that she was planning a
coat pattern, I therefore was more than happy to test it. My little one
really needed one. As the smallest of four and third girl, she often
wears hand me downs, but this year she got her own hand made coat.
Een
winterjas, niet echt een beginnersproject, is echt super bevredigend om
te naaien. Je kind heeft het voor een paar maanden elke dag aan. Het
zit niet verstopt onder andere kleren, dus je kan er elke dag van
genieten. Toen ik begon met naaien vond ik een gewone jas al super
spannend, nu naaide ik er echter al een paar. Toen Marte van Compagnie M*. vertelde dat zij een winterjas ging ontwerpen, was ik dus meteen erg
enthousiast. Mijn jongste was dit maal de gelukkige ontvanger. Als
vierde kind en derde meisje, is haar jas over het algemeen niet nieuw,
dit jaar wordt ze echter gehuld in een jas van mijn hand, speciaal voor
haar gemaakt.
The Louisa coat*, the newest
Compagnie M. baby clearly resembles her sister, the Louisa dress*.
Although, they are clearly from the same mother, the Louisa coat has a
different character and also tries to look like her other sister Susanne*
(the back of the coat looks like the front of the Susanne). As all the members of their family, there are several
options to personalize. I chose for the hood and all piping options, but
you can also make a simpler version or use a collar.
De Louisa jas * is dus de nieuwste dochter uit de Compagnie M. familie en ze
heeft veel weg van haar zus, de Louisa jurk*. Hoewel beide patronen dus
duidelijk dezelfde moeder hebben, heeft de Louisa jas duidelijk een
ander karakter dan haar gedeeltelijke naamgenoot. De Louisa jas probeert
namelijk ook te lijken op haar andere zus de Susanne* (de achterkant van de jas heeft iets weg van de voorkant van de Susanne).
Zoals iedereen uit de familie heeft ook de Louisa jas een heel
stapeltje opties. Ik naaide de versie met veel paspel en een kap. Je kan
ook voor een simpelere variant gaan en er is een een super leuke tulp
kraag.
I bought a coupon wool felt a few weeks ago and it was
the perfect amount for this little coat. The first tester versions used a
thick piping and I felt my usual tester-envy. Especially because my
main fabric is simple, I went for an over the top piping. I used a scrap
from when I sewed this dress. I used some yarn to make a super thick
version, it is unconventional and I love the effect.ou can choose for zipper or buttons. I did both, the main closure is the zipper, but to keep the flap closed, I added snaps.
Enkele
weken geleden kocht ik een couponnetje wolvilt bij Textielstad en ik knipte
daar precies dit jasje uit. De eerste testers produceerden pareltjes
met dikke paspel en mijn gebruikelijke tester-nijd stak op en ik ging
voor eenzelfde look. Mijn buitenstof is relatief simpel, dus ging ik
voor heftige paspel, ik maakte een echte dikke van een restje van toen
ik deze jurk maakte.De jas past helemaal bij mij onconventionele stijl,
ik vind hem echt super. Je kan kiezen voor rits of knopen. Ik ging voor beide door de rits als hoofdsluiter te gebruiken, maar voegde nog een rijtje kam snaps toe om de flap dicht te houden.
I made a true
winter version, so I sewed an extra layer of the fleece that I put
between the main and lining. It worked great and the coat is very soft
and warm, only the hood has become a bit too heavy. I ran out of
flexible fleece, and could not line the sides of the hood, so I used
another slightly heavier lining, that was not the smartest idea. The
hood's front seam became very thick and I had to stop stitch it, to keep
the fabrics in place. There was no way that I could top stitch the
middle part though. Due to the thick piping, my machine would never
manage,so that became a thing that I will have to do in front of the tv
by hand. I used a See You at Six fabric for the lining.
Ik ging voor een echte warme winter versie.
Ik voegde dus wederom een laagje fleece tussen de buiten- en binnenstof.
De jas is hierdoor heerlijk warm en zacht, alleen de kap werd er iets
te zwaar door. Het probleem licht waarschijnlijk in de iets dikker
fleece die ik gebruikte voor de zijpanelen van de kap. Mijn soepele
fleece die in de rest van de jas zit, was op. Door de dikte werd de
voorzoom van de kap te bol en moest ik het geheel met een top-stiksel
vast zetten. Alleen in het midden ging dat niet lukken. Dat moet dus nog
een keer met de hand.., een keer.., hopelijk snel. De voering werd een See You at Six stofje.
I
was in a hurry to make pictures, and I did not dare to iron the bottom
seam yet. I never ironed wool yet, so very scary. The pictures were
originally intended to be fit pictures, taken quickly when shooting
these. I liked the pictures so much though, that I just stuck with them,
although my bottom is a bit wobbly (due to the not yet ironing, the
patterns instruction for bagging the lining are excellent) and the fact
that I still had to secure the hood middle piece in the front by hand.
Deze
foto's maakte ik als tester foto's, gewoon snel toen ik ook dit project
fotografeerde. Ik liep tegen de deadline aan en durfde de zoom niet te
strijken. Ik weet het, niet-strijken en naaien schijnt niet samen te
gaan, maar toch doe ik deze heiligschennis vaak. Ik weet dat wol
minder warm gestreken moet worden en laten we zeggen dat ik het over 1
kam scheerde met het vast zetten van die kap met de hand. Komt nog een
keer. De foto's zouden dus eigenlijk tijdelijke foto's moeten worden,
maar ik was eigenlijk zo tevreden met hoe het geheel eruit zag, dat
jullie het dus maar gewoon moeten doen met een beetje hobbelige
onderkant en nog iets wijkende kap. Die lach maakt veel goed lijkt me.
The Louisa coat* is on a 10% introduction sale now, over at the Compagnie M. web shop* with the code LOUISACOAT10. Feel free to leave a comment in the language you prefer (although Google
translate might have to assist me if you choose something different
than English, German, Dutch or Hungarian). If you buy anything through
my affiliate links (*), I get a small commission (the price stays the
same for you), I am very grateful for everything that feeds my fabric
addiction.
De Louisa jas* is nu tijdelijk te krijgen met 10% introductiekorting in de Compagnie M. web shop* met de code LOUISACOAT10. Ik vind het altijd super leuk om reacties te lezen om mijn creaties. In deze post zitten enkele
affiliate linken, aangeven met een *. Mocht je het patroon aankopen
doordat je in de shop kwam via een link van mij, dan krijg ik een kleine
commissie. Het patroon wordt niet duurder voor jou, maar mijn
stoffenkast is er wel heel blij mee.
You know I love blog tours. Today, I am participating again in one.
This is not any blog tour though, it is a blog tour that I actually
organized! I picked and contacted most of the 25 bloggers, and I
was super excited that almost all of my picks wanted and could make time
for the "Welcome to Twig + Tale" blog tour. Twig + Tale (formerly
known as BigLittle), recently changed her name, and we would like the
world to know. We therefore picked a very international selection of
bloggers. All these bloggers sewed at least one lovely Twig + Tale
garment. As cherry on the pie, Art Gallery Fabrics was willing to sponsor the tour! We
could all pick any fabric from the Art Gallery website. Of
course, there is also a give away. At the end of this post you can enter
a Rafflecopter with the chance to win two yards of Art Gallery fabrics
and five Twig + Tale patterns.
Jullie weten ondertussen wel dat
ik van blogtour etc houd. Vandaag doe ik er weer aan een mee, maar niet
aan zomaar een, ik organiseerde hem! Ik was de hoofdverantwoordelijke
voor het uitzoeken en contacteren van de 25 bloggers. Met een bang
hartje begon ik eraan, maar tot mijn verbazing wilde bijna iedereen
gewoon meedoen aan de "Welcome to Twig + Tale"bogtour.Twig + Tale
(voorheen BigLittle) ging recent door een naamswijziging en dat moest
gevierd worden. We wilden dat de hele wereld het wist en dus kozen we
bloggers van alle hoeken van de wereld. Art Gallery stemde in om de tour
te sponsoren, waardoor we allemaal stof mochten kiezen van de Art
Gallery website! Natuurlijk zit er voor jullie als lezers ook iets leuks
in. Aan het einde van de post vind je een Rafflecopter waarmee je bijna
twee meter Art Gallery stof en vijf patronen van Twig + Tale kan
winnen.
At the beginning of the
year, I sewed all my kids some outwear from Twig + Tale. With the season
change now upon us, most of those now need a warmer replacement. I
picked a lovely combination of Line drawings in canvas for the outside of the coat and Moon stories spark
for the lining. To make the coat really winter proof, I added an extra
layer (from thick fleece) between the main and lining, this way she will
stay warm for sure.
Aan het begin van het jaar voorzag ik alle
vier mijn kids van een Twig + Talebuitenlaagje. De meeste van deze
werden aan de koude kant, zo met de herfst/winter voor de deur, dus
moest er iets nieuws komen. Ik koos daarom voor een combinatie van Line drawings in canvas voor de buitenkant en Moon stories sparkvoor de binnenkant.Om het echt lekker warm te krijgen stak ik er een fleecelaag tussen.
I used the updated Pixie Pea coat
pattern for my coat. The updated version now contains two different
hoods and a collar. I had seen several coat in the Twig + Tale Facebook group, combining hood and collar, and I wanted the same. I really love the
look. When the hood is down, the collar is a great eye catcher. When the
hood is up, the collar almost disappears and does not bother the wearer
at all. If anything, it is an extra protection against the wind. To protect some more, I also added ribbing to the sleeves. The pattern is intended to have extra long sleeves. By folding them, your kids can use the coat one year longer. I loved the idea, and placed the ribbing such that I kept the extra length fold.
Ik
gebruikte het recent geupdate patroon van de Pixie Pea jas. De geupdate
versie heeft twee kappen en een kraag. Ik zag in de Twig + Tale facebook groep al verschillende schitterende jassen voorbij komen met
een kap en kraag optie en ik wilde die ook. Als de kap omlaag is, is de
kraag een leuke blikvanger. Met de kap ophoog verdwijnt de kraag bijna
volledig. De kraag zit helemaal niet in de weg dan en beschermt zelfs
een beetje extra tegen wind. Voor nog wat extra wind bescherming voegde ik ook een randje boordstof aan de mouwen toe. Het patroon is bedacht met extra lange mouwen die je om kan slaan. Zo kan je kind nog wat groeien, ik vond dat een goed idee, dus plaatste de boordstof zo, dat de omvouw nog steeds mogelijk was.
I
of course, had to play with the pattern a bit. I added a zipper and an
alternative kind of pocket. Another blogger on the tour added a zipper
through a slightly different method, and wrote a tutorial about it.
Seeing this
will be a mid-winter coat, I wanted the front flap as extra protection. I
therefore added one part of the zipper in the seam between the front
flap
and right front. The easiest way to sew in the other half is like
another blogger on the tour did. She widened the left front piece a bit,
such that the other half of the zipper could be sewn between lining and
main fabric. I took a small detour by adding an extra piece of fabric to
the left side (that is what you get if you start cutting without a
clear plan in mind). I wanted the flap to stay closed, so I added snaps
next
to the zipper, but still hidden by the flap.
Natuurlijk speelde ik
ook een beetje met het patroon. Ik deed er een rits in en een aparte
zak. Een andere blogger op de tour voegde ook een rits toe, weliswaar
met een beetje andere methode, maar ze schreef er een tutorial over.
Omdat ik een jas maakte voor hartje winter, wilde ik echter de flap aan
de voorkant behouden. Ik stak dus de rits tussen de naad van flap en
rechtervoorkant. Een andere blogger op de tour deed vervolgens wat ik
ook had moeten doen. Zij verbreedde het linkervoorpand een beetje, zodat
de andere helft van de rist gewoon zullen buiten en binnenstof gestoken
kon worden. Ik voegde een extra stukje toe om hetzelfde te krijgen, maar
verbreden is duidelijker sneller. Om de flap goed te laten sluiten
voegde ik kam snaps toe naast de rits, maar nog wel onder de flap.
The inspiration for the pocket came from
a retail bought coat from my husband. It is a double function pocket.
You can either but something in the pocket from the top, or you can use
the (open) side. This combination is really perfect for both storing gloves (or stones and twigs if you are my daughter),
and just keeping your hands warm in your pockets. I had been
planning to write a small tutorial, but I was not satisfied with the
method I had chosen. The corners are so thick, that I had to hand sew
them to coat. There was no way my machine would do it, I broke a needle
trying, which of course did not stop me from trying some more. I like the
concept so much though, I will add these to more coats to come. I will
keep you posted.
De inspiratie voor de zak kwam van een winkeljas
van mijn man. De zak heeft een dubbele functie. Er kunnen spullen van de
bovenkant in, maar je kan ook je handen in de (open) zijkant steken.
Ideaal om dus zowel je handschoenen goed op te bergen (in het geval van
mijn dochter hebben we het over stenen, takjes en andere troep), maar
toch je handen makkelijk en snel in je zakken te steken. Ik was van plan
om er een tutorial over te schrijven, maar ik was achteraf niet
tevreden met de door mij gekozen methode. The hoeken van de zak zijn
veel te dik om met de naaimachine vast te naaien. Ik naaide ze daarom
vast met de hand. Geloof me, ik heb het echt geprobeerd, de eerste
gebroken naald hield me niet tegen. Ik ben wel helemaal weg van het
idee, dus ik ga het zeker nogmaals proberen en hopelijk dan wel met
tutorial.
Art Gallery Fabrics is kindly sponsoring 2 yards of Art Gallery fabric of your choice. To make the prize extra sweet, we are also adding a collection of 5 Twig + Tale patterns of your choice.
International entries are very welcome. Our bloggers come from every corner of the world to celebrate the global nature of Twig +Tale too.
Enter using the rafflecopter below. (The winning entry will be checked to ensure all criteria are met).
Art Gallery sponsort dus bijna twee meter stof, die je helemaal zelf mag kiezen. Er zijn heel veel stoffen die je hier normaal gezien niet makkelijk kan krijgen. Daarnaast kan je, als je wint dus vijf Twig + Tale patronen kiezen. Vul de Rafflecopter in om kans te maken.
Although we, in Europe are moving towards summer, the other half round
is gearing up for winter. Today, Big Little has released a lovely way to
keep you kid warm on cold days, the Pathfinder vest. My kids love vests
because they can move their arms freely, and still stay warm. For the
release I made a summer vest, just two layers without batting, and all
my girls love it.
Hoewel bij ons de zomer dan eindelijk lijkt te
beginnen, staat op het andere halfrond juist de winter voor de deur.
Vandaag lanceert Big Little (uit Nieuw Zeeland) vandaag daarom de
Pathfinder bodywarmer. Mijn kids zijn super fan van body warmers omdat
ze daar veel beter in kunnen spelen dan in een jas. Ik naaide voor de
lancering een lente/zomer versie en alle drie mijn dochters zijn fan.
Because
I made a summer version, one that will not be worn over a jumper, I
sized down. The advantage of having many kids, is that you strongly
increase the likelihood that a garment will perfectly fit (someone). The
vest fits my middle ones best, but also my eldest and youngest helped
me out with the shoot. The sizing of the vest for fall/winter versions
is spot on, so you normally will not have to guess of course
Omdat
ik een lente/zomer versie naaide, eentje die dus niet over een trui
gaat, versmalde ik de body warmer rigoureus. Het voordeel van veel
modellen thuis, is dat hij geheid bij eentje perfect past. Deze
bodywarmer past mijn middelste dochter het best, maar de andere twee
wilde er ook mee op de foto, hij past de andere twee namelijk ook. Als
je wel een gewone herfst/winter versie maakt, past hij trouwens perfect
zag ik bij de testers, dan geen giswerk qua maat nodig dus.
Lisa,
the designer behind Big Little shares my love for upcycling, she has a
enviously huge pile of pretty woolen blankets. No woolen blankets here,
but I did have an itchy pair of woolen trousers. I truly hated wearing
them (when they still fitted), but they had been rather expensive, so I
felt I needed to. These itchy trousers were perfect for this vest
though. The seam at the back is the original leg seam, but all the other
pieces I could cut without extra seams.
Lisa, de designer van
Big Little heeft net als ik een liefde voor recykleren. Zij werkt veel
met schitterende wollen dekens, waar ik hier helaas niet een van heb
liggen. Ik had echter wel een jeukende wollen broek. Toen hij nog paste,
was het een hel om hem te dragen, maar omdat hij nogal duur was, kwam
hij toch uit de kast. Die vreselijke broek was de perfect basis voor
mijn bodywarmer, het middenachterstuk heeft een stuk oorspronkelijk
beennaad in het midden, maar de rest is vrij van extra naden.
I
have to admit that I am extremely pleased with the embroidery. I had
seen many embroidered Big Little items, and always assumed it would be
so much work. It was not actually. I had the birthday party of a friend,
and I managed to embroider the whole thing in about two hours. My son
really loved the effect as well, so I have to find a cool boy embroidery
project, maybe dinosaur bones?
Ik ben zelf helemaal weg van het
borduurwerk. Ik zag op veel Big Little naaisels schitterende
borduurwerkjes, maar het leek mij zoveel werk. Dat bleek helemaal niet
waar, ik nam mijn vest mee naar de verjaardag van een vriendin en met
twee uur was mijn borduurwerk klaar. Mijn zoon is ook wel van de
techniek, dus ik moet voor hem iets stoerders verzinnen, misschien dino
botten?
The vest pattern contains two different hoods, a collar,
two necklines, two lengths and a flutter sleeve, so it is full of mix
and match possibilities. If you subscribe to the newsletter you will
receive the FREE Crossroads front that I used for my version. The
neckline of the vest matches the neckline of the Wild Things Coat, so
you can easily make a Wild Things Vest as well. The vest is on sale for
three days (until Wedesday midnight PST) for $ 6.50 (normally $10) in
the Big Little web shop.
Het patroon heeft twee verschillende
kappen, een kraag, twee verschillende halzen, twee lengtes en een
froezelmouw, er zijn dus heel veel mix en match mogelijkheden. Als je je
inschrijft voor de Big Little nieuwsbrief dan ontvang je gratis het
Crossroads patroondeel, dat ik gebruikte voor mijn vest. Daarnaast is de
neklijn van de bodywarmer hetzelfde als die van de Wild Things Coat,
dus je kan ook makkelijk een Wilde Things bodywarmer maken. Het patroon
is drie dagen te verkrijgen met lanceringskorting voor $ 6.50, (normaal
$10) in de Big Little webshop.
A few weeks ago, I showed youtwo animal coats and promised showing your
a third. I did not manage to keep that promise. Today, I will show you
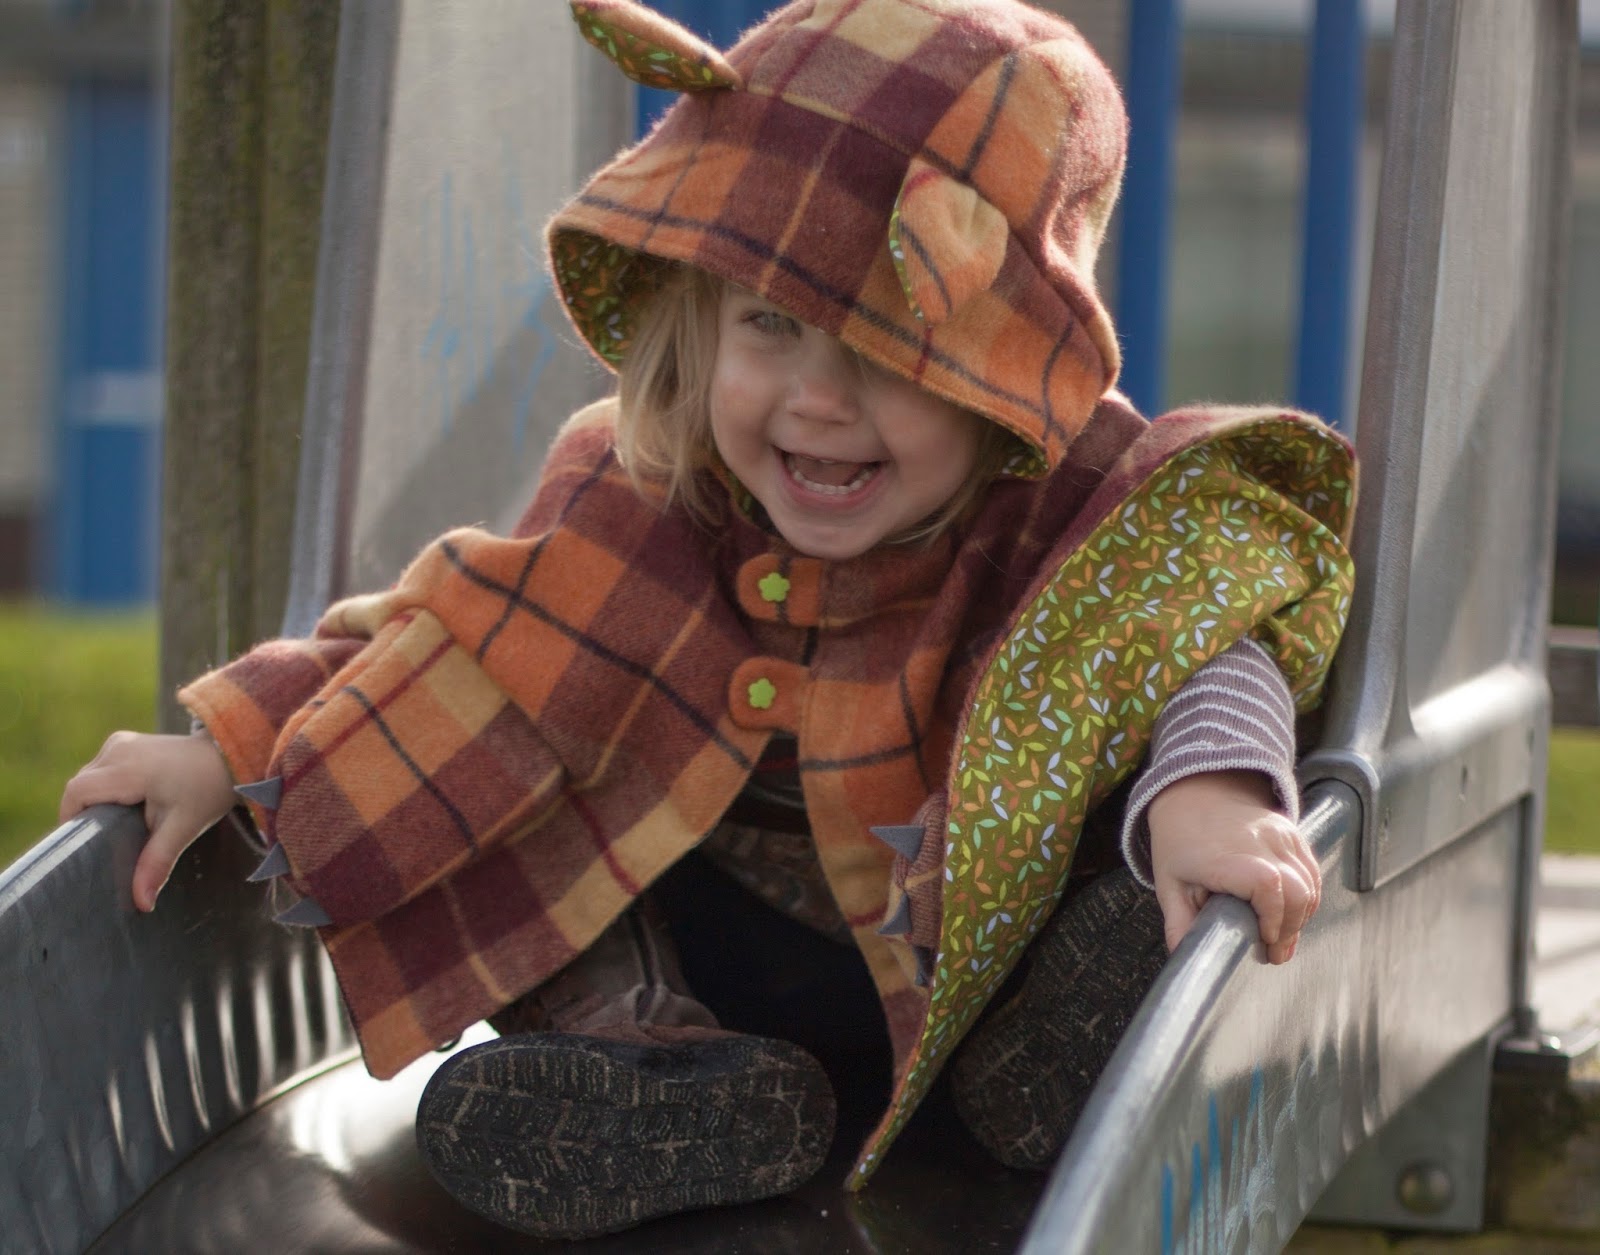
the third coat as a dessert. The main course is two animal capes. Big Little released her newest pattern today, the Wild Things Cape. She
already had an unisex cape, and this cape is either an upgrade to that
pattern, or a new reason to buy a cape pattern in the first place.
Like
with the coat, there are 14 animals described, but the possibilities
are endless. I started with a kitty cape for my youngest. I made it with
leftovers from when I made my eldest her coat (see, why I now really
have to show you the coat at the end). The lining is Soft Cactus, the same as in this skirt. With permission I immediately
hacked the cape pattern.
Instead of having pockets on the
inside, I created an inverse kind a pocket (sorry, best description I
could some up with). The little paws that hang on the front are a
functioning pockets that you can be reached from the inside (where the
hands are). I thought it would be a fun detail that she could put her
hands in it like little paws as well. My daughter thought so too,
instead of a fun option, she insists on wearing the coat with her hands
in the pockets. She even tries to crawl in it like this. The main cape
option is a button loop closure. I added two small tabs such that I
could use snaps.
I made my four year old a horse cape. I
became jealous seeing all the gorgeous manes on the Wild Things coat and
wanted our own. I used three different yarns and went for a full mane, a
very full mane, an eye catcher for sure (and a bit on the heavy side). I went
for a different front closure, which is (shortly) mentioned in the
instructions. This way the entire front overlaps making my girl better
protected against the wind. I totally went crazy with my snap placement
on this one. I love those flowers.
I made a horse cape
because that animal was missing in the examples, but this horse will
probably be turned into a unicorn. The coat pattern came with adorable
draw-your-own-coat cut and coloring pages ( as does the cape pattern)
and ever since both my girls cut and glued a set of unicorn coats, I
have been wanting to sew that horn. No picture, but it succeeded
beautifully, much easier than I expected. I just have to sew it on, but
those last details...
The fabric is the same fabric as this coat, I am still not sure if I would call it red or raspberry. In combination with the pink manes which of the two is not important any more. My middle daughter also wanted claws, like her
little sister, but I felt that a horse/unicorn hooves where not as
suitable to be turned into reversed pockets.
To make this
picture heavy post even more packed, I now show you the bunny coat I
sewed a few weeks ago. Both the shell and lining where bought at
Textielstad. The store is relatively close by, so I actually went there
to look at suitable coat fabrics (usually I buy all my fabrics on the
web). I did not have plans to combine this jersey and wool, but when the
nice store lady stacked them on each other to put them in a bag, I saw
how well they matched.
I again tried something else with the pockets. I went for bunny paws,
and used the same method as the other two coats. I cut the jersey
pattern pieces a bit smaller than the wool ones, to avoid a hanging
lining. In the end it turned out I kind a cut the lining a bit too
small. SO all pieces are a bit curved inwards. My daughter does not mind
though, she loves the coat. It is a bit cold though still. The tail is
detachable with a snap.
The cape comes in three lengths and
with a huge size range. Teenagers and not too tall grown-ups can wear the
biggest size. The pattern is on sale for two days for 7 USD excluding
taxes. Check out the web shop here. If you already own the cape you can
buy an upgrade for 5 USD. During the release only, it is possible to use
the extension to extend the Wild Things Coat with the Wild Things cape.
I love to hear what you think of my creations. Feel free
to leave a comment in the language you prefer (although Google
translate might have to assist me if you choose something different than
English, German, Dutch or Hungarian).