In April, I added a lovely new badge to the right side of my blog without talking about it. Since spring I am a Sewing Portfolio's Ambassador. Sewing Portfolio's is the initiative of Candice who became fed up with the hassle of applying for testing or other contact with pattern and fabric designers. People were telling and showing the same thing over and over again and she thought it should be easier. Sewing Portfolio's therefore is a place to store all your best work in one place and besides easily sharing this info through one link, pattern and fabric designers can also actually find you without you knowing they were on the look out for someone with your profile.
In april plaatste ik een logo op de rechterzijde van mijn blog zonder er rekbaarheid aan te geven. Sinds het voorjaar ben ik een Sewing Portfolio's ambassadeur. Sewing Portfolio's is een initiatief van Candice die vond dat het opgeven voor testen en ander contact met designers makkelijk moest kunnen. Men liet elke keer dezelfde foto's zien en vertelde hetzelfde verhaal, dus hoe handig zou het zijn als je gewoon een linkje kon opgeven. Toen werd Sewing Portfolio's geboren, als je je portfolio vult kan je vervolgens de link opsturen naar designers en daarnaast kunnen designers snuffelen tussen alle portfilio's en jou vinden zonder dat je wist dat ze iemand zoals jou zochten.
Being a Sewing Portfolio's member became even more attractive when Candice decided to share the fabric goodies she received to show the world, with selected ambassadors. She is regularly searching for new sewing ambassadors, so when you start out as a member and have your portfolio up to date, make sure you check her ambassador calls. In August, I received three yard of Michael Miller Christmas fabric. The fabric arrived too late for the Christmas in July party, so now, after Thanksgiving, I thought it was high time to show you what I made! I turned the Nutcracker fabric designed by Sarah Jane into four garments, one for each of the kids. I love Michael Miller fabrics, the fabrics remain beautiful after many washes and the prints are awesome. This dress from Michael Miller fabric is still one of my most favorite makes ever and it still looks awesome after many many wears and washes.
Het lid zijn van Sewing Portfolio's werd nog aantrekkelijker toen Candice besloot de stoffen, die zij toegestuurd kreeg om te showen, met haar leden ging delen. Ze doet regelmatig een oproep voor nieuwe ambassadeurs (diegene die stof ontvangen), dus houd haar in de gaten als je portfolio up to date is. Ik kreeg in augustus drie yard (iets minder dan een meter) Michael Miller kerststoffen opgestuurd. Ik ontging ze net iets te laat om aan de Christmas in July tour mee te doen. Maar nu, na de Amerikaans Thanksgiving, vond ik dat de tijd rijp was om jullie mijn creaties te laten zien.
Although three yards is a significant amount of fabric, I still had to be innovative to make it into three dresses and a shirt. I used three dress patterns by Straight grain, the Tinny, the Laure and the Ishi. For my son I made a Theo from Zonen09. The Tinny dress was the only pattern that I had not used before. Due to fabric scarcity I ended up adding a color block to the bodice of the Tinny and I winged the skirt piece based on the amount of fabric that I had. I made the pocket on the Theo a bit bigger such that the little boy from the panel could fit on it.
Ik puzzelde er lekker op los en naaide er vier kledingstukken mee, eentje voor elk van de kids. Ik gebruikte drie jurk patronen van Straight grain, de Tinny, de Ishi en de Laure. Voor onze zoon maakte ik weer Theo. De Tinny was het enige patroon van die vier die ik nog niet naaide, maar toch hackte ik het meteen. Ik zat schaars in mijn stof dus kreeg het een gecolorblockte voorkant en de rok plooide ik op basis van de beschikbare stof. het zakje van de Theo maakte ik iets groter zodat het jongentje met stokpaard van de paneelstof er precies op kon.
I of course planned to have a shoot with four kids happily watching the camera like little angles and showing of their clothes. I should have known better, I always forget that having them all watch in my direction is already almost impossible, but somehow every time I think it will be better now that they are older. During the first shoot with these garments I had more garments to shoot and this resulted in rather tiered kids so the picture that I posted on Instagram was a good indication of the quality level of the group pictures during that shot. This is another gem from that session.
Natuurlijk zouden die kledingstukken met vieren tegelijk op de foto gaan met schattig lief lachende snoetjes. Ik had beter moeten weten, ik probeer het immers vaker. Het voor elkaar krijgen dat ze alle vier mijn richting uitkijken is al uitdaging genoeg, laat daar die glimlach en zichtbare kleding dan nog maar achterwege. Elke keer denk ik weer dat het nu vast beter gaat, ze zijn immers ouder. Tijdens de eerste shoot had ik sowieso verkeerd gepland. Ik had nog een hele stapel andere kleren en toen de kerskleding boven kwam was iedereen moe en verveeld. De foto die ik gisteren op Instagram plaatste was een mooie voorbeeld van de kwaliteit van de groepsfoto's. Dit is nog een ander pareltje.
A week later I tried again and decided that I needed two type of pictures, one from the garments and one for our yearly Christmas card. At the end of that shoot, I had both. So today, I am mostly showing you pictures of the kids individually, because that was the best way to show of the clothes. Maybe next year, I can do both objections with one set of pictures, you know, when they are older... and when I gifted myself a bigger background.
Een week later deed ik een nieuwe poging. Ik besloot voor mezelf dat ik twee type foto's nodig had, foto's die de kleren zouden laten zien en een leuke groepsfoto voor onze jaarlijkse kerstkaart. Aan het einde van die shoot had ik ze beide gelukkig. Maar vandaag zien jullie dus voornamelijk foto's van losse kids, dit blijft de beste manier op de kleding goed in beeld te brengen. Misschien volgende jaar kan ik beide doelen in een foto samen brengen, volgend jaar zijn ze immers weer wat ouder... en geef ik mezelf een grotere achtergrond cadeau.
During the second shoot I let my kids come up with their own idea's for the shoot. The picture of, my our middle daughter angrily standing on the chair is a picture of a conflict in their artistic process. The picture of our eldest in front of a very crowded table was the end result of that shot and somewhere in the middle I got the perfect Christmas card picture. I am not showing you that one yet, but it does not show of any of the garments well, so you are not missing out on that front. I will post the final pictures over Christmas on Instagram.
Gedurende de tweede shoot liet ik de kinderen zelf bedenken hoe ze samen op de foto zouden gaan. De foto met onze middelste dochter boos staand op haar stoel is een mooi voorbeeld van een conflict gedurende hun artistieke proces. De foto van mijn oudste voor een vreselijk volle tafel was aan het einde van shoot, nadat ze (te) veel accessoires bedacht hadden. Ergens in het midden maakte ik dan toch de ultieme kerstkaart foto. Die foto laat bijna niks zien van de kleren en komt vandaag ook niet op de blog. Die laat ik rond kerst zien op Instagram.
These three green fabrics are part of the Michael Miller Nutcracker act 1 collection. Besides this green color scheme there is also a blue and red one and coordinating plaid fabrics. I always have a weak spot for gold metalic paints and in all three of mine fabrics there were golden details. You can check out the entire collection here. I did not have enough fabric to make a blind join over the zippers, but to show you that I have the skills, I am showing you the join that I made on the panel.
De drie stoffen die ik kreeg zijn deel van de Michael Miller Nucracker act 1 stoffen collectie. Naast groen zijn deze stoffen ook beschikbaar in blauw en rood. Daarnaast zijn er nog coördinerende stoffen zoals ruitjes en kleine gouden printjes. Als je net als ik weg bent van gouden details dan vind je het vast interessant om te weten dat die in al deze stoffen zitten. Hier zie je de hele collectie van de Nutcracker die werd ontworpen door Sarah Jane. Ik had niet genoeg stof om een doorlopende stof te hebben over de rits. Maar om te laten zien dat ik het wel gekund had laat ik jullie zien hoe ik het paneel van de rok samenvoegde.
Today, I am part of the Global blog tour of Chris W designs, who designs super cool bags. I usually like blog tours, but sometimes I am extra excited. Today's blog tour is one of those, the organizers were searching for "crazy" people, so I was immediatly intrigued. I am not a frequent bag sewer (although this is my fourth bag this half year, so I might have chance that statement), but I am a bit crazy for sure. I am a rule breaker. I am a hacker at heart and have a hard time following instructions to the letter. I am a quick and dirty sewist (sewing is my Candy Crush) and prefer to solve issues when they arise than to have an iron tight plan when I start. Chris, the designer is a bit crazy herself, and I so appreciate that of her. She made this awesome video of making a wallet, I dare you not to laugh out loud!.
Vandaag ben ik deel van de wereldwijde blogtour van Chris W Designs, een designer die erg mooie tassen ontwerpt. Ik ben altijd fan van blogtours, maar sommige zijn extra leuk. Vandaag is er zo een, bij de zoektocht naar bloggers zochten ze "gekke" mensen, dus ik was natuurlijk meteen erg geïnteresseerd. Ik geloof dat mijn naaistijl behoorlijk gek te noemen is en ik ben er eigenlijk wel trots op dat ik een (gekke) herkenbare stijl ontwikkeld schijn te hebben. Chris zelf valt ook gezellig in dat "gekke" spectrum. Ze maakte dit super grappige filmpje, ik daag je uit om niet lachend van je stoel te vallen.
I feel that self irony is one of the best forms of humor. Being able to laugh over your own mistakes makes it much easier to deal with them. Besides being a good form of entertainment, your mistakes can also be source of inspiration. More than two years ago I wrote a blog post about how mistakes inspire me, and I still very much believe in it. On today's bag I again managed to turn a mistake into a rather successful hack. I am totally in love with my version of the Savannah bag!
Zelfspot vind ik de hoogste vorm van humor en ik doe daar graag aan mee. Het kunnen lachen om je eigen fouten maakt het maken van fouten ook direct een stuk draaglijker. Ik schreef er twee jaar geleden deze blogpost al over, hoe fouten je extra creatief kunnen maken. Ik sta nog steeds erg achter de inhoud en was sindsdien nog vaak op vergelijkbare methode "creatief" zo ook met de Savannah tas die ik jullie vandaag laat zien.
Hacking the pattern was encouraged, so I stared with omitting all interfacings and instead use extra sturdy fabric (a hack that worked lovely). One of those extra sturdy fabrics was a pair of upcycled jeans (I love upcycling and especially denim). I used the jeans for the strap and for the bottom/sides. I knew I needed something non- white for the bottom, because I will place it on the floor for sure. I also used the jeans as lining to stabilize the pockets. I decided to make the upcycling extra funny and used the back including pockets for the lining of the big inside pocket.
Het "hacken"van het patroon werd toegejuicht, dus liet ik meteen alle verstevigingen achterwege. Ik houd niet van een hele avond strijken. Ik koos daarom voor extra dikke stof, canvas aan de buitenkant en ik recykleerde een jeans. De jeans gebruikte ik voor de onderkant/zijkant en schouderband. Ik wist dat ik de onderkant niet schoon ga houden, dus zocht ik expres een donkere stof. De jeans gebruikte ik ook als voering van de zakken. De grote binnenzak kreeg het kontdeel en heeft dus twee extra zakken waar ik niks voor hoefde te doen.
I wanted the bag to "stand" but I did not want to buy thick (and expensive) interfacing. I did have a large piece of wool felt that I once took from a remnant bin. It is a very thick and sturdy fabric, in my previous post, the cheese is cut from that wool felt, so you can see how thick it is. I have a rather sturdy Pfaff, so I thought the thickness would not be an issue. But I had been a bit optimistic. I had to sew the sides together by turning the needle by hand (yes that does give you a blister). After doing this twice per side (my machine was skipping stitches) the bag held together fine. I did not dare to sew over the sides again to top stitch them. So I decided to leave it like this. Than, later I realized that if you take a rather narrow needle it is much easier to go through this fabric, so after the entire bag was done I did top stitch the bottom (and broke three needles). This way I also sewed the lining inside the bag, but that is fine for me.
Ik wilde dat de tas echt zou "staan". Ik wilde er echter geen (dure) versteviging voor kopen dus gebruikte ik een stuk wolvilt dat ik ooit als reststuk kocht. Het is erg dik en stevig en leek me ideaal, de kaas uit mijn vorige blogpost is van die wolvilt, dus dan zie je hoe dik het is. Ik heb een behoorlijk zware Pfaff dus ik voorzag geen problemen bij het in elkaar zetten van deze tas... Ik was iets te optimistisch, maar met geduld en het met de hand bewegen van mijn machine (ja dat levert blaren op) lukte het dan toch. Zelfs met de hand bleef mijn machine steken overslaan, dus deed ik elke kant twee maal, maar toen zat toch alles echt vast. Ik durfde er echter geen topstiksel op te zetten. Ik liet het dus eerst achterwege. Later kwam ik erachter dat je met een dunne naald er toch nog best makkelijk doorheen komt dus drie naalden later had ik toch een net topstiksel. Daarbij naaide ik wel de voering vast aan de tas, maar dat vond ik geen probleem.
Besides ommitting the interfacing, I was totally planning to follow instructions (no, this is not sarcastically, omitting interfacing does not really count as ignoring instructions for me). But then, I somehow ended up sewing the welt pocket in the top flap (it should have been on the main body piece on the inside of the bag). I was out of my main fabric. I decided to just roll with it (I had to sleep on it, when I noticed my mistake I first became frustrated of course). I sewed an extra strip on the flap to conceal the zipper and I actually like having not to open the bag and still be able to reach some essentials.
Naast het weglaten van de vlieseline dacht ik echter de stappen behoorlijk te gaan volgen. Toen naaide ik echter per ongelijk de ritszak in de voorflap in plaats van in de "body"aan de binnenkant. Mijn stof was op, dus een nieuwe voorkant knippen zat er echt niet in. na een nachtje slapen (in eerste instantie baalde ik enorm), naaide ik een extra stripje op de rits en vind ik het resultaat super gaaf. Nu kan ik ook bij kleine belangrijke zaken zonder de tas open te hoeven doen.
The Savannah pattern is packet with pockets, but I decided to omit some of them (which may or may not be due to a lack of time and fabric). This way I ended up with missing a small zipper pocket (which is actually a part of the original pattern) and I decided to convert one of the front pockets into a zipper pocket. I sewed in a zipper by hand, it actually only took me half an episode of a tv show (watching tv with my husband is the best way to make hand sewing bearable). For the picture I pulled down the fabric a bit, else it would not show at all, it normally is nicely covered.
Het Savannah patroon heeft heel veel zakken, maar ik besloot er een heel stel achterwege te laten (in verband met tijd en stof gebrek). Uiteindelijk miste ik toch wel een klein ritszakje (die wel in het oorspronkelijk patroon zit natuurlijk). Ik naaide daarom met de hand een rits in het voorste steekzakje. Ik deed er een half tv programma over en ben zeer blij met het resultaat. Voor de foto duwde ik de zak helemaal naar benden, normaal zie je het ritsje helemaal niet.
Finding my keys is the most frequent interaction I have with bags. I therefore like to store them separate and easily reachable. I sewed an elastic in a side pocket, this way my keys are safe and easily reachable. I like to sew frugally in general, so besides upcycling the denim, I also upcycled the hardware of this bag. I repurposed the strapholders from an old conference bag. The fabric that I used was very inexpensive as well. Besides the upcycled jeans, the other main outside fabric was a free remnant that Joyce (blogless) donated to the "pile" on our most recent sewing weekend. The arrow fabric was an Art Gallery fat quarter that I got as a gift accompanying this skirt. The black dotted lining is from too small pillow cases that were part of a recently bought bedcover set from Ikea.
Het zoeken van mijn sleutels is iets wat ik gedurende de dag heel vaak moet doen. Ik houd er daarom van om ze los van al mijn andere troep te houden. Ik naaide daarom een stuk elastiek in een van de zijzakken. Zo kan ik makkelijk de deur openen en kan ik ze ook niet kwijtraken. Naast het recykleren en het weglaten van de versteviging naaide ik op nog meer manieren "zuinig" (als echte Hollander). De stof aan de buitenkant kwam van de "gratis" stapel van ons laatste naaiweekend (Joyce, de oorspronkelijke eigenaar is nog steeds blogloos). De stof met pijlen was een fat Quarter van Art gallery die ik als cadeautje bij deze rok kreeg. De metalen onderdelen voor de schouderband knipte ik van een tas die ik ooit op een congres kreeg. De voering was van te kleine kussenslopen die bij ons recent aangeschafte dekbedovertrek van Ikea zaten.
If I convinced you about the awesomeness of the Savannah pattern, you will be delighted to hear that you can win the pattern and more! There are two give away's connected to today's post. The first give away is that I am allowed to give away two(!) Savannah bag patterns. If you would like a chance to win one, you have to leave a comment on this blog post, in which you tell me how you follow me (Bloglovin, Instagram, Facebook). I will pick two random winners on Tuesday the 21st. For the second giveaway, the big one, you can fill the rafflecopter.
Als ik je overtuigde van de geldigheid van het Savannah patroon, dan ben je vast heel blij te horen dat ik maar liefst twee van die patronen mag weggeven, en dat is nog niet alles. Mocht je dus één van die twee taspatronen willen winnen, dan vertel je mij in de comments even hoe je mij volgt (Bloglovin, Instagram, Facebook) en dan trek ik daar twee random winners uit op dinsdag 21 november. Naast deze twee taspatronen is er ook nog een grote give away waar je deel aan kan nemen door je naam in de Rafflecopter te stoppen.
Updated: Bieke from Biebiezonder and Delphine Hoorelbeke won the two bag patterns that I was allowed to give away! Please contact me inspinration(at)gmail.com
Tour Discounts
ChrisW Designs is taking 20% off all patterns until end of day (Australian Central Standard Time) November 21. Code GlobalBlogTour17 (applied automatically with this link. Buy without fear: If you purchase during the tour and then win a pattern, your purchase price will be refunded.
Handbag Hardware Australia (aff link) is offering a 10% discount for the duration of the tour. Use code: CWD10. (Excludes interfacing and Emmaline Bling.)
Bobbin Girl has a 10% discount using code BLOGTOUR17. (Not to be combined with any other discount or rewards points.)
Gold Star Tool is taking 15% off for our tour readers. Use code chriswdesigns.
Zipit (aff link) is also offering a 10% discount on shop items. Use code ChrisWDesigns.
I know that many people feel they give you a compliment if they tell you your projects look store bought. I always assume that those people believe our store bought pieces are made by artists that love their work or by very advanced machines and not by the underpaid exploited factory workers that actually make our stuff. My husband knows what I think off that "compliment"so when he saw the shirt that I am showing your today, he immediately told me that it was totally incomparable to all the boring shirts in the store. He and my over-the-moon daughter made my day.
Ik weet dat veel mensen het idee hebben dat ze je een compliment geven als ze zeggen "Oh je ziet helemaal niet dat het zelf gemaakt is, het ziet eruit als in de winkel". Ik neem dan aan dat mensen denken dat de spullen uit de winkel gemaakt worden door gemotiveerde creatievelingen of door geavanceerde machines en niet door uitgebuite fabrieksarbeiders. Mijn man weet wat ik van dat "compliment" vind (ik glimlach altijd vriendelijk als mensen het zeggen hoor) en vertelde mij dus dat dit shirt niet vergelijkbaar was met gewone saaie shirt uit de winkel, de kinderen waren het helemaal met hem eens.
The project that inspired such praise was this interactive shirt. Yes, interactive, besides being a shirt it doubles as a toy. My middle daughter LOVES kitchen toys (besides the kilo's of Lego's in our house we have a lot of kitchen play sets as well), so when I saw this applique I immediately knew who I would use it for. Although the original project is an easy sew, I made it even easier. Officially you have to stabilize your fabric for the food item and sew the halves together. I went a slightlydifferent route, I saw this as the perfect opportunity to finally use the felt that I once bought. Besides the cheese, all the food items were made from inexpensive hobby felt that I glued together with textile glue. The cheese is from high quality felt and it is one layer. After cutting the union I decided to make an olive which is not in the set) from the little scrap circle.
Het shirt waar hij het over had is dus dit interactieve shirt. Ja, interactief, naast kledingstuk is het eigenlijk gewoon speelgoed. Onze middelste dochter is weg van keukenspeelgoed. Naast de kilo's Lego die we hebben loopt ons huis dus ook over van de potjes, pannetjes en snijdbaar houten groentes. Toen ik het patroon voor deze applicatie zag wist ik dus meteen wie de ontvanger zou worden. Normaal gezien is dit een makkelijk project, ik maakte het echter nog makkelijker. Volgens de handleiding knip je de groentes uit stof, strijk je er versteviging op en naai de twee helften aan elkaar. Ik zag dit echter als een uitmuntende gelegenheid eindelijk eens iets te doen met dat hobby vilt dat in de kast ligt. Ik knipte de stukken uit en plakte ze met textiellijm aan elkaar. Zo werd het dunne hobby vilt echt een mooi stuk speelgoed. Alleen de kaas knipte ik van dik wolvilt, dat had ik ook nog liggen. De olijf zit officieel niet in de set, maar was het restje van toen ik de ui knipte, restje groen erop en klaar.
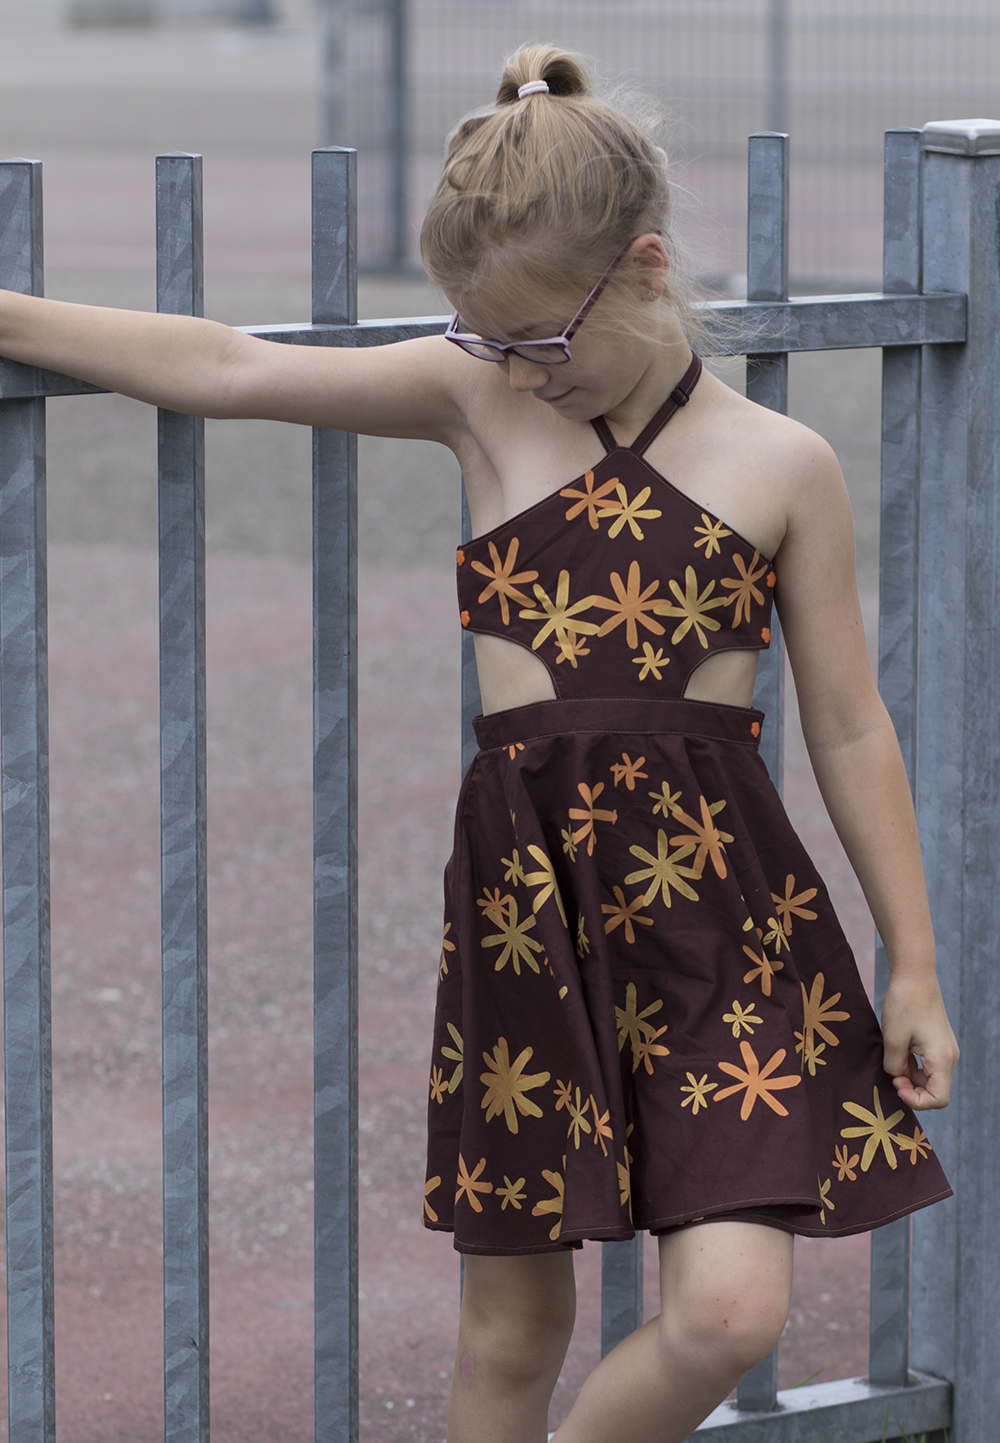
This interactive applique is part of the new One thimble issue 17*. Although this applique would be an awesome stand alone toy, I finally did decide to sew the applique on something. I chose the new Regem* shirt by Sofilantjes as my canvas. Besides containing this applique, the new issue has many more patterns, and today I am also showing you the Nori dress by Paisley Roots. I tested the dress over the summer, so when she was wearing this dress, she was not freezing, I promise. After this test the pattern got adjusted a bit, the cut outs became a bit smaller and the skirt a bit longer.
Deze interactieve applicatie is onderdeel van de nieuwe One Thimble issue 17*. Hoewel deze applicatie het prima zou doen als los speelgoed besloot ik het toch maar op een shirt te naaien. Ik gebruikte daarvoor de Regem*, het nieuwe shirt van Sofilantjes als canvas, Naast deze applicatie bevat issue 17 natuurlijk nog veel andere patronen. Zo zit er ook de Nori jurk in van Paisley Roots. Ik testte de jurk deze zomer, dus dochterlief stond echt niet te blauwbekken op de foto's. Na het testen werd het patroon nog ietsje aangepast, de uitsnijdingen aan de zijdes werden iets kleiner en de rok iets langer.
The Nori dress closes with snaps on the sides and sliders in the neck. Snaps I have enough to last a lifetime, but sliders are not in my sewing supply. I feel hardware is often overpriced in craft stores and prefer to use a frugal solution or upcyle those parts. If you are similar, you might be happy to realize that old bra's also have sliders, and those I did have in my upcycle pile.
De Nori jurk sluit met drukknopen en schuifjes op de bandjes in de net. Snaps / drukknopen heb ik in overvloed, die hoe ik waarschijnlijk mijn hele leven nooit meer te kopen. Schuifjes had ik echter niet op voorraad. Dat soort zaken vind ik altijd erg duur in de winkel, ik pas het patroon daarvoor meestal aan of ik recyckleer wat. Mocht je hetzelfde zijn als ik, dan ben je mogelijk blij om te realiseren dat schuifjes ook op bh's zitten. Die lagen op mijn recykleer stapel, dus wederom hoefde ik er geen geld aan uit te geven.
I told you before, my fabric stash mostly contains jersey, there is not much woven in there, and certainly not many wovens that are big enough to cut a circle skirt for a nine year old from. I did have some brown biological Cloud 9 fabric that I once bought to make a suit for my son from (which did not happen). Uni brown did not really say "summer"dress to me, so I took my Bobbinhood kit and for the first time hand-cut a stencil. I was between two summer vacations and scarce on time, so I freestyled this fabric in under 40 minutes. It could have been done better but I like the vintage vibe.
Ik schreef het al vaker, mijn stoffenvoorraad bestaat voornamelijk uit tricot. Er zijn weinig geweven stoffen en al helemaal weinig waar je een cirkel rok voor een negen jarige uit kan knippen. Ik had echter nog wel effen bruine biologische stof van Cloud 9. Ik ging er ooit een kostuum voor mijn zoon uit knippen, dat is er dus niet van gekomen. Bruin is echter niet echt typisch zomers, dus pakte ik ook mijn Bobbinhood kit erbij en versierde ik de stof. Ik zat tussen twee vakanties is en het moest rap rap klaar, dus in 40 minuten bedrukt ik de stof, dit was de eerste keer dat ik met de hand in een stencil sneed. Dat ging echt heel goed en was makkelijker dan ik gedacht had.
This post is part of the One Thimble issue 17 blog tour. The tour is nearing the end, which means that there is already a lot of inspiration available. Here you have an easy clickable overview of the entire tour organized my Pattern Revolution. This issue also contains shorts, a bag, teacher gifts and jacket, a woman's dress and more. You can buy issue 17 one the One thimble site.
Deze blogpost is deel van de One Thimble blog tour. De blog tour is bijna aan het einde, dus dat betekent dat er al heel veel inspiratie beschikbaar is via deze klikbare links. In issue 17 staan ook nog patronen voor shorts, jasje, cadeautjes, tasje, jurk voor dames en meer. Je kan One Thimble isue 17* aanschaffen via de One Thimble website.
Feel free to leave a comment in the language you prefer (although Google
translate might have to assist me if you choose something different
than English, German, Dutch or Hungarian). If you buy anything through
my affiliate links (*), I get a small commission (the price stays the
same for you), I am very grateful for everything that feeds my fabric
addiction.
Ik vind het altijd super leuk om reacties te lezen om mijn creaties. In
deze post zitten enkele affiliate linken, aangeven met een *. Mocht je
het patroon aankopen doordat je in de shop kwam via een link van mij,
dan krijg ik een kleine commissie. Het patroon wordt niet duurder voor
jou, maar mijn stoffenkast is er wel heel blij mee.
Lotte Martens released a new collection on Wednesday and I again had the honor to provide you with some sewing inspiration. You know that my heart beats for jersey fabrics, so I picked an Aronia from the new collection. The Aronia fabrics have a gradient print with stripes and there are five different colors. I sewed with the yellow version which is a lovely color combination with a warm and bright effect.
Lotte Martens lanceerde afgelopen woensdag weer een nieuwe collectie en ik had de eer om weer deel uit te mogen maken van de blog tour. Jullie weten dat mijn hart sneller gaat slaan van tricot stoffen, dus ik koos een Aronia stof uit de collectie. De Aronia stoffen hebben een schitterend kleurverloop in combinatie met strepen. Ik naaide met de gele versie die zowel warm als fleurig is en dus een zonnig effect geeft op een winterdag.
I wanted to provide as much inspiration as possible, so I used the stripes in vertical direction on the front and in horizontal direction on the back. I used the Legend dress pattern from Sew Straight and Gather. I sewed the dress before and I just love the neckline. The entire front of the dress is lined, for that nicely finished neckline. I color blocked the lining such that I only used the Aronia on the top of the lining.
Ik ging voor zoveel inspiratie als mogelijk en naaide strepen daarom voor in een andere richting dan achter. De stof heeft namelijk een fijne rek naar alle kanten, dus je kan hem draaien hoe je wil. Ik naaide een Legend jurk van Sew Straight and Gather. Ik naaide de jurk al eerder en ik ben weg van de mooie halslijn. Voor die mooie halslijn is het hele voorpand gevoerd, maar dat vond ik zonde van mijn Aronia stof, dus ik color blockte mijn voering. Alleen de bovenkant is in Aronia, de rest in een andere effen tricot.
>
The theme of the new collection is "Stories without endings" and I associate that with fairy tales. This weekend we had another sewing weekend that was located in a storybook surrounding which perfectly fitted the collection's theme. Katrien also took her dress on the weekend to make some magically beautiful pictures of her Lotte Martens party dress.
Het thema van de collectie is "Stories without ending"en dat associeer ik met sprookjes. Afgelopen weekend hadden we weer een naaiweekend in een magisch mooie omgeving. Ik liet dus foto's schieten naast een kasteelachtig gebouw en ook Katrien zette haar schitterende feestjuk daar op dromerige foto's.
Lotte Martens' fabrics are known for their sparkle, and many of the fabrics in the new collection are printed with metal paint. The Aronia fabrics are also available with metal screen printed stripes, make sure you check this listing because that yellow dress takes your breath away for sure. Besides jerseys, the collection contains thick knits, scuba, wovens and more. I got a sneak peek from several of the blogger projects and with every sneak, I was amazed again, so make sure you check out all the posts that will become available for the tour.
Lotte Martens stoffen zijn bekend van hun glinstering en de meeste stoffen uit de nieuwe collectie zijn ook voorzien van schitterende metalen opdrukken. De Aronia tricot stoffen zijn ook beschikbaar met gouden strepen. Bekijk zeker hier de listing, je valt stijl achterover van de jurk die Lindsey ermee naaide. Naast tricot stoffen zitten er ook dik gebreide stoffen, scuba, geweven stof en nog meer in de collectie. Ik kreeg al verschillende sneak peeks te zien en elke keer werd ik weer verrast, Zorg dus dat je alle posts van de blog tour een keer bekijkt.
I sewed my dress with one and a half meter of fabric and only had some small scraps left. This time I could not turn them into a dress for my youngest, but I did manage to sew a shirt. I used the Nivalis* pattern and some extra creativity. I had used all the clear stripes in the fabric on the dress, but by combining scraps, you can still see the gradient effect. I cut the front from four smaller pieces, but they go well together like this. I top stitched with some sparkling gold thread.
Ik naaide mijn jurk uit een ander halve meter stof en had aan het einde alleen nog wat kleine restjes over. Deze keer ging het geen extra jurk worden, maar ik kreeg er nog wel een shirtje uit voor mijn kleinste op basis van de Nivalis*. Er waren geen strepen meer over, die verwerkte ik allemaal in de jurk. Door het voorpand uit vier rest stukken te naaien zie je het veelkleurige effect toch echter weer goed terug komen. Ik stikte sommige naden door met goudkleurig stiksel, niet zo duidelijk op de foto's maar dochterlief was weg van de glimmende extra's.
In the theme of never ending stories, I will also show you another Lotte Martens piece that I made earlier. After this ensemble, I still had quite some fabric left and I sewed my middle daughter a Aura* bolero. I probably do not have to tell you she loves this sparkling piece.
Volgens het thema "never ending stories" laat ik jullie nog een Lotte Martens project zien. Nadat ik dit ensemble naaide had naaide ik ook nog een Aura*. het zal jullie niet verbazen dat het glimmende vestje regelmatig op beide van mijn jongste meiden opduikt.
Although the collection was launched on Wednesday, you will have to be a little more patient for the Aronia fabrics. They unfortunately were not delivered yet, but you can already check the stores and the other fabrics from the collection.
Hoewel de collectie sinds afgelopen woensdag beschikbaar is, moet je nog even iets langer wachten op de Aronia stoffen. Die werden helaas niet niet geleverd. Ze zijn het echter meer dan waard om op te wachten en in de tussentijd kan je hier al wel vast zien waar ze te koop gaan zijn en snuffel ook fijn even door de wel beschikbare stoffen.