I wrote it in my previous post already, I am not sewing as much anymore as a few years ago. What did not change is my love for quick projects and today, I am showing you four long sleeves that I sewed in less than one hour in total, including cutting. They were, of course that super quick because they are upcycling projects. Sweaters from me and from my husband, that got a second live.
Ik schreef het al in mijn vorige post, ik naai niet zoveel meer als een paar jaar geleden. Wat niet veranderde, is mijn liefde voor snelle projecten en vandaag laat ik je vier sweaters zien die ik in totaal in minder dan een uur naaide, inclusief stof knippen. Ze zaten zo super snel in elkaar omdat het natuurlijk recykleer projecten waren. Sweaters van mij en van mijn man, die een tweede leven kregen.
I love "before" pictures, even though the quality of today's ones is crap, no other way to say so, I still added them. These four upcylces were a spur of the moment project. One evening, I was overwhelmed by the fact that there really was nothing with fitting long sleeves to be found in our son's closet. So, I pulled four garments out of the to-be-upcycled-pile (as big as the new fabric stash now a days), slapped them on my son for fun, made pictures with my phone... and adjusted the sweaters. The idea was that me and our son needed a quick fix (I my sewing kick and he clothes), so in my mind there was no time to take out the good camera and background screen. The modelled shot were made several days later, seeing as the clothes were worn before anyway he was allowed to just wear them before I made final pictures.
Ik hou van 'voor'-foto's, ook al is de kwaliteit van de foto's van vandaag zeer slecht, geen andere manier om dat te zeggen, voegde ik ze toch toe. Deze vier recykleer projecten kwamen voort uit een plotseling opkomend plan. Op een avond realiseerde ik me dat er geen sweaters in de kast van de zoon lagen en trok ik direct vier kledingstukken uit de recykleerstapel (ondertussen zo groot als de nieuwe stoffenverzameling), trok ze aan bij een niet in fotostemming zoon, maakte foto's met mijn telefoon ... en paste de truien aan. Het moest gewoon lekker snel snel dus in mijn gedachten was er geen tijd om de goede camera te pakken en het achtergrondscherm te plaatsen. De gemodelleerde foto's werd enkele dagen later gemaakt, aangezien de kleding al eerder was gedragen, kon hij de truien ook gewoon dragen voordat ik definitieve foto's maakte.
This heavy knitted sweater I bought for myself several years ago, I still love the style, but it just is not for me. When you upcyle such knitted fabric, a serger comes in extra handy. Jersey fabrics do not fray, but this knitted fabric will disintegrate into loose threads if not handled correctly. In the before-picture you see that the sweater's neckline is super big on our son and the whole thing is of course too long, I took off the neckline, cut a new body and sleeve pieces keeping the bottom intact and sewed back the neckline (that I had made smaller). No hemming for me on this one.
Deze gebreide trui kocht ik enkele jaren geleden voor mezelf, ik vind de stijl nog steeds super mooi, maar het is gewoon niet mijn stijl. Wanneer je zo'n gebreide stof bewerkt is een lock wel bijna een vereiste. Tricot-stoffen rafelen niet, maar deze gebreide stof valt uit elkaar in losse draden als je niet oplet. In de vóór foto zie je dat de hals van de trui super groot is bij onze zoon en het hele ding is natuurlijk te lang, ik sneed de halslijn af, knipte een nieuw lijf en mouwdelen, zodat de onderkant intact bleef, naaide schoudernaden, zette mouwen in, zijkanten dicht en naaide de hals terug (die ik kleiner had gemaakt). Deze trui had dus geen zoom nodig.
The white/blue sweater was one of my husbands favorites, but there was a tiny hole near he bottom of the button placket. I closed the hole with a thread, but my husband did not deem the garment suitable for work anymore. He is a star in spotting small imperfections (not in me fortunately). I added four golden triangles at the bottom to the button placket. One was enough to cover the stitching of the tiny hole, but I wanted to give it an intentional look. For this sweater I actually kept the entire original neckline and just narrowed the body and made a new hem. This did of course result in a non-stripe matching between sleeves and body.
De wit / blauwe trui was een van de favorieten van mijn man, maar er was een klein gaatje in de buurt van de knoopsluiting. Ik sloot het gat met de hand, maar mijn man vond het kledingstuk niet meer geschikt voor werk. Hij is een ster in het spotten van kleine vlekjes en gaatjes. Ik streek vier gouden flex driehoeken aan de onderkant van de knoopsluiting. Eén was genoeg om het stiksel van het kleine gaatje te bedekken, maar zo lijkt het meer of er een idee achter zat. Bij deze trui hield ik juist de originele halslijn in stand en maakte ik een nieuwe zoom. de strepen tussen mouwen en lichaam sluiten nu niet meer aan, maar dat geeft niet..
The other two sweaters got the same recipe as the white/blue striped one. I re-cut a sweater by keeping the neckline, and shoulder seams intact.The grey/black sweater was mine and by pulling up the neckline and two small hand stitched pleats keep the rather strange neckline perfectly in place. I could not save the entire text from the black sweater, the "S" from Shipyard lost it's top, in the sleeve cycle, but I think he looks fancy even with an incomplete 'S'.
De andere twee truien kregen hetzelfde recept als de wit / blauw gestreepte. Ik knipte een kleinere trui en hield daarbij de halslijn en de schoudernaden intact. De grijs / zwarte trui was er nog een van mij en door de neklijn op te trekken en twee kleine handgestikte plooien houd de nogal vreemde halslijn perfect op zijn plaats. Ik kon de hele tekst van de zwarte trui niet redden, de "S" van Shipyard verloor een stukje bovenkant, in de mouwopening, maar ik vind dat hij er zelfs bij een incomplete 'S' netjes uitziet.
I am a huge fan of upcyling and I have done several upcycling projects in the past. I also love challenges, and sewing competitions, I have done several from those in the past as well. Not because I think that I would have a chance to win ( I usually drop out after the first round), but simply because they inspire me. The Candice Ayala’s Upcycling Challenge functioned exactly like that. I had all the materials that I need already in my stock, but somehow had not come around to using them yet. I am so happy I did now!
Jullie weten vast wel dat ik een enorme fan ben van recyckleren, ik blogde er al verscheidene keren over. Daarnaast houd ik van uitdagingen en wedstrijdjes en daar deed ik ook al aan een paar mee. Niet omdat ik denk te kunnen winnen (ik lig er meestal na de eerste ronde al uit), maar gewoon omdat het me inspireert weer eens iets anders te doen. Zo ging het ook met de upcycle wedstrijd waar ik vandaag over post. Ik had alle materialen gewoon in de kast liggen, maar kwam er maar niet toe om ze te gebruiken. De wedstrijd was precies de push die ik nodig had en ik ben super blij met het resultaat.
Here you can read more about the actual upcycling assignment, but quickly summerized, you had to upcycle and use new fabric as well. The piece that I upcycled, I received from my sister in law, she thrifted it for me, it consisted of natural materials, cotton and silk and had three very interesting textures, drapey silk, knitted cotton that was super soft an fluffy and cotton lace, plus the skirt part included a knitted lining). Candice gave some great tips in her kick off post. When I upcycle I always try to use as much as possible from the garment, so of course I worked according to Candice's tip of really dissecting the garment with a seam ripper. The shape of the individual fabric pieces usually inspire me like the shape of a rock can inspire a sculptor. I also like to to use original details, like the tailored finishes that Candice mentions. The original garment contained two straps to fixate rolled up sleeves, those I turned into shoulder straps on the sundress, including the original button hole and button.
Hier kan je meer details lezen over wat de opdracht was, maar kort samengevat moest je iets recyckleren en er ook nieuwe stof bij gebruiken. Het stuk dat ik recykleerde kreeg ik van mijn schoonzus met als doel om het te recykleren. De top/jurk was gemaakt van natuurlijk materialen, er zat zijde, katoen en kant in. De stoffen zorgde ook voor interessante structuren, de gebreide bovenkant voelt als zachte wol, de zijde is heel soepel vallend en de kant geeft een mooi 3d effect. Candice gaf in haar eerste post allerlei tips die kunnen helpen bij het recykleren en ik zag dat ik ze eigenlijk allemaal ook gebruik. Ik haal een reyckleerbaar kledingstuk uit elkaar met tornmesje om zo veel mogelijk stof te behouden en vervolgens laat ik me inspireren door de vormen van de stof. Ook gebruik ik graag onderdelen uit het originele kledingstuk zoals knopen etc. Bij het kledingstuk van vandaag zaten bandjes waarmee je de mouwen kon vastzetten na het oprollen. Die bandjes gebruikte ik als schouderbandjes op een van de jurken inclusief de knopen en originele knoopsgaten.
I used one meter Michael Miller Mermaid Magic Blossom and turned the fabric and the garments into four pieces to create three outfits. I always make before pictures, but this time it was also a requirement. Full disclosure, I did line the bodice of our eldest daughter with a remnant fabric from my stash and I used an earlier made bias to finish the arm and neck holes on the top of our youngest, but those were the only extra pieces of fabric that I used. I lined the lace middle piece on the smallest top with a piece of excess silk that I had to cut off and I used the original lining of the tunic to both line the dress of our eldest and to back the lace on the sun dress of our middle one.
In dit recykleer project gebruikte ik ook een meter Michael Miller Mermaid Magic Blossom en kreeg het zo voor elkaar om vier kledingstukken te maken die drie outfits vormen. Ik maak altijd voor-foto's maar deze keer was het ook een vereiste aan deelname. Ik moet wel eerlijk zijn, niet alle stof die ik gebruikte staat op de voor-fotos'. Tijdens het creatieve proces bedacht ik me dat ik extra stof nodig had voor de voering van de jurk van de oudste en ik werkte de armsgaten van het topje van de jongste af met een biasband die ik al eerder maakte. Dat waren echter de enige extra stoffen die ik gebruikte. Ik voerde de jurk van onze oudste met de oorspronkelijke voering en die voering gebruikte ik ook als backing voor de kant op de jurk van de middelste. Ik gebruikte een stukje overschot zijde om het topje van de jongste te voeren
The dress that I made for our eldest is a hacked Brueram dress by Sofilantjes. I have already sewn so many of those, I keep getting warm feelings every time that I see the back of that pattern. Our eldest has started to develop, so I crated two small darts inspired by this blog post. The resulting fit is perfect. The skirt part is simply the skirt part from the original garment, but now I used the back of the skirt as the front, I just loved that flutter detail.
De jurk die ik voor de oudste naaide is een aangepaste Brueram, een patroon van Sofilantjes. Ik naaide er al heel veel jurken mee en elke keer word ik weer zo blij van die achterkant. Onze oudste is iets aan het ontwikkelen en daarom maakte ik coupnaden die geïnspireerd waren door deze blogpost/ De pasvorm is nu echt helemaal geweldig. Als rok nam ik gewoon de rok van het oorspronkelijke kledingstuk maar deed nu de frutsels aan de voorkant. Ik vond het juist zo'n leuk detail.
The dress on our middle daughter was totally free styled. That lace on the back of the original garment had a bit strange shape, but when I but in a triangle of the knitted fabric from the original garment, it totally looked like bodice. Like I wrote before, I lined this bodice with a piece that I had cut of from the skirt knitted lining. I gathered a rectangle of the Mermaid Magic Blossom fabric that was as wide as the fabric as a skirt. It is not a full skirt, but the pretty fabric which includes golden details more than makes up for that.
De jurk van de middelste is volledig ge-free-styled. De kant van de rug van het oorspronkelijke stuk had een vreemde vorm, maar door er een driehoek in te naaien werd het een soort lijfje. Ik gebruikte dus de voering van de oorspronkelijke rok, die dus exact de juiste kleur had, om het lijfje niet te voeren zodat je niet dwars door de kant heen kijkt. Ik rimpelde een rechthoek in de stof breedte tot een rok. Het is geen wijde rok, maar de stof maakt alles goed, ik ben dol op gouden elementen en deze stof zit er vol mee.
Our smallest is wearing Scuttle shorts. They are designed for knit fabric, but I felt that the color blocked pocket should work in woven, and it totally did. From the sleeves and front of the original garment I had enough fabric to cut those cute trousers from. I managed to squeeze out a woven top to finish her outfit. I used the other half of the lace as a center piece, I really needed that piece, I would not have been able to create a top out of the Mermaid Magic Blossom fabric that I had left. I used the Sally dress pattern as a base. I tested it a few years back and I remembered that it fits over the head without closure.
Onze jongste draagt een Scuttle short. Dat patroon is getekend voor rekbare stoffen, maar ik schatte in dat de zakken wel in geweven stof konden en ik had gelijk. Van de mouwen van het oorspronkelijke kledingstuk kon ik precies een broek knippen en van het voorpand een tailleband. Uit de restjes Mermaid Magic Blossom kon ik nog een topje persen. Ik gebruikte de andere helft van het kant om er een middenbaan op het voorpand mee te maken. Aan de ene kant vind ik het gewoon mooi en aan de andere kant had er geen heel voorpand uit de stof gekund. Ik voerde de kant ditmaal met een stuk zijde dat ik van de oorspronkelijke rok knipte. Ik knipte het topje op basis van het Sally patroon dat ik jaren geleden testte en waarvan ik wist dat het zo over het hoofd gaat zonder sluitingen.
One Thimble fifteen* was released today and I tested one of the new patterns, the Dax trousers* bij Gracious Threads. The pattern is for a pair of classic chino pants complete with full fly and welt pockets on the back. The pattern includes the option to roll up the trousers and to fixate them (with a flap on of the inside) to turn them into summer trousers . We needed some summer pants, so I slightly adjusted the pattern (just cut of the bottom part of the leg pieces) and made pair of shorts.
One Thimble 15* werd net gelanceerd en ik mocht een van de patronen testen, de Dax broek* van Gracious Threads. Het patroon is voor een nette Chino stijl broek compleet met schuine steekzakken, volledige rits en dubbele paspelzakken op de achterkant. Het patroon beschrijft ook de optie om flapjes in de binnenkant te naaien en zo de optie te hebben om de broekspijpen op te kunnen rollen en vast te zetten. Wij hadden nog behoefte aan een zomer broek, dus ging ik voor zo'n opgerolde versie. Ik voorzag dat hij alleen verkort gedragen ging worden en knipte het patroondeel dus gewoon korter, direct een kleine hack dus.
The instructions of the pattern are perfect, do not worry if you never made trousers with a zipper or welt pocket, you will do great with all the tips and tricks. There are even movies that you can watch. I did sew trousers before and this new pair of shorts was actually one of my sewn trousers in the past. I love upcycling, but I rarely upcycle items that I sewed (I am trying to decrease my fabric stash and putting back things I already sewed is very bad for my moral). Due to loosing weight, I could not wear these trousers anymore, and I am very happy that they got such a good new destination. I reused the zipper and the belt loops, that is why they have a golden top stitching.
De instructies zijn heel gedetailleerd. Mocht je nog nooit een broek met rits en paspelzakken gemaakt hebben dan wordt je overal (in Engels) doorheen geloodst. Er zijn zelfs filmpjes die je kan kijken. Ik naaide al wel eerder broeken. De stof waar ik deze broek van maakte was zelfs al een broek die ik zelf naaide. Ik recykleer vaak, maar meestal geen projecten die ik zelf naaide. Ik doe een poging om mijn stoffenvoorraad te verminderen en kleren die ik naaide er weer op leggen is te contraproductief. Door mijn gewichtsverlies stond deze broek echter niet goed meer en zo kwam de stof gelukkig weer goed terecht. Ik hergebruikte ook de rits en riemlusjes, daarom hebben zij een gouden topstiksel.
The pattern has elastic in the back of the waistband to create a perfect fit. We love color around here and an unexpected color pop makes me very happy. I therefore chose to have a light blue color pop behind the welt pockets. I lined the side pockets with the same light blue fabric. As a (blue) cherry on the pie, I used blue snaps for the flaps and on the waistband
Het patroon heeft elastiek in de achterkant van de tailleband om hem mooi aan te laten sluiten. We houden van kleur, maar dat wist je waarschijnlijk al. Ik zorgde daarom voor nog wat extra kleurdetails in de oranje broek. De paspelzak en steekzakken voerde ik met licht blauwe stof die een beetje komt piepen en ik deed blauwe snaps op de flapjes en de tailleband.
The pattern is available as standalone pattern* on the One Thimble site or as part of the new One Thimble 15*, which has nine other patterns and of course several articles and tutorials. You can read about the full content at the bottom of the listing. Feel free to leave a comment in the language you prefer (although Google
translate might have to assist me if you choose something different
than English, German, Dutch or Hungarian). If you buy anything through
my affiliate links (*), I get a small commission (the price stays the
same for you), I am very grateful for everything that feeds my fabric
addiction.
Het patroon is los beschikbaar* op de One Thimble site of als onderdeel van het One Thimble 15* magazine. One Thimble 15 heeft nog negen andere patronen en natuurlijk weer extra artikelen en tutorials. Onderaan deze omschrijving staat de hele inhoud opgesomd. Ik vind het altijd super leuk om reacties te lezen om mijn creaties. In
deze post zitten enkele affiliate linken, aangeven met een *. Mocht je
het patroon aankopen doordat je in de shop kwam via een link van mij,
dan krijg ik een kleine commissie. Het patroon wordt niet duurder voor
jou, maar mijn stoffenkast is er wel heel blij mee .
In September last year, Davina organized the first edition of the Sewing Challenge. In that edition I was challenged by Marie Paule to create something for myself based on a La Maison Victor pattern using only uni colored fabric. I challenged Margot with three different criteria and she made this beautiful dress. This second edition is organized a bit different. This time Davina created duo's and I was paired with Marjolein from Flaflinko and we did things a little different.
In September vorig jaar organiseerde Davina de eerste Sewing Challenge. Tijdens de eerste editie werd ik door Marie Paule uitgedaagd om een La Maison Victor patroon voor mezelf te naaien in een uni kleurige stof. Ik daagde toen Margot uit met drie hele andere criteria en zij creëerde toen deze gave jurk. Deze keer deelde Davina ons in in duo's en mochten we onze criteria direct naar elkaar sturen. Marjolein van Flaflinko en ik deden het net ietsje anders dan wat van ons verwacht werd (maar je had vast niet anders van mij verwacht... )
Instead of making separate criteria for each other, we actually came up with one set of criteria for the both of us! We decided to do this because we both love to see different interpretations of the same theme/challenge. We decided that we would both sew a Jaanu (we both had bought it at release but had not taken the time to sew it yet), we were going to hack/mash it and we were going to use fabric that has been in stash for long.
In plaats van criteria voor elkaar te bedenken, bedachten we samen drie criteria waar we ons allebei aanhielden. We deden dit omdat we het allebei super leuk vinden om te zien hoe een bepaald patroon er zo anders uit kan zien als zij door twee verschillende naaisters wordt genaaid. We kozen ervoor om beide de Jaanu te naaien (we kochten hem beide toen hij uitkwam, maar kwamen er nog niet aan toe), ook zouden we beide iets van een hack/mash doen en zouden we stof gebruiken die al lang in onze voorraad lag.
As you know, I love to sew with knits, my Jaanu hack was therefore quickly decided, I was going to use some knit fabric. Woven fabrics do have a nice drape though, so I decided to only make the top of the bodice from knit fabric. This way I would have the comfort of knit and the sturdy pleats from woven (and I could omit the zipper in the process).
Zoals jullie weten naai ik super graag met tricot. Mijn hack was daarom snel beslist, ik ging het iets met tricot doen. Geweven stoffen geven echter een mooie plooienrok, dus ging ik voor alleen het bovenstukje en mouwen in tricot. Zo creëerde ik het beste van twee werelden, geen rits door de tricot en mooie plooien.
During the nice talk we had about our criteria, it was clear that we both had a different reason in wanting to use "old fabric". I actually wanted a reason to use my upcycle pile. I have a hard time throwing away garments of which the fabric is still nice. I therefore have several piles of garments that are waiting to be re-used. While going trough the piles I actually selected two fabric pairs that I wanted to turn into a Jaanu. One of them was a huge success, the other not so much. I am showing both today.
Toen Marjolein en ik kletsten over de criteria was al snel duidelijk dat we beide een andere route gingen nemen in het "oude stof" thema. Ik ging voor de recykleer richting. Ik heb altijd veel moeite met oude kleren weggooien en heb dus een grote stapel kleren die ooit opnieuw gebruikt zouden moeten worden. Ik viste uit mijn stapels twee combinaties die ik beide omzette in een Jaanu, de een lukte beter dan de ander, maar toch laat ik ze beide zien vandaag.
Let's start with the successful one. I turned this pregnancy waistband and pregnancy pants into this adorable dress. I have to admit, the dress turned out a bit shorter than I had planned. Which is a pitty, because I actually would have had enough fabric to make it a bit longer. If I ignore the fact that it is a bit short, I am actually super satisfied with the fabric placement. The hem is the original trousers' hem. The trousers were a bit open on the side, and I kept that feature. I did close the sides a bit more though, but this way I did not have to hem the dress.
Eerst de succesvollere versie. Ik zette deze linnen zwangerschapsbroek en tailleband om in een schattig jurkje voor de jongste. De Jaanu valt iets korter dan ik gepland had, maar met een legging in de zomer zal het super goed te doen zijn. Ik ben vooral heel tevreden met het feit dat de zoom van de rok, de oude zoom van de broek is. Ik hoefde er niks aan te veranderen. De broek had een split in de pijp en bij het aan elkaar naaien van de zijkanten naaide ik die iets verder dicht, maar door die splitten is de onderkant overal meteen super netjes afgewerkt.
Due to the knit bodice, I omitted the zipper on the back. I did cut the neckline a bit wider, or else she would not have been able to put her head through it. Because only the top of the bodice is in knit, I do have to help her a bit with dressing. The dress has an additional seam in the front and back which used the be the trousers inside leg seam. Seeing she is still so small, the length is not a deal breaker, I will just dress her in some cute short leggings and she can wear it as a tunic/dress.
Door het jersey bovenkantje deed ik er dus geen rits in. Ik knipte wel de halsopening wat wijder, anders had haar hoof er niet doorheen gepast. Omdat alleen de bovenkant tricot is zal ik haar wel een beetje moeten helpen met aankleden. De jurk heeft dus (bijna) middenvoor en middenachter een extra naad, dat was de binnenbeen zoom. Het stoor me echter totaal niet. Ik ben zo blij dat ik die mooie stof kon gebruiken, hij zal heel fijn dragen.
For the second dress I used a long sleeved cardigan (hand me down from a colleague) and a pregnancy skirt. I originally really loved the color combination of the garments, but in the end I am not so convinced of the grey and white combi. The skirt was narrower that the amount of fabric that I officially needed for the box pleated dress option. I therefore winged the pleats a bit.
Voor de tweede jurk gebruikte ik een vestje met lange mouwen (ooit tweedehands gekregen van een collega). Ik was in eerste instantie helemaal weg van de stoffen combinatie, beide met koraal erin. Achteraf ben ik echter niet meer zo zeker van de keuze. Ik vond het wit en grijs misschien niet optimaal. Ik plaatste daarom de knopen van het shirtje op de plooien in de rok in een poging meer eenheid te creëren.
This was actually the first dress that I sewed and totally forgot about the side pleats. The skirt is a drapy woven, and that turned out to be non-optimal for this dress, the pleats do not stand out like with the other version. I neither was satisfied with the grey/white combination. So, to create some unity, I moved the grey buttons to the skirt (on the end of the box pleat seam). Like I said, it did not became what I envisioned, but my girl is happy with her extra dress, and I have less fabric on my upcycle pile.
Dit was eigenlijk de eerste jurk die ik naaide. Ik was toch aan het hacken en lette niet zo op. De rok was smaller dan het oorspronkelijk patroondeel, dus ik legde er zelf plooien in. Ik zag echter niet dat er 6 plooien in moesten en geen vier (dat krijg je ervan als je hem "even snel" voor het eten in elkaar denkt te zetten. De stof van de rok bleek ook een beetje te soepel, de plooien staan daardoor niet uit. Een Elena (andere Jaanu optie) was misschien beter geweest. Ik torn de plooien misschien nog wel eens een beetje verder naar boven open. Voor nu is dochter lief er in ieder geval blij mee.
Like I hinted already, Marjolein did a very different take on her "old" fabric challenge, be sure to check out her post. In Davina's post you can find the links to all other blog posts for this edition. Not all of them will be live yet, but be sure to check them out later.
Zoals ik al stiekem reeds vermeldde, ging Marjolein een hele andere richting op met haar "oude stof". Check dus snel haar versie van onze challenge. In Davina's post staan linkjes naar de andere blogsters van deze week en van die gaan komen. Nog niet alle zijn dus live, maar de blogs zelf zijn sowieso leuk om eens te checken.
She apparently sewed her first version during our sewing weekend and this week she launched the dress as a FREE pattern; wow that
is speed. The dress in question is called the Simple Dress, and as you
could have guessed from the name, it is a pattern for a relatively
simple jersey dress. No zipper, no buttons and a subtle gathering at the
sides.
You might have already seen my first version on Instagram. I was testing this dress at the same time as this shirt. I do
not like putting fabric back in my fabric closet after I used a piece
from it, so I cut a dress from the same dog fabric. The busy fabric is
not ideal to show off the nice detail in the waist. The gathering is
almost invisible, check out her release post to see how it should look.
I
love the combination of the cardigan and dress, which were actually
coincidentally paired. She was wearing the cardigan and feared the short
sleeves would be cold. Wearing the cardigan was a compromise to get
pictures. My middle one is spot-on a size four in the measurement table.
A little bit extra length was added to the final pattern, this one
might become tunic over the summer.
For this test
version of the pattern I really followed the instructions and ironed a
neckline seam and sewed it down. The result was better then I expected,
the dog fabric was a relatively thick jersey and the neckline looks
great.
I also made my eldest a Simple Dress. I was paying so
much attention to adding enough length hem (seam allowance is not
included in the pattern), that I forgot that the rest of the pattern
also needed a seam allowance (palm to the face). I therefore added
narrow cuffs to the sleeves and a bias to the neckline. Due to me forgetting the seam allowance and maybe picking a bit too small size to start with, the dress has a slightly different shape, it is more fitted than it should be. I forgot to
change the bobbin holder to go with my twin needle, which resulted in a
stretched neckline. I unpicked, steamed and resewed, but I hope that a
wash will truly remove the evidence of my mistake.
I noticed
that I am starting to prefer different fabric prints for my eldest,
than for my middle daughter. I became aware of this when people pointed
out to me how grown up she looked in this dress. I was searching my
jersey stash and did not find a fabric that I really liked for her
Simple Dress (I have the same hot air balloon fabric and it seemed so
perfect, but I did not wanted to make a replica), so I let her pick
herself. I would not have chosen this one for her, but seeing that she
loved the print, I am totally fine with it. I bought the fabric last summer during a crazy sale at Joyfits.
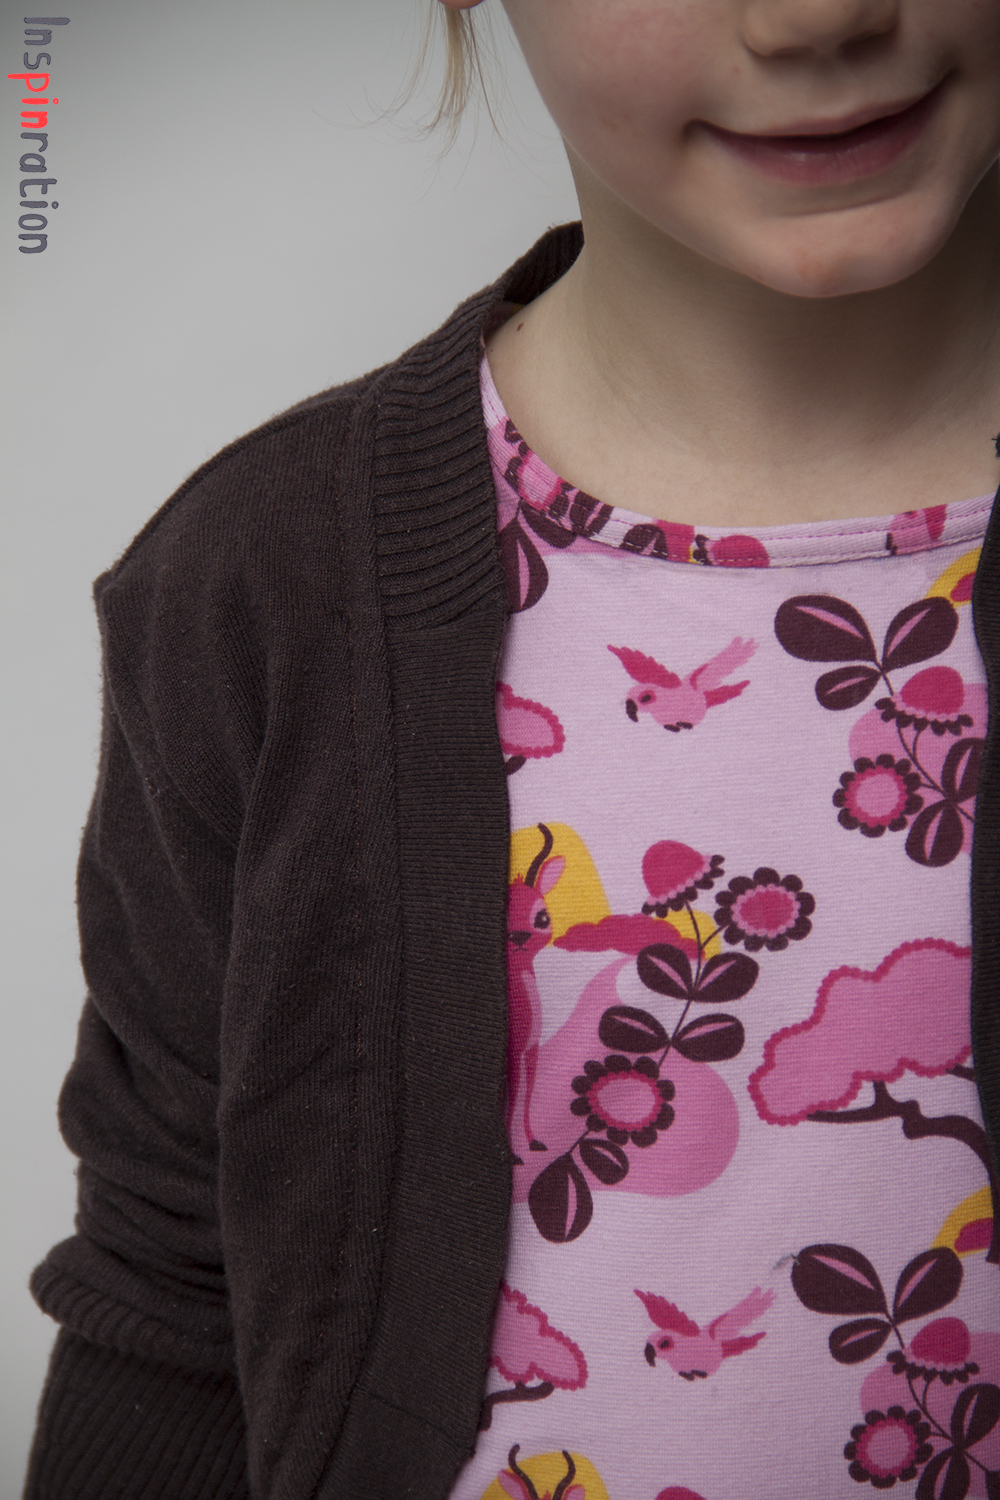
I feel other
bloggers have closets full of cardigans, we do not. I never had one when
I was a kid (and do not own any now). I am warming up to them though.
We have a few, but most were gifted. For today's post I made one. I felt
the busy fabric had to be toned down a bit, and the short sleeves could
get some help in warming her. I used one of my old sweaters so it
actually became a cropped cardigan (or long bolero), there simply wasn't
more length.
I used the Slouchy Cardigan pattern from Heidi and Finn. I made a size 5, which would normally have to be
lengthened for her, but I actually had to shorten the pattern pieces due to my fabric constraint.
The arm cuff are less tall than the original pattern, again due to fabric
constraints. I used the original hem, both from the bodice and sleeves
for the band around the cardigan. The original neckline fabric was a
stretchy ribbing, as you can see on the picture, and I used a small
piece of that stretchy ribbing to make the neckline of the cardigan. One
of the cardigans in our closet has this two fabric type combination
band, and I really like it.
The cardigan can be worn with sleeves up or
down. I very much like the bunched up sleeves, but I already know my
daughter prefers them down. I see many more cardigan types in my sewing
future. As could be expected, I added pockets to the second dress. I did not add them to the first, and you can really see my girl searching for them in one of the pictures.
I love to hear what you think of my creations. Feel free
to leave a comment in the language you prefer (although Google
translate might have to assist me if you choose something different than
English, German, Dutch or Hungarian).