First things first, happy new year! I hope that all the good things from last year will continue and that the bad ones will quickly only be memories. I usually do not make resolutions, but this year I have at least one. My life became very busy the last months and especially in December, I simply did not have time to blog. For this year, I will continue taking up less sewing deadlines (tests and tours) such that I have more time to freestyle. My blogging and sewing relaxes me, and I will go back to regular weekly blogging. I have several backlogged projects and today I am starting with a special one. Today, I am showing you my first clothing piece within years created from yarn, the Dadirri cardigan* from Compagnie M.
Allereerst, de beste wensen voor het nieuwe jaar! Ik hoop dat de fijne dingen van 2017 blijven voortduren en dat de nare zaken snel alleen een herinnering zullen zijn. Ik maak meestal geen voornemens, maar dit jaar dan toch wel minimaal één. Het was druk de afgelopen maanden en zeker in december dus zakte mijn blog ritme in. Voor komend jaar ga ik daarom verder met het zeer kritisch selecteren van naaideadlines zoals testen en tours. Ik ga voor een constante stroom van (wekelijkse) blogberichten, omdat ik daardoor ontspan. Vandaag begin ik meteen goed met een project van een paar weken terug. Het is een bijzondere, want het is het eerst gebreide kleding project sinds jaren, het Dadirri* vest van Compagnie M.
When I started this blog, sewing was not my main hobby. I had sewn a few things, but I mostly crafted with yarn. Knitting and crochet were the two things that kept me busy. Since I discovered sewing with knits (already four and a half year ago), those yarn related crafts just seemed to take so much time. But there is a huge advantage of yarn crafts, you can do them wherever you are. You can take them with you or just do them in front of the tv. Sometimes I feel like "doing nothing"in the evening and just want to watch tv, and then crocheting or knitting is perfect. Therefore, I usually have a yarn project laying around (which often do not reach the blog when finished). Through the years I have made a few blankets and toys, but not clothing.
Toen ik de blog startte naaide ik niet tot weinig. Ik haakte vooral en daarvoor breidde ik. Toen ik echter het naaien met tricot ontdekte gingen alle remmen los en leken haak en brei projecten zo vreselijk veel tijd in beslag te nemen. Hoewel dat soort projecten inderdaad qua uren langer duren, zijn ze wel heel makkelijk mee te nemen. Ook kunnen ze prima voor de tv, dus heb ik altijd wel zo'n projectje liggen. Ik creëerde door de jaren speelgoed en dekens, maar niet zozeer kleding.
I have often sewed with Compagnie M* patterns, I love the unique twist that Marte has in all her patterns. When I heard that she was going into knitting patterns, I was intrigued. The thing that make the Compganie M knitting patterns stand out, is that you are free to choose your own yarn and needles. For every pattern there is a special calculator that creates a pattern based on your personal gauge. You make a test square per stitch type and than you sit back and just follow schedule especially created for you.
Ik naaide al regelmatig met Compagnie M* patronen. Ik vind de unieke "Marte" details die al haar patronen hebben echt super leuk. Toen ik van haar hoorde dat ze brei patronen ging maken was ik meteen nieuwsgierig. Zeker gezien het feit dat ze van plan was om haar patronen zo in te steken, dat het gepersonaliseerd is op jouw wol en spanning. Het patroon is voorzien van een speciale rekentool die op basis van jouw proeflapjes berekend hoeveel steken je nodig hebt. Het patroon schrijft dus geen wol voor, je kan helemaal zelf kiezen.
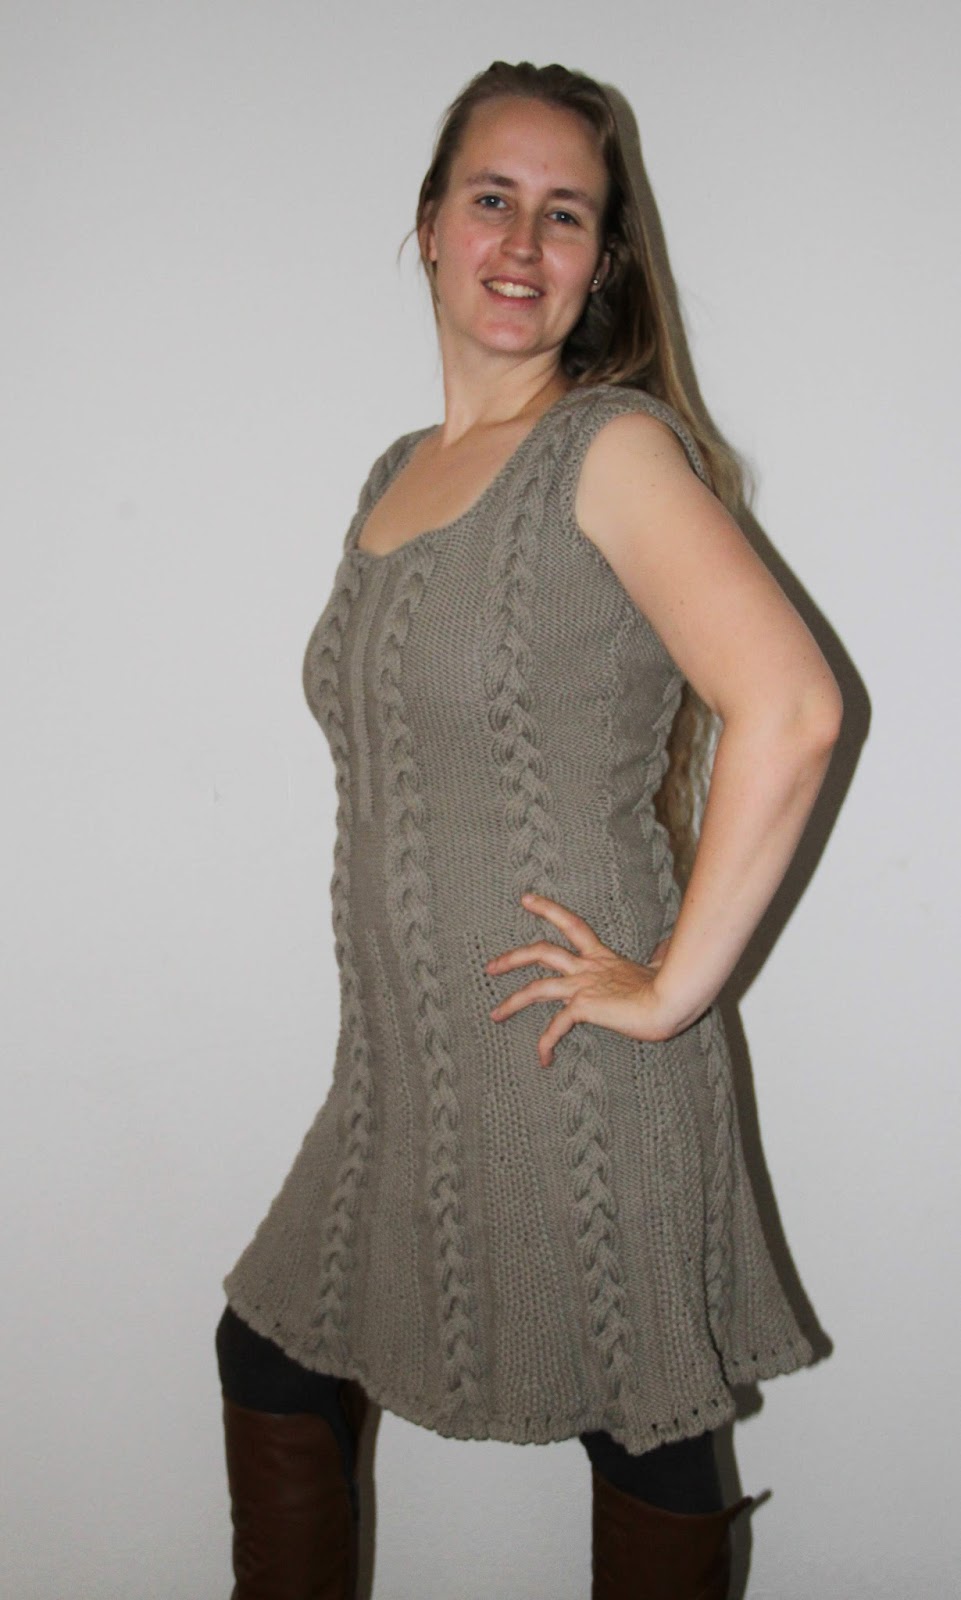
The Dadirri *cardigan front is knitted in a coin stitch, and has regular knitted sleeves and back. The yarn that I used is recommended for needle size 4-5 (I knit rather loose, so I knitted it on 3.5). You can make the front dots very obvious by using a contrasting color, but I went for a rather subtle gray. On my version, the shoulders became a bit too wide. In the test pattern (the one I used) the shoulders were wider than in the final and I had even widened the front a bit because I knew my daughter would wear it over long sleeves. I am not bothered my the slightly wide shoulders, but in case you were, than it is important to know that this should not happen in your version.
De voorkant van de Dadirri sweater* is in de "coin"steek en de mouwen en achterkant in tricot steek. Ik gebruikte wol voor pennen 4-5, maar aangezien ik los brei, gebruikte ik pennen 3.5. Ik ging voor vrij subtiele stippen door grijs als contrast kleur te gebruiken. In mijn versie zijn de schouders iets te breed. In de testversie (die ik maakte) waren de schouders nog wat breder dan in het finale versie en daarnaast maakte ik het gehele voorkant iets breder omdat ze haar vest over kleding met mouwen gaat dragen. Ik heb totaal geen last van de bredere schouders, maar mocht het jou opgevallen zijn, wees dan gerust in jouw toekomstige versie zal dat niet zo zijn.
I am a craft material horder and besides a big fabric pile, I also own quite some yarn. I am a big fan of cotton, and I bought this lovely blue yarn with the plan to once knit a cardigan. In blog and Instagram land I often envious look at all the perfectly matching knitted projects, so I always have plans. I also have the yarn in red, in that color I even once started a cardigan, but after knitting the back and a sleeve the project stagnated for a year, and I pulled it all out. I turned the pulled out yarn into this squirrel.
Ik heb een grote verzameling van allerlei knutsel materialen, naast stof heb ik ook behoorlijk wat wol. Deze blauwe en grijze wol kwamen gewoon uit mijn voorraad. Ik kocht het ooit jaren geleden omdat ik net als al die mooie Instagramen en blogger plaatjes ook zelf gemaakte vestjes wilde. Het bleef echter voornamelijk bij plannen. Ik begon ooit aan een rode versie, maar nadat die een jaar lag, haalde ik alles uit en haakte van wat ik uithaalde deze eekhoorn.
The biggest challenge with knitted cardigans is probably finding the perfect button. I almost never use buttons on my sewing projects am very loving the kam snap option and so do my kids. I have a very small collection of buttons and almost all buttons are tiny. I therefore decided to try making my own buttons from Fimo clay (which I also just happen to have in my craft collection). I had no clue how much clay I would need, so in the end I ended up with about 20 buttons...
De grootste uitdaging van breien is mogelijk het vinden van de juiste knopen. Hoewel ik knopen op voorraad heb zijn het voornamelijk hele kleintjes. Ik ga normaal gezien voor kamsnaps in mijn naaiwerk. Dat was nu geen optie, dus gebruikte ik iets anders uit mijn voorraad, ik kleide de perfecte knoop met Fimo klei. Volgens internet kan je ze prima wassen. Ik had geen idee hoeveel klei ik nodig had voor vijf knopen, en ik eindigde uiteindelijk met 20 knopen te veel....
For the shoot I decided to sew a dress and I hacked the Nore for kids* into to be like option B in the Nore for women. I only had half a meter from the blue tree fabric, because I bought it so long ago (I started out with buying half a meter pieces, but now I buy at least a meter). My eldest really liked the fabric, so I squeezed a dress out of it. I had to make an extra seam in the skirt. I even had to put the trees diagonal there (due to not having enough fabric), but I still feel it either looks intentional or does not show.
Voor de fotoshoot naaide ik ook nog een Compganie M jurk. Ik hackte Nore voor kinderen* geïnspireerd door optie B van de Nore voor vrouwen. Van de bomenstof had ik maar een halve meter. Ik kocht het al zo lang geleden (vroeger kocht ik halve meters, nu minimaal een meter). Ik had eigenlijk geen plannen meer voor het lapje, maar toen liet mijn oudste haar oog erop vallen. Dus perste ik er een jurkje uit. Ik moest een extra naad maken op de voorkant, de bomen staan zelfs diagonaal daar. Toch heb ik het idee dat het aan de ene kant niet pvalt en aan de andere kant lijkt of het zo hoort.
When I started this blog, I mostly crocheted, now sewing has taken over
my life. Once in a while I still do some yarn stuff though. Last year, I
participated/ crocheted along with the CAL (Crochet ALong) 2015 of
Jolanda and Tertia. I did not finish in September, the moment the last
rows became available, but I finished it within a year after starting.
On January 1st I made my last row (new year's resolutions and all).
The
pattern is free and available in Dutch and English. I crocheted the
afghan with a random selection of cotton yarns. I had/have a big
selection of cotton yarn that I bought inexpensively because those
particular lines had been discontinued. I paid around one euro per 50
grams ball, mostly from Phildar but also some other quality brands. At
the end of 2014, I realized my stash had become very big, and I did not
have any ideas how to attack it in the near future. I coincidentally
came across the plans for the afghan and decided to participate it.
I
decided to crochet the blanker for two reasons. The first one because
it is a great opportunity to use 40+ knots and the other because I was
curious if I had the persistence to finish such a huge project. I went through my stash and found an unconventional mix of colors that I thought was going to work well together, and I would have enough from for sure. When the
blanket was about 80% finished my resolve got tested. I started to run
out of yarn for several colors and the 300+ double crochet per side
became boring. Coincidentally my family in law delivered me some old
pink cotton (left over from a grand mother), right at the moment when I
was debating either to just let the blanket as it was, or to continue
with different color set. Although the color was slightly different than
the one that I had been using, it was similar enough to continue the
color mix that I had been using.
The afghan does not have
a purpose. It is just laying around the living room, and the kids play
with it. For me it is my persistence reward, I am also a bit proud of
the fact that I actually followed the pattern. In sewing I am almost
incapable of following the guidelines, with crocheting I do not really
feel the urge. The blanket ate a lot of yarn, but I somehow still seem
to have enough to create another blanket. Like I already said, the mix of colors is in line with my usual unconventional color combi's. I have seen many well balanced combinations, the fun thing is though that if you work on it for a year, after a while it starts to grow on you.
The blanket
took a lot of time, the hat was done in a few hours. The pattern is from
this book (also available in Dutch). Besides crocheting the eyes instead of using buttons, I did
not change anything. I even knitted on the needle sizes that were
required and used similar color of yarn as the example (bought at the
Zeeman). It is just as cute as the one in the book.
I love to hear what you think of my creations. Feel free
to leave a comment in the language you prefer (although Google
translate might have to assist me if you choose something different than
English, German, Dutch or Hungarian).
Finding small gifts for people can be hard. Most of my friends and
family simply have everything that they desire (a combination of
satisfied people and no money problems). I feel that my ability to sew,
crochet, knit etc has really helped me in my quest for nice presents. A
hand made gift usually requires more work than going to the store and
fortunately most of the people that I want to give gifts, realize that.
This way I can give gifts that are inexpensive on the financial side,
but show that I care due to my invested time. Turning a rejected item
into a new gift gives even more satisfaction. In this post I will show
you how I turned an impractical pot holder into a cute Reindeer pot
coaster.
Okay, let's be honest from the start, I could
just have folded the potholder and get an instant coaster, the hole
thing would even have been bigger, but where would have been the joy in
that? I have sewn many children clothes, but I am a novice when it comes
to quilting. Although my Pinterest feed often makes me drool over the
most gorgeous creations, I didn't really try it yet. It is usually good
to start small, so this pot coaster seemed a great idea (I know it is
not true quilting because I didn't sandwich the fabrics in the end, but I
have no clue how to call it technique other wise).
First, I
took out all the original seams, so also the sandwiching stitches. Then I
cut narrow strips of fabric and sewed them back together using both
sides of the fabric. With hindsight I could have cut more interesting
shaped strips, but keep in mind, I am just experimenting. Then I
enlarged the new free Sis Boom's Rachel Reindeer to 160% and drew my two
sides of the deer on my my re-sewn piece of fabric. The pattern lines
are the sewing lines, so if you want to pre-cut your fabric make sure
you use a seam allowance. The 160% enlargement was the maximum size that
I could draw of my fabric piece, but it is also a perfect size for all
my pots. Then I puzzled my heath resisted bating (which was a part of
the original pot holder) into a deer shape. I took two layers (the
maximum that I could cut from it) to make sure my table was optimally
protected.
Sewing the two sides together had to be done slow
because the hole thing was rather thick, but going round still took me
only about 10 minutes. I carefully cut corners and seams allowance
before turned the deer to the right side. I considered sandwiching the
piece together with some decorative stitching, but in the end I decided
against it. I started sewing on the side, but because the thing is
rather thick I immediately broke a needle. I wanted to save my time and
frustration and just kept it like this. My decision to not stitch it
through also had to do with the fact that I couldn't decide on the
color. Due to the December month I felt the urge to use red, but the
deer is so cute that it could also protect your table in spring, when
the red combination would be slightly less appropriate.
I made this deer as part of this year's Sinterklaas (Secret Santa
celebration with my friends). I also embroidered three small towels with
inspiration quotes that I found on the web. I did the one with more
space between the letters a day before the other two. I do not know why
the whole thing got more condensed, I only noticed it when I took the
pictures. The pictures are not of the best quality because the procrastinator
in me had me postpone these project to the last moment, and I had to make
pictures in the night.
For the same joyous occasion I also
knitted a hat from a free pattern. I knitted it
to be an optional gift for one of the male partners of my friends. In the end
we enjoyed the evening that much, that not all the gifts were
exchanged, my daughter really didn't want to part with the hat, so I
made sure she got it in the end. My girly girl wears it well.
Here you can first part 1, 2 and 3 from this series.
I love to hear what you think of my creations. Feel free
to leave a comment in the language you prefer (although Google
translate might have to assist me if you choose something different than
English, German, Dutch or Hungarian).
Earlier this week I read about the Match With Me, mother-son sewing
series from Boy, oh By, oh Boy crafts. I immediately wanted to sew
along. I assumed that my son would love some matching cloths and would
enjoy a small joint photo shoot.
I looked through my stash and
found two green-white matching jerseys from Birch. The fabric is super
soft and I knew my son would love the feel on its skin. I quickly
considered sewing a skirt for me and trousers for my son to have
complete matching outfits but I settled for two hoodies. My son loves
hoodies and I need some new shirts. In case you are tempted to quickly
scroll forward to see our matching shirts, I have to disappoint you,
because those pictures are not coming.
A few months ago I bought
several Birch fabric jersey's on sale at Fabricworm. At that time I was
in my right mind, and realized Birch jersey is not as wide as Lillestoff
and bought 1 yard of deer and half a yard of a matching skinny chevron
to make my son something (the project was to be determined). From a
total of one and a half yard I was never going to make two hoodies of
which one adult sized. I realized this after cutting my paper pattern
pieces and simply settled on a hoodie for myself. I thought it was time
for some selfish sewing after weeks of kids cloths sewing. But as it
turned out, making an adult hoodie was already a challenge with these
fabric pieces.
It was at the end of the evening, when I started
cutting the sleeves, The pattern I followed (Ottobre 5/2010) had sleeves in two pieces,
which was new to me because kids raglan sleeves are in one piece. I
found out that my half a yard was not going to give me complete
sleeves. I was only able to cut the lower piece of sleeves. I had cut
the pieces on the fold (including seam allowance next to the fold) when I
decided to stop for the night. I usually get good ideas in bed and I
clearly needed inspiration to solve this sleeve problem. Just before I
went upstairs, I quickly cut the sleeves in two. This, of course I
should not have done. The sleeves were drawn in two separate pieces
because of the sleeve head split. In my case the sleeve head would
become a separate part anyway and I could have left the lower part one
piece. But now I had two lower sleeve parts that were not going to have
matching side prints. This shows that when you are in doubt about how to
cut or sew your project further, please stop immediately. IMMEDIATELY.
Before
I actually fell asleep I decided to give the whole thing an intended
look by retrying the elastic piping method that I had been trying for a
Louisa dress. The next day at first it again did not seem to work but
indeed with some more practise it worked out fine. The idea is simple, I
sewed the sleeve pieces together on my serger using my pipping foot,
while sandwiching some pipping. After I finished the seam I pulled out
the piping cord leaving only an empty tube which has the same
flexibility as the rest of the garment. After I decided to just add a
band of deer fabric on the sleeve to create enough length for long
sleeves, the whole thing came together quickly.
So I decided to
give this post a spin (because it should have been a mother son post)
and make it all about me and me alone. I will show you all the dresses I
have made myself. The dresses are all from knit fabric, one I actually
knitted, because I have not dared to make a woven one yet. I planned a
small photo shoot inside because of the rain but then of course my kids
wanted to be in the pictures as well. This is how the first picture of
this post was created. My son simply photo bombed my "Me-Myself and I"
photo shoot. The pictures were taken on Sunday morning and my son
prefers to dress in as few cloths as we allow (which comes down to him
being in his underwear for a big part of the weekend, do more kids have
his?). So I cannot even claim we match because I made both our shirts
(this was my plan C). I have more, many more pictures with photo bombing
kids, and even some with wet spots on my dress from tears of my middle
daughter after a comfort session after her falling from a chair. But the
picture with my son was the only one that made the cut. The post should
have been about the both of us, and like this it still is a little bit.
This is the first dress I made from scratch. I had one meter of fabric, which was
just not enough for sleeves (you see that underestimating the amount of needed fabric remains a problem). The pattern was made from an existing
dress.
The second dress I made, was the Martini dress from La Maison Victor, the fabric is Lillestoff.
The third dress I made, an adapted Martini dress. I simply skipped the asymmetrical front and opted for a symmetrical one, the fabric is Lillestoff.
The fourth dress I made is from Ottobre 2/2013, the fabric is again Lillestoff.
The
last dress, is actually the first dress I started. I had seen this
great picture on Pinterest, and I just had to knit it. My body is a very
different shape than the girl showing the original dress, but I simply
longed for the challenge. It took me a few months to finish the dress
(in which I actually sewed up some of the earlier discussed dresses). I
did not buy the pattern and just winged the pattern based on the
pictures.
After knitting Christmas decoration and dolls I kind a was up for
knitting clothes again. I felt more confident I could finish a bigger
knitting project. But baby steps, I decided to first knit for my kids. I
have fond memories of knitting on the couch in front of the television
(especially during the winter). When I told my mother my plans she also
became enthusiastic and together we bought yarn online and looked
through old knitting magazines (which I kept from 10 years before),
instant fun! Besides the old magazine I drooled over Phildar magazines that I bought but never used.
The actual knitting went faster than I hoped and I quickly created two sweaters. The bear application is from a Phildar
magazine and and red shirt is an adjusted version of a grown up
pattern.
The red yarn ran out before the project was done. We had bought
the yarn on sale in a mixed surprise package and I therefor had to be
creative with a different color. Although unplanned I think that it spices up the sweater in a positive way.
I like knitting (or crocheting for that mater) because it is more social
than sewing. Although sewing has stolen my heart, when I sew, I sew I
can not talk to somebody at the same time, let alone look at them. If I
have people over sewing is not possible. Knitting and especially
knitting clothes (more repetitive stitching without complex counting) is
perfect. I now even have some friends that regularly come over to knit
(and talk).
Last year I refound my knitting passion when I spotted the book:
Christmas ornament knitting from Arna and Carlos. A few years earlier I
took up knitting simply because I wanted to master it. My mother taught
me when I was small but it never really got the hang of it. So a few
years ago I knitted a few sweaters. Knitting a sweater is really a big
commitment for me because it takes a lot of time! Especially because I
never was really interested in my own knitted sweaters so they just
remained in the closet. The Christmas ornaments seemed a perfect project
to get back into the knitting game. Finishing one never took more than
three evenings (my way of counting creative time) and they looked great.
So Arne and Carlos's new book, knitting dolls looked like another very
promising new project especially because my eldest is really in the doll
playing phase. Over Easter Arne and Carlos had a nice book containing a
bunny.
At that moment I was totally into crocheting and I made adjusted
the pattern somewhat to make a crochet version . When I got the doll
book I got the same giddy feeling as when I got the Christmas ornament
book. It is just so nice to look at all the pictures. flipping through
the pages was like flipping through an illustrated cookbook. You simply
want to try them all immediately. Not only the dolls look amazing they
come with a bunch of clothes!
Knitting a doll took me around 6
evenings and I enjoyed it a lot. If you are considering to start up
knitting (again) but are wondering what to make, this is very
recommendable!
Arne and Carlos restarted my knitting activities, but after Christmas I did not want to make more tree ornaments. Although the tree was far from full, creating Christmas decorations looses its charm if you have to wait 11 more months before you can use them again. So, I needed a new project.
I had some green yarn lying around, which was already waiting for years to get some purpose. I had bought it probably ten years earlier but never came around to use it. I felt that I had to use the old materials first before I could buy new ones (another habit that I got rid of for which re-installment wouldn't hurt).
Around the time I bought the green yarn I also had a subscription to a knitting magazine. I kept all the magazines and after browsing (through the seemingly very old fashioned models) I found one I liked. I did not feel up to knitting an adult size sweater yet, so I knitted one for my eldest daughter.
The green yarn I had was really very green... so when I finished the sweater I felt it needed some extra color to spice it up. I decided I wanted some light green accents and some crocheted flowers on them. I had never crocheted a flower, so thank god for the internet! Flowers really are a great, very small scale crocheting project. They only take a few minutes (not counting the hour you need to finding out what single, double and triple stitch are...).
Forgive me for the extremely poor quality of the picture. This is the only picture I have of the sweater. The yarn I had was 100% polyester and I really did not like the feel of it, so after lying on the shelve for a year I just threw it out. Although I do not have a garment to show for it, I did learn a very valuable lesson from this project: always use good materials which in my case means cotton. I realize this is not a universal lesson for everybody, but I love to knit with (good quality) cotton. If you decided to try out cotton start with Phildar cotton 3. It really has every color you can imagine and it has a nicely woven threat. The sweater also steered me onto the crocheting path, so all in all a very successful sweater I would say ;)
Chronologically this was not the first post I wrote, but I consider the content to be the match that lit up my creativity.
When I came across this book I was immediately intrigued. And started to think for who I could buy this book. For myself
quickly came to mind... This blog is slightly back dated and at the
time I saw this book I was far from creatively productive. If I started
something at all, I usually did not finish it. Therefore I did not feel
that I "deserved" this book just for fun. In present time by the way
I have no trouble at all to treat myself to a new creative book or
pattern (although maybe I should).
Back to the question who to
give it to, I decided that I could give it either to my mum or to a
friend (who did not knit, but could always use an very cool book on her
shelves about knitting gay guys) to whom I was her Secret Santa. But
when the book arrived, and I took a sneak peek my self resistance caved
in. I simply had to have this book for myself! Judging from my
enthusiasm you would almost think I get commission on the book because
besides giving it to both my mum and my friend I have been promoting the
book ever since. Just browsing through the book puts you in an instant
happy holiday mood even if you can not knit.
I had
learned knitting from my mother but I would never wear the sweaters that
I knitted, because I was not ready to reveal my knitting skills to the
world (a very common teenager thing at that time when knitting was far
from cool). As some of you might know, knitting sweaters takes a
relative long amount of time and you have to have quite some
perseverance to finish it. These Christmas ornament took me about two
evenings each, which makes them a great condensed project to start up
knitting again. I say start up knitting again because if this is actually your first knitting project these balls can be nerve racking. The balls
start out with a very small amount of stitches over four needles and for
the beginner this might be hard to handle. But two of my friends that
did not have much experience tried, succeeded and loved it (not the
friend who got the book though, she prefers to keep these guys on the shelves, but you never know for the future..)
Most of the balls I made I gave away as presents. Where I have some pictures of a few that I kept.


