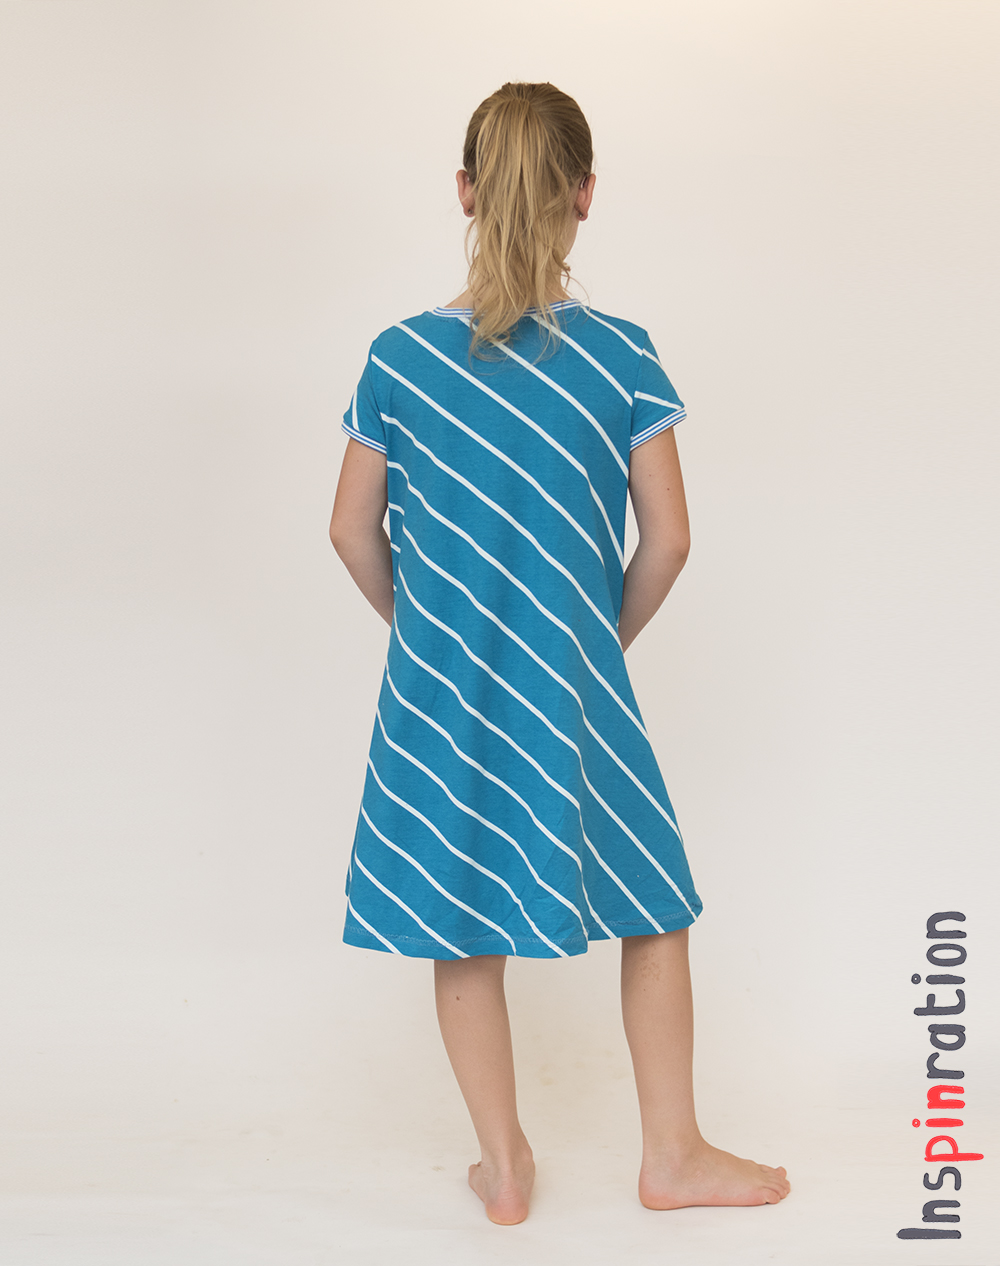
Today, the Sofilantjes' Cessim shirt is releasing, and this release is an extra special one for me, because I worked together with Anne in creating the pattern! I always love a Sofilantjes release, but now that I actively participated in the creation of the pattern, I am of course extra excited. The Cessim is a relaxed fitted boy shirt with many options. There are multiple color block options, sleeve lengths and necklines.
Vandaag brengt Sofilantjes een nieuwe patroon uit, de Cessimen deze lancering is voor mij extra bijzonder, ik werkte namelijk mee aan het maken van het patroon. Ik ben altijd enthousiast als er weer een Sofilantjes lancering is, maar nu is het natuurlijk bijzonder leuk. De Cessim heeft een relaxte pasvorm, zodat hij zowel in zomer als winter (met dikkere stoffen) gedragen kan worden. Er zijn vier opties om het lijf te color blocken, drie mouwlengtes en drie manieren om de halslijn af te werken.
Over the course of the last months, I created many different version of the pattern. Not all the options that we considered actually made it into the pattern, but to avoid confusion about what is in the pattern, today I am only showing you some shirts that were sewn with the final options (okay one has something extra that we still want to make an instructions for, did you spot it). There are many examples of the long sleeve option in the release post that I wrote for the Sofilantjes website.
Gedurende de afgelopen maanden naaide ik veel Cessim's, maar niet alle opties die we bedachten kwamen ook daadwerkelijk in het patroon terecht. Om verwarring te voorkomen laat ik vandaag alleen opties zien die er wel in zitten (nou ja, er zit er een bij met een optie waar we nog een aanvullende instructie voor gaan schrijven, zag je welke?). In deze lanceringspost die ik voor de Sofilantjes site schreef zie je trouwens nog heel veel andere voorbeelden.
The Cessim was designed with panel fabrics and/or scraps in mind. There are four main options for color blocking the body. The first option is cutting the body in one piece and having only one seam at the back. The dark blue fabric with white print is an example of that this option. I screenprinted the fabric last year on her bachelorette party, the print is drawn by our son.
De Cessim is uitermate geschikt voor het gebruik van paneelstoffen en voor stofresten. Er zijn vier verschillende manieren om het lijf te color blocken en vooral optie A is perfect voor panelen. Het lijf is dan één deel en de naad komt achter. Het donker blauwe shirt met witte print is daar een voorbeeld van. Ik printte vorig jaar op haar vrijgezellen feestje een baan met een tekening die zoonlief zelf maakte.
The second color block option has an asymmetrical split in the body, there is one big part and a narrow side piece. The yellow/white shirt is an example of that option. The sharp line is perfect for strong contrasted fabrics. The third color block option has a curved upper insert. The pattern is designed such that you can flip that upper color block in mirror image and have the body seam on the front. Both for the half sleeve and the long sleeve there is the option to color block it such that the line of the curved insert is continued onto the sleeve. The beetle shirt is an example of that.
De tweede color block optie, optie B heeft een asymmetrische verticale split van het lijf, een deel is breed en het andere deel smal. De scherpe lijn is perfect voor scherp contrasterende stoffen, de geel met ballonnen versie is er een voorbeeld van. De derde color block optie heeft een rond bovendeel. De belijning van de color block kan je dan laten doorlopen in halve of lange mouw. Het blauw rode shirt is daar een voorbeeld van. Het patroon is zo getekend dat je de bovenste color block ook ondersteboven op de stof kan leggen en zo de naad aan de voorkant van het shirt krijgt.
The fourth color block option is the full Monty, it has both the narrow side panel and the curved color block. This option is also great with the color blocked sleeve. In all today's shirt I used the rounded neckline. It is a round neck fitted in a V neck hole. I really love the extra color showing in the front of the neck where the ribbing is higher. The pattern also includes a V neck and a color block V neck.
De vierde optie is de volledig complete versie qua color blocking. Zowel de bovenste curve als het kleine zijdeel zitten erin. deze optie is ook erg leuk met de gecolorblockte mouw. In de shirts die ik vandaag laat zien gebruikte ik alleen de ronde hals. Het is een bijzondere ronde hals, want hij zit in een V halslijn en daardoor krijg je een extra accent aan de voorkant. Het patroon bevat echter ook een meer stnadaard V nek en een gecolorblockte V nek.
The relaxed fit also makes the pattern very suitable for using thicker knitted fabrics like jogging during the winter months. The Cessim is on sale in the Sofilantjes webshop for three days for just 5 euro excluding VAT. I really hope you will like the pattern as much as we do, especially because I very much enjoyed the making process and already have ideas for more! Did you by the way spot the three new Domi's?
De Cessim is dus vanaf nu te koop op de Sofilantjes website voor 6,05 euro. Ik hoop dat jullie het een leuk patroon vinden, want ik vond het design proces erg leuk en ik heb al een rijtje nieuwe plannen in mijn hoofd.Spotte je trouwens de drie nieuwe Domi's in deze post?
I am a huge fan of upcyling and I have done several upcycling projects in the past. I also love challenges, and sewing competitions, I have done several from those in the past as well. Not because I think that I would have a chance to win ( I usually drop out after the first round), but simply because they inspire me. The Candice Ayala’s Upcycling Challenge functioned exactly like that. I had all the materials that I need already in my stock, but somehow had not come around to using them yet. I am so happy I did now!
Jullie weten vast wel dat ik een enorme fan ben van recyckleren, ik blogde er al verscheidene keren over. Daarnaast houd ik van uitdagingen en wedstrijdjes en daar deed ik ook al aan een paar mee. Niet omdat ik denk te kunnen winnen (ik lig er meestal na de eerste ronde al uit), maar gewoon omdat het me inspireert weer eens iets anders te doen. Zo ging het ook met de upcycle wedstrijd waar ik vandaag over post. Ik had alle materialen gewoon in de kast liggen, maar kwam er maar niet toe om ze te gebruiken. De wedstrijd was precies de push die ik nodig had en ik ben super blij met het resultaat.
Here you can read more about the actual upcycling assignment, but quickly summerized, you had to upcycle and use new fabric as well. The piece that I upcycled, I received from my sister in law, she thrifted it for me, it consisted of natural materials, cotton and silk and had three very interesting textures, drapey silk, knitted cotton that was super soft an fluffy and cotton lace, plus the skirt part included a knitted lining). Candice gave some great tips in her kick off post. When I upcycle I always try to use as much as possible from the garment, so of course I worked according to Candice's tip of really dissecting the garment with a seam ripper. The shape of the individual fabric pieces usually inspire me like the shape of a rock can inspire a sculptor. I also like to to use original details, like the tailored finishes that Candice mentions. The original garment contained two straps to fixate rolled up sleeves, those I turned into shoulder straps on the sundress, including the original button hole and button.
Hier kan je meer details lezen over wat de opdracht was, maar kort samengevat moest je iets recyckleren en er ook nieuwe stof bij gebruiken. Het stuk dat ik recykleerde kreeg ik van mijn schoonzus met als doel om het te recykleren. De top/jurk was gemaakt van natuurlijk materialen, er zat zijde, katoen en kant in. De stoffen zorgde ook voor interessante structuren, de gebreide bovenkant voelt als zachte wol, de zijde is heel soepel vallend en de kant geeft een mooi 3d effect. Candice gaf in haar eerste post allerlei tips die kunnen helpen bij het recykleren en ik zag dat ik ze eigenlijk allemaal ook gebruik. Ik haal een reyckleerbaar kledingstuk uit elkaar met tornmesje om zo veel mogelijk stof te behouden en vervolgens laat ik me inspireren door de vormen van de stof. Ook gebruik ik graag onderdelen uit het originele kledingstuk zoals knopen etc. Bij het kledingstuk van vandaag zaten bandjes waarmee je de mouwen kon vastzetten na het oprollen. Die bandjes gebruikte ik als schouderbandjes op een van de jurken inclusief de knopen en originele knoopsgaten.
I used one meter Michael Miller Mermaid Magic Blossom and turned the fabric and the garments into four pieces to create three outfits. I always make before pictures, but this time it was also a requirement. Full disclosure, I did line the bodice of our eldest daughter with a remnant fabric from my stash and I used an earlier made bias to finish the arm and neck holes on the top of our youngest, but those were the only extra pieces of fabric that I used. I lined the lace middle piece on the smallest top with a piece of excess silk that I had to cut off and I used the original lining of the tunic to both line the dress of our eldest and to back the lace on the sun dress of our middle one.
In dit recykleer project gebruikte ik ook een meter Michael Miller Mermaid Magic Blossom en kreeg het zo voor elkaar om vier kledingstukken te maken die drie outfits vormen. Ik maak altijd voor-foto's maar deze keer was het ook een vereiste aan deelname. Ik moet wel eerlijk zijn, niet alle stof die ik gebruikte staat op de voor-fotos'. Tijdens het creatieve proces bedacht ik me dat ik extra stof nodig had voor de voering van de jurk van de oudste en ik werkte de armsgaten van het topje van de jongste af met een biasband die ik al eerder maakte. Dat waren echter de enige extra stoffen die ik gebruikte. Ik voerde de jurk van onze oudste met de oorspronkelijke voering en die voering gebruikte ik ook als backing voor de kant op de jurk van de middelste. Ik gebruikte een stukje overschot zijde om het topje van de jongste te voeren
The dress that I made for our eldest is a hacked Brueram dress by Sofilantjes. I have already sewn so many of those, I keep getting warm feelings every time that I see the back of that pattern. Our eldest has started to develop, so I crated two small darts inspired by this blog post. The resulting fit is perfect. The skirt part is simply the skirt part from the original garment, but now I used the back of the skirt as the front, I just loved that flutter detail.
De jurk die ik voor de oudste naaide is een aangepaste Brueram, een patroon van Sofilantjes. Ik naaide er al heel veel jurken mee en elke keer word ik weer zo blij van die achterkant. Onze oudste is iets aan het ontwikkelen en daarom maakte ik coupnaden die geïnspireerd waren door deze blogpost/ De pasvorm is nu echt helemaal geweldig. Als rok nam ik gewoon de rok van het oorspronkelijke kledingstuk maar deed nu de frutsels aan de voorkant. Ik vond het juist zo'n leuk detail.
The dress on our middle daughter was totally free styled. That lace on the back of the original garment had a bit strange shape, but when I but in a triangle of the knitted fabric from the original garment, it totally looked like bodice. Like I wrote before, I lined this bodice with a piece that I had cut of from the skirt knitted lining. I gathered a rectangle of the Mermaid Magic Blossom fabric that was as wide as the fabric as a skirt. It is not a full skirt, but the pretty fabric which includes golden details more than makes up for that.
De jurk van de middelste is volledig ge-free-styled. De kant van de rug van het oorspronkelijke stuk had een vreemde vorm, maar door er een driehoek in te naaien werd het een soort lijfje. Ik gebruikte dus de voering van de oorspronkelijke rok, die dus exact de juiste kleur had, om het lijfje niet te voeren zodat je niet dwars door de kant heen kijkt. Ik rimpelde een rechthoek in de stof breedte tot een rok. Het is geen wijde rok, maar de stof maakt alles goed, ik ben dol op gouden elementen en deze stof zit er vol mee.
Our smallest is wearing Scuttle shorts. They are designed for knit fabric, but I felt that the color blocked pocket should work in woven, and it totally did. From the sleeves and front of the original garment I had enough fabric to cut those cute trousers from. I managed to squeeze out a woven top to finish her outfit. I used the other half of the lace as a center piece, I really needed that piece, I would not have been able to create a top out of the Mermaid Magic Blossom fabric that I had left. I used the Sally dress pattern as a base. I tested it a few years back and I remembered that it fits over the head without closure.
Onze jongste draagt een Scuttle short. Dat patroon is getekend voor rekbare stoffen, maar ik schatte in dat de zakken wel in geweven stof konden en ik had gelijk. Van de mouwen van het oorspronkelijke kledingstuk kon ik precies een broek knippen en van het voorpand een tailleband. Uit de restjes Mermaid Magic Blossom kon ik nog een topje persen. Ik gebruikte de andere helft van het kant om er een middenbaan op het voorpand mee te maken. Aan de ene kant vind ik het gewoon mooi en aan de andere kant had er geen heel voorpand uit de stof gekund. Ik voerde de kant ditmaal met een stuk zijde dat ik van de oorspronkelijke rok knipte. Ik knipte het topje op basis van het Sally patroon dat ik jaren geleden testte en waarvan ik wist dat het zo over het hoofd gaat zonder sluitingen.
During our latest sewing weekend she made an Amelia*, a pattern from Bella Sunshine. I had tested and made many jersey patterns from Bella Sunshine, but not the Amelia. Seeing her dress come alive and looking at the adorably cute pictures in the blog post, gave me pattern envy. The Amelia therefore made a quick entry to my long sewing to-do list. Today's Amelia sunshine sale was the perfect opportunity to move the pattern to the top of the sewing list.
Gedurende ons laatste naaiweekend naaide zij naast me een Amelia* jurk, naar het patroon van Bella Sunshine. Ik testte en naaide al veel patronen van Bella Sunshine, maar de Amelia naaide ik nog niet. De jurk naast mij tot leven zien komen en vervolgens deze super schattige foto's zien gaven mij overduidelijke patroon-jaloezie. De Amelia kwam dus hoog binnen op mijn oneindige naai to do lijst. Vandaag is er weer een Sunshine sale en deze week is het de Amelia, toen ik dat nieuws vernam steeg de jurk naar de eerste positie op mijn naailijstje.
The Amelia can be sewn with long sleeves, 3/4 sleeves, short sleeves or sleeveless and in either top, dress or maxi length. I made the sleeveless, considering that our eldest is in need of summer dresses. The Amelia has a cross over front and a V back neckline. The gathered empire waistband is a lovely play full feature that is perfect for color blocking. I personally really like the contrast with the red dot fabric in the waistband. In my eyes it gives a sophisticated look.
De Amelia kan worden genaaid met lange, 3/4 en korte mouwen, daarnaast is er ook nog een mouwloze optie. Ik naaide een mouwloze jurk om meer zomergoed te naaien om de hard slinkende kledingkast van onze snel groeiende oudste terug te vullen. De Amelia heeft een overslag aan de voorkant en een V nek aan de achterkant. De gerimpelde verhoogde tailleband is perfect om te spelen met kleur contrast. Persoonlijk vind ik de rode witte stippen stof het geheel behoorlijk stijlvol maakt.
I am very happy with the fact that our ten year old loves wearing colors and bold prints. She will have a guitar recital next week where she has to wear black and when she told me the rolled her eyes and says she "hates" dark clothes. Bunnies are her favorite animals, so I knew this fabric would be perfect for her. With this fabric I have made two dresses before, this one and this one. The two meter that I bought at Joyfits is now starting to near the end.
Ik ben er heel blij mee dat onze tien-jarige dol is op kleurrijke kleding met wilde printjes. Konijnen zijn haar favoriete dieren, dus ik wist dat deze stof perfect geschikt zou zijn voor haar. Ik maakte met deze stof reeds deze en deze jurk en de twee meter die ik kocht bij Joyfits is ondertussen aardig opgebruikt. Volgende week heeft ze een gitaar concert en met afgrijzen in haar stem en gezicht vertelde ze dat ze zwarte kleding aan moet. Ze voegde eraan toe dat ze donkere kleding "haat".
During the sewing weekend end stress, my sewing partner in crime sewed up two wrong bodice parts. This happens relatively easily when you rush because in the official version there are four different bodice parts (which leads to eight different cutted fabric pieces due to having to mirror the bodice pieces). The lining is slightly smaller to avoid having a peeping lining and a perfect finish. But, you know me, I am lazy, so I again just cut the lining pieces and serged the dress with a slightly narrower seam allowance to keep the intended fit.
Tijdens de einde-naaiweekend stress naaide mijn partner in crime het lijfje eerst verkeerd in elkaar. Dit is niet zo heel verrassend omdat je onder tijdsdruk nogal snel de vier verschillende patroondelen, die gespiegeld geknipt acht verschillende onderdelen opleveren verkeerd aan elkaar naait. Het patroon heeft speciale onderdelen voor de voering zodat je een perfecte afwerking krijgt. De voering is iets kleiner en daardoor nooit zichtbaar. Jullie kennen mij echter ondertussen, ik knipte dus gewoon tweemaal de voeringsdelen en lockte de jurk in elkaar op een iets kleine naadwaarde zodat de pasvorm gelijk bleef, maar er veel minder verschillende delen waren. .
Due to the Sunshine Sale, the Amelia* pattern is now just 5 dollar for twenty four hours and you can buy the pattern here with the code “sunshinesale”. Feel free to leave a comment in the language you prefer (although Google
translate might have to assist me if you choose something different
than English, German, Dutch or Hungarian). If you buy anything through
my affiliate links (*), I get a small commission (the price stays the
same for you), I am very grateful for everything that feeds my fabric
addiction.
Door de Sunshine sale is de Amelia *vandaag te verkrijgen voor maar 5 dollar in de webshop met de code “sunshinesale”. Ik vind het altijd super leuk om reacties te lezen om mijn creaties. In
deze post zitten enkele affiliate linken, aangeven met een *. Mocht je
het patroon aankopen doordat je in de shop kwam via een link van mij,
dan krijg ik een kleine commissie. Het patroon wordt niet duurder voor
jou, maar mijn stoffenkast is er wel heel blij mee.
Blank Slate patterns re-released the Catalina* dress which was the perfect opportunity to sew one. The Catalina is a versatile summer dress that can be sewn in woven or in knit. It was a no-brainer that I would sew one in knit. Knit is my go-to fabric. Seeing that the pattern can be sewn in woven, I actually top stitched it in a non-stretch stitch. This made sewing up this dress even quicker, am I the only one that dislikes how slow a stretch stitch is? The re-released pattern now has a wider size range and an optional front placket.
Blank Slate Patterns bracht deze week de Catalina* jurk opnieuw uit. De lancering leek me het ideale moment om zelf ook een Catalina te naaien. De Catalina kan genaaid worden in geweven stof maar ook in rekbare stof. Jullie hoeven vast niet lang na te denken welk van de twee ik koos. Omdat het patroon ook niet rekkende stof genaaid kan worden, stikte ik de armsgaten en neklijn door met een niet rekkende steek. Hierdoor rekt de stof niet uit en het is ook een stuk sneller. Ben ik de enige die een stretch steek zo vreselijk langzaam vind?
I sewed up a super easy version without pockets. I thought I never really use them, so why bother? But I have to admit that when I put on the dress, I immediately missed them. I am sure that I will get used to not having them though, because the dress is super comfortable and I already know it will be one of my favorites. I made it with a drapey light weight knit and it is super comfortable. I slightly haked the finishing of the armholes and neckline. I took a narrow strip of jersey and folded it. I sewed the raw edge to the good side of the hole and turned it over. It is not the official way to sew a bias, bit it works well with knits.
Het nieuwe uitgebrachte patroon heeft nu nog meer maten en er is een optie voor een plooi voor toegevoegd. Ik ging echter voor een hele simpele versie, geen plooi en zelfs geen zakken. Ik dacht dat ik die toch nooit gebruik. Toen ik de jurk aantrok bleek ik de zakken toch wel opeens te missen. Ik weet echter zeker dat ik snel over het gemis heen kom. De jurk is namelijk super comfortabel en hij zal zeker veel gedragen worden. Ik naaide hem in een soepele viscose tricot die heel soepel valt.
Since I was a kid I have a weak spot (pun intended) for spotted fabric and it seems that our eldest has the same. This dress has been her favorite ever since I sewed it, and she still wears it. It has become a bit short, so I bought fabric to make a new red-white dot fabric. By mistake I got twice as much as I planned, so enter my own red dot dress! I do not know why I did not sew one for myself earlier. I love red in general and dots somehow make it even better.
Sinds dat ik een jaar of 10 was heb ik een zwakte plek voor stoffen met stippen. Ik heb vroeger verschillende van die jurkjes gehad en ik dat waren altijd mijn favorieten. Onze oudste lijkt dezelfde zwakte te hebben. Deze jurk is nog steeds een zeer geliefde en ze draagt hem nog steeds. Ik zag echter nu toen het warme weer weer kwam dat hij toch echt wel te kort is geworden. Ik bestelde daarom nieuwe stof met stippen. Door een foutje had ik echter veel meer stof dan ik bedoeld had en daarom naaide ik rode stippen voor mezelf. Ik ben zo blij met het resultaat en snap niet waarom ik het niet eerder deed.
I sewed the knee length version, but the pattern also has a maxi dress option. In her post you see her recently sewn beautiful maxi version and her version is in woven. For even more examples you visit this Instagram tag.
Ik naaide knie lengte, maar er is dus ook een maxi lengte. Zij naaide een schitterende versie in geweven stof. Wil je nog meer inspiratie dan geeft deze Instagram link nog veel kijk-moois. Ik hackte de afwerking van de jurk een beetje. In plaats van biasband gebruikte ik een stripje tricot die ik dubbel vouwde en zo aan de armsgaten en neklijn vast naaide op de goede kant. net als een boord. Toen klapte ik het geheel naar binnen en bracht topstiksel aan. Niet de officiële manier, maar wel heel snel met tricot.
You can buy the pattern in the Blank Slate patterns webshop*. To celebrate the re-release I am allowed to give away a version of the pattern! For a chance to win the pattern you play along by filling in the rafflecopter as ususal. You get "tickets" for following me and commenting on this blog post.The give away is open until May 25.
Je kan het vernieuwde Catalina patroon kopen in de Blank Slate pattern webshop*. Om de lancering te vieren kan je er echter ook weer eentje winnen, hier op de blog. Als je mee wil dingen dan vul je de Rafflecopter in. Je krijgt punten als je me volgt en als je blog post berichtje achter laat.
Feel free to leave a comment in the language you prefer (although Google
translate might have to assist me if you choose something different
than English, German, Dutch or Hungarian). If you buy anything through
my affiliate links (*), I get a small commission (the price stays the
same for you), I am very grateful for everything that feeds my fabric
addiction.
Ik vind het altijd super leuk om reacties te lezen om mijn creaties. In
deze post zitten enkele affiliate linken, aangeven met een *. Mocht je
het patroon aankopen doordat je in de shop kwam via een link van mij,
dan krijg ik een kleine commissie. Het patroon wordt niet duurder voor
jou, maar mijn stoffenkast is er wel heel blij mee.
Last week, I showed you two patterns from OT 19*, the Pixel Pullover and Alfie Sweatpants. Today, I am showing you a dress pattern from OT 19. The Playtime dress is designed by Sew by pattern pieces. The eye catcher of this dress are the round sewn in pockets which create a very interesting color block option.
Vorige week liet ik jullie twee patronen uit One Thimble 19* zien, de Pixel Pullover en Alfie Sweat pants. Vandaag laat ik jullie een jurkenpatroon zien uit hetzelfde, nieuwe issue. De Playtime jurk is ontworpen door Sew by Pattern pieces. De zakken springen natuurlijk meteen in het oog. De zakken zijn ingenaaid en daardoor krijg je interessante opties voor color blocking.
This blue dress, that I am showing first is, as usual actually the second of the two Playtime dresses that I sewed. In this blue dress I actually followed the instructions for the pockets, and sewed them as set in pockets. If you cut the main piece of the dress it has very big holes in it that you fill with these pockets. I have to admit I was a bit scared of them because, I am not the most precise sewist, that is why I cheated in the first version. But there was no need to be afraid. I just pinned them in and it worked like a charm. You have to pin, but if you do this, it lines up perfectly.
Deze blauwe jurk, is zoals gebruikelijk natuurlijk eigenlijk de tweede jurk die ik naaide. Bij deze tweede jurk naaide daadwerkelijke volgens de instructies, dus met ingezette zakken. Als je volgens de instructies het voorpand knipt zitten er grote gaten in het voorpand waar de zakken komen. Ik moet toegeven, ik als niet zo precies naaister vroeg me af of het bij mij ging werken, maar ik durfde het bij de tweede jurk toch aan.Wat bleek, als je het gewoon netjes speld, of met klipjes vast zet is het totaal niet moeilijk en past het zonder problemen.
For the first dress I actually flipped the pocket to the inside and top stitched the pocket to the dress. This way you still have the circle shape, but your main fabric continues all the way to the pocket hole. I used a small lining to finish the pocket hole, that is why I top stitched the hole on the white dress. The fit of the dress is perfect and due to the fact that it has different sleeve lengths, your daughter can actually wear variations of this dress all year long.
Voor de eerste jurk verplaatste ik de zakken dus naar binnenkant en ik stikte de zakken door tegen het voorpand en zo krijg je een vergelijkbaar effect, maar dan loopt de stof van de jurk dus door tot aan de zak. Ik voegde een belegje toe aan de zakopening om die netjes af te werken. Die moest dan natuurlijk wel worden doorgestikt. De jurk paste perfect en doordat er verschillende mouwopties bijzitten kan je je dochter je hele jaar door van zulke jurken voorzien.
The white dress I made with "magic" fabric, my kids and me immediately fell in love with the concept. Our kids always like me to make them clothes that can double as toys. They for example also really would love some clothes with the reversible pallets. I did buy a bit of that fabric, but I just did not find the inspiration yet. This fabric changes color in sun light and very quickly made itself in two garments, and I bought enough to make two more and I might or might not have ordered more... Shooting this one inside is a logical challenge, and she had to quickly run inside where I was waiting with my camera.
De witte jurk naaide ik met "toverstof". Nooteboom textiel bracht er verscheidene uit en wij zijn er helemaal weg van. Onze kinderen suggereren vaak ideeën voor bijzondere kledingstukken. Zij maken er graag een stuk speelgoed van. Zo kocht ik ook eens van die omkeerbaren pailletten toen het net uitkwam, maar de inspiratie om ze ergens op te naaien vond ik nog niet. Deze stof was echter zo verwerkt. Ik kocht genoeg voor voer kledingstukken en naaide er vast twee. Een foto maken binnen van het kleureffect, het verkleuren in de zon was wel wat lastig. Ze moest heel snel op en neer rennen van buiten naar binnen en dan zat ik klaar met de camera. Waarom niet gewoon buiten vraag je je af, tja ik vind een mooie achtergrond vinden buiten echt heel lastig tegenwoordig.
Pattern Revolution, as always during OT release organized a blog tour and there you can easily see all the good stuff that is OT 19. You can order your copy or the individual patterns here*.
Zoals ik mijn vorige blogpost al schreef kan je nu helaas niet meer foto's van alle patronen bij elkaar zien, maar daar is nog een alternatief voor. Zoals bij elke lancering heeft Pattern revolution een overzicht en blog post, hier heb je dus een schitterend overzicht van alles wat OT 19 te bieden heeft. Je kan OT 19 hier kopen* voor 15 euro exclusief btw.
Feel free to leave a comment in the language you prefer (although Google
translate might have to assist me if you choose something different
than English, German, Dutch or Hungarian). If you buy anything through
my affiliate links (*), I get a small commission (the price stays the
same for you), I am very grateful for everything that feeds my fabric
addiction.
Ik vind het altijd super leuk om reacties te lezen om mijn creaties. In
deze post zitten enkele affiliate linken, aangeven met een *. Mocht je
het patroon aankopen doordat je in de shop kwam via een link van mij,
dan krijg ik een kleine commissie. Het patroon wordt niet duurder voor
jou, maar mijn stoffenkast is er wel heel blij mee.
The season is changing, which means a new issue of One Thimble! One Thimble 19 * will officially be available from tomorrow, May 11 (but since today for pre-orders and subscribers). Due to the fact that the season change in Australia actually means a change to cooler weather, the new issue is winter themed. Although we are moving to summer, I already sewed several pieces from the issue. Today I am showing you two perfectly complementary pieces, the Pixel Sweater and Alfie Sweat pants. Besides winter attire, they are great for summer hikes, cool evenings are typical Dutch summer in general unfortunately ;)
Er komt weer een wisseling van seizoenen aan, dus dat betekent een nieuw nummer van One Thimble. One Thimble 19* komt morgen, 11 mei uit (mensen met een abonnement en pre-order krijgen hem vandaag). Gezien het feit dat de seizoensverandering in Australië betekent dat het winter wordt, zit het magazine vol met winter patronen. Toch naaide ik een heel rijtje stuks en vandaag laat ik jullie twee perfect bij elkaar passende patronen zien, de Alfie Sweatpants en Pixel Pullover. Naast winter kleding zijn ze perfect voor wandelen door het bos in de zomer, of gedurende afkoelende zomeravonden, maar helaas soms ook voor een gewone Nederlandse zomerdag.
This pink and red set is actually the second set that I sewed. If you scroll down a bit you will see the first. When I sewed the first one I was apparently in a rather dark mid winter vibe and choose rather plain colors. I was not optimally happy with my color scheme, probably especially because it hot summer weather now, so I went for a more color full set.
De rood-roze zet is eigenlijk de tweede set die ik naaide. Als je naar beneden scrolt kom je ook een andere tegen. Ik koos de stoffen voor de eerste set twee weken geleden toen het koud was en ik blijkbaar in een soort mid winter vibe was. Ik vind het geheel dus wel erg sober geworden. De stoffen voor de tweede set koos ik dus een stuk vrolijker.
The color is not the only difference. For the first set that I sewed both pieces in size 12. I do not know what I was thinking exactly, but I know that I was driven by the fact that our eldest two seem to outgrow all their clothes within one season at the moment. Our eldest daughter is ten and I never ever sewed according to her age, she was always smaller and even skinnier. But her recent growth spurt let me choose a size bigger than what she has now according to the table. Because I wanted it to fit during the winter. What I of course did not realize that even in the size table 10 and 12 year it shows that kids usually stay longer in one size than one season. The size 12 really was too big. She did not agree with it being too big though and wore it for two days straight. It is so comfy she says, and last week was rather cold. I folded the cuffs of the sweat pants inside for the picture, I did not hack them out.
De kleuren combi is niet het enige verschil, ook de maat is anders. Onze oudste twee groeien tegenwoordig per seizoen zoveel dat ze in een rap tempo overal uitgroeien. Ik maakte voor onze oudste nooit haar leeftijdsmaat, zelf niet naar lengte maat. Ze is altijd kleiner en smaller geweest. Nu paste ze qua maat echter perfect in de maat 10 volgens de maattabel. Maar aangezien ik wilde dat het ook nog goed zou passen in de winter, dacht ik 1 maat groter te pakken. Dat is blijkbaar niet meer aan te raden bij dit soort leeftijden. Logisch natuurlijk achteraf, 1 maat groter is namelijk 12 jaar en ja daar zit toch wel echt twee jaar tussen. De grijze set is dus echt wat op de lange termijn groei. Dochterlief is het er niet mee eens en trok het gewoon twee dagen aan vorige week toen het fris was. Maar voor de foto's sloeg ik de enkelbanden van de broek toch maar even naar binnen.
The Alfie sweat pants are designed by Ainsley Fox, the woman behind the brand also is the heroin behind the entire One Thimble. The pants are just as cool as the designer and actually have four different front views. The views differ in the front color block options. Two of them are perfect for reinforced knees, which my son's versions are going to get. There are two different options for front pockets. The version with a vertical splitted front creates a cool pocket option that is perfectly in sync with the color block options. The pattern also comes with instructions on a welt front pocket.
De Alfie sweat pants zijn getekend door Ainsley Fox, De dame achter dat merk is ook de drijvende kracht achter One Thimble zelf. Het patroon is net zo indrukwekkend als de designer. De sewatpants hebben vier verschillende gecolorblockte voorkanten. Twee van de vier zijn perfect voor versterkte knieën, die bedacht ik al voor de zoon. Er zijn twee verschillende opties voor zakken. Ik ging twee maal voor de zakken die geïntegreerd zijn in de vertical middensplit. Er is echter ook een optie voor paspelzakken.
When I saw the design of the Alfie sweat pants I knew that the pattern would be great for upcycling. I noticed before that somehow a grown up pair of pants does no longer have enough fabric between the seams (who is brave enough to unpick jeans seams, I know those people exist) to make our eldest pants. So, by making one side of the splitted front from new fabric I could turn one of my favorite worn to-the-thread stretch pants into one pair for her. Now that I dissected the trousers I could easily reinforce the pockets that had torn before. I kept the original back pockets in the new pants.
Toen ik het design van de broek zag dacht ik meteen een recykleren. Ik merkte namelijk een tijd geleden al dat het soms verrassend lastig is om een broek voor wat grotere kinderen uit een bestaande spijkerbroek te knippen. Geen idee hoe dat kan, maar het kan er iets mee te maken hebben dat ik over het algemeen weinig zin hem om de zijnaden uit een spijkerbroek helemaal los te maken. Doordat de broek met een gesplitste voorkant komt kon ik met een klein extra stukje stof prima een oudste stretch broek van mezelf omzetten in een broek voor onze oudste. Ik behield de originele zakken op de achterkant. Ik was er zelf uitgescheurd en nu de broek helemaal uit elkaar lag kan ik alles goed verstevigingen voor een volgende draagronde.
The Pixel Pullover is designed by Jennuine Design. Seeing that I also cut the Pullover a size to big, the grey version is a rather roomy. But as you can see on the red version, the sizing is actually excellent. What is better visible on the grey version are the saddle sleeves. They look and sew like raglan sleeves but behave like set-in sleeves when they are worn.
De Pixel Pullover is van Jennuine Design. Ook die knipte ik in eerste instantie een maat te groot. Aan de rode versie kan je echter zien dat de pasvorm prima is. In de grijze versie kan je echter wel beter de zadelschouders zien. Zo'n patroon naait en ziet eruit als een Raglan, maar het draagt als en ingezette mouw. Perfecte bewegingsvrijheid zonder dat het een laag armsgat is.
The Pixel Pullover comes with three necklines, a hood, a shawl collar and a cowl. Our kids still love hoods, so I picked the hood twice. The grey stretchy velvet is very fluffy and therefore the hood on the grey one looks rather big on the picture, but she assured me that it is supper comfortable. There are two sets of cuffs, one with thumb holes. When our daughter found out there was a thumb hole option she insisted on getting it in the second version. The apparently feel so natural that she forgot to take them off" when she started to make pastry..... Let's hope she quickly gets used to them.
De Pixel Pullover komt met drie hals opties, een kap, een sjaalkraag en een wijde rimpel kraag. Ik koos tweemaal voor kap omdat de kids daar de voorkeur aan geven. Ik gebruikte bij de grijze versie een soort stretch fluweel die de kap gigantisch lijkt te maken, maar dochterlief is helemaal weg van de zachte binnenkant natuurlijk. Er zijn twee verschillende polsboorden, eentje met en eentje zonder duimgaten. Toen ze hoorde over het bestaan van duimgaten, stond ze erop dat de tweede versie die zou hebben. Ze vind ze echter zo fijn dat ze ze vergat uit te doen toen ze deeg ging kneden...
The way to buy One Thimble* for Europeans changed a bit due to the European VAT rules and new privacy law. Now, you will be automatically directed to another site where you immediately see euro prices (just 15 euro without VAT). The only small issue is that we can no longer see multiple pictures of the listing, but you can see one picture from all the stand alone patterns if you scroll through to the second page of the OT shop. If you are interest in buying issue 19, independently of your location, I advice you to become a member of the One Thimble Facebook page, you can see all kind of pictures there as well.
De manier om One Thimble* aan te schaffen veranderde een klein beetje. Door de nieuwe privacy wet en de BTW regels is er besloten om de verkoop via een Britsche website te laten lopen. Hierdoor zien we nu direct euro's, maar is het niet meer mogelijk om meerdere foto's uit het magazine te zien. Je kan per patroon wel één foto zien door de losse patronen te bekijken, maar als je interesse hebt in het kopen van een nummer dan zou ik me ook aanmelden bij de One Thimble Facebook groep. daar zie je heel veel voorbeelden van de verwerkte patronen. Inclusief 21% procent belasting kost het issue dus € 18,15.
Feel free to leave a comment in the language you prefer (although Google
translate might have to assist me if you choose something different
than English, German, Dutch or Hungarian). If you buy anything through
my affiliate links (*), I get a small commission (the price stays the
same for you), I am very grateful for everything that feeds my fabric
addiction.
Ik vind het altijd super leuk om reacties te lezen om mijn creaties. In
deze post zitten enkele affiliate linken, aangeven met een *. Mocht je
het patroon aankopen doordat je in de shop kwam via een link van mij,
dan krijg ik een kleine commissie. Het patroon wordt niet duurder voor
jou, maar mijn stoffenkast is er wel heel blij mee.