Tuesday, March 31, 2015

Reversible Easter dresses to wear the whole year round

After making our newest doll two reversible knit dresses, I wanted to try the same technique on a bigger dress. I took two fabrics from my stash, one with bunnies and flowers (which I bought at Suz designers stoffen) and one very special digital print jersey (bought at Joyfits). It is a panel and it shows a picture of a forest with animals drawn on it. I bought the fabric at the same time as this one. Deciding what to make from it, and how to cut it, was even harder because the fabric is actually just one big picture and I kind a wanted to use every part of it.


I am all for breaking the rules and especially my own apparently. Last week I stated that every dress should have pockets to immediately ignore this rule the next week. Due to the reversibility, putting in pockets would mean putting a double thick pocket (both sides would need its own set). I feared this would create strange bumps so I left the pockets out. I will explore reversible pocket possibilities another time, because I know I should be able to use one set of pockets, but I wanted a quick project this time.


I love making this type of the dress, all seams can be done with a serger (with the exception of 10 cm side seam which you have to close by hand). No regular sewing machine needed, no binding, no hemming, lovely!


After finishing the dress for my middle daughter, I saw I still had a nice piece of both fabrics left. I therefore decided to give my eldest the same type of dress. I didn't have enough digital forest to cut both a back and front, so I opted for a plain back back. I couldn't cut both the back and front in one piece from the bunnies either, but there I made a seam at the back between the skirt and bodice.


I love the fact that although the dresses are made from the same panel, the forest part of the dresses are different. I did succeed in putting a bunny on both fronts though. My girls both liked the green bunnies better than the forest, I prefer the forest. I think these are perfect all-year-round dresses. In winter and fall the forest print looks lovely combined with dark colored tights and shirt. In the pictures my eldest is wearing black and my middle daughter is wearing dark blue. The light green outside is perfect for warmer weather. The dresses can than be worn without clothes underneath. The pictures were made on a nearby street. I did not wanted to really undress my daughters in public and the weather also didn't allow sleeveless either, so I used same shirt and tights for the spring/summer side as well.


I drew both from regularly used dress pieces. For my eldest daughter I used the Louisa base like here (this time I added some flare at the bottom), and the dress for my middle daughter has the Princess castle dress from Ottobre as its base.


From the digital jersey a small piece with a lovely squirrel remains. I wasn't in the mood now, but I will use him in one of my coming project. He might make it into one of my Kids Clothes Week projects. He fits the wild thing theme perfectly. Today I posted my second post as  KCW contributor, check it out here.


I love to hear what you think of my creations. Feel free to leave a comment in the language you prefer (although Google translate might have to assist me if you choose something different than English, German, Dutch or Hungarian). 

Saturday, March 28, 2015

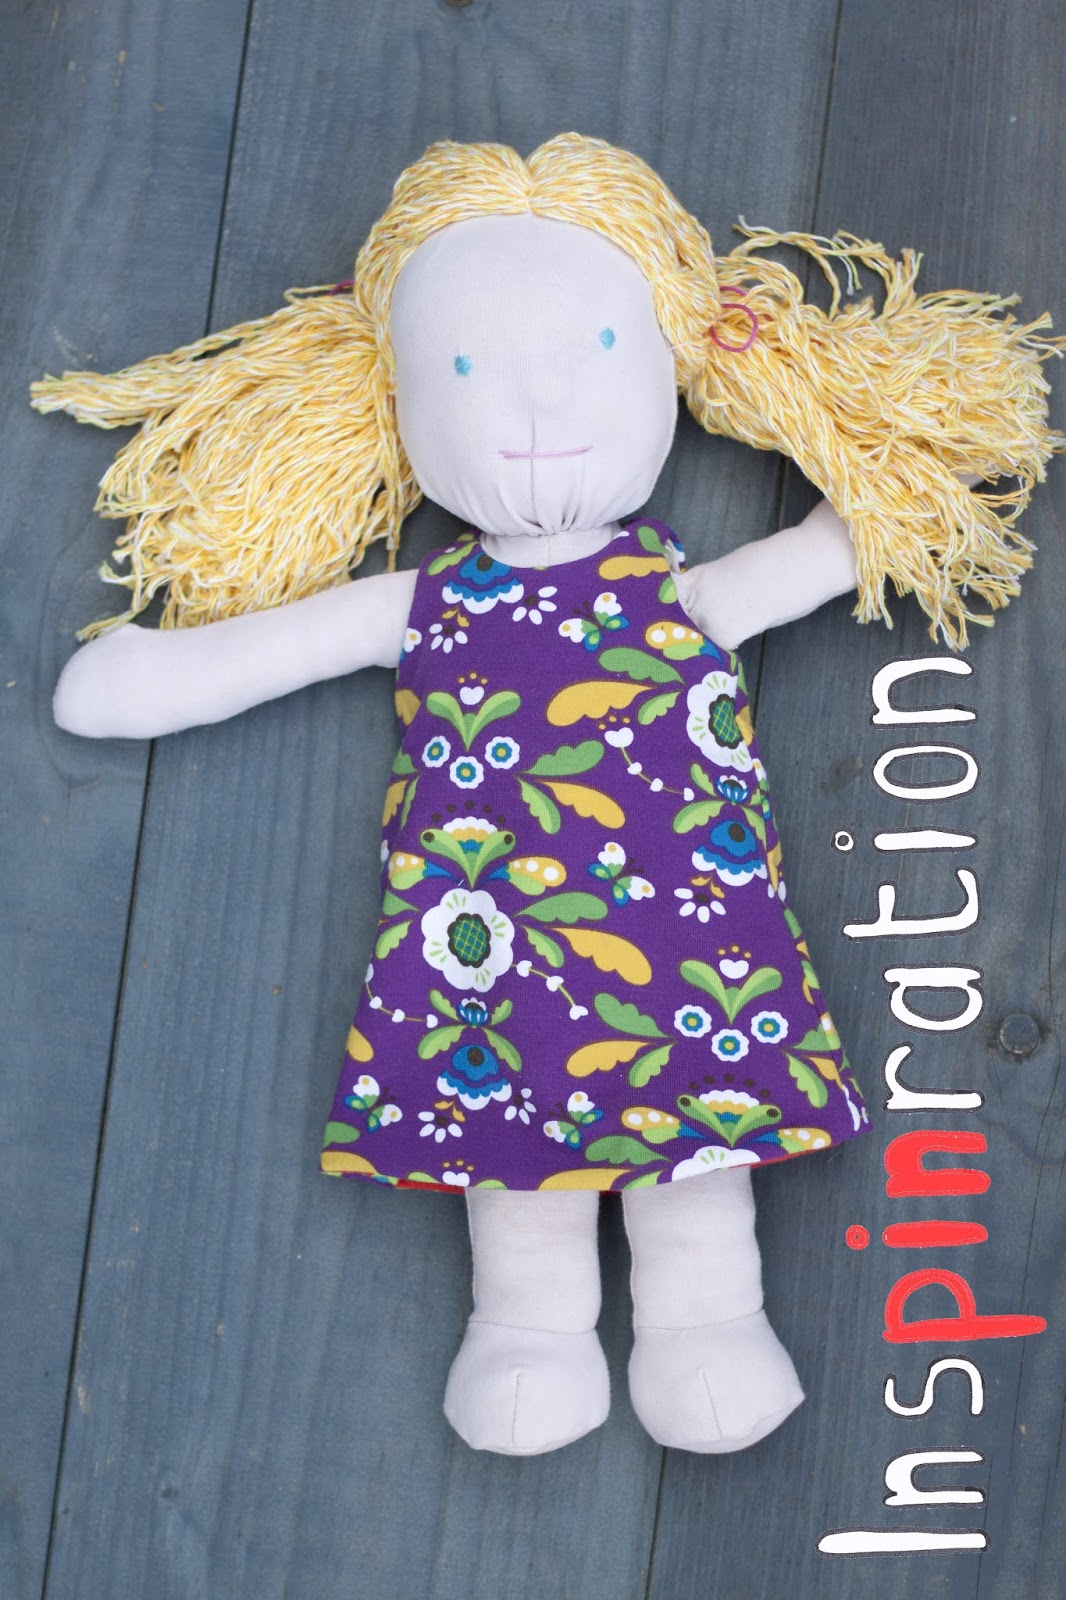
A doll and a wardrobe

Sewmamasew is organizing the six weeks of love for softies. At the start of the six weeks they featured a Bamoletta doll. I checked up on it and loved it. The faces are extremely inviting. I was intrigued by the nose, where did that shape come from. I found out the doll is a Waldorf type of doll and the head is first shaped and later covered with jersey. Bambolettadolls has uploaded a few YouTube movies showing how such dolls are made and the internet has many other resources as well, so I wanted to give making one myself a try.


I tried to make it work with materials I had at home, I own a lot of everything. I dyed some  jersey from a plain white shirt with tea to make the jersey skin colored. I used the book My own rag doll to create the body. Earlier, I made a doll from the book and the result was not that great. I didn't do a satisfactory job om embroidering the face and I didn't understand how to to the hair. Sewing the filled limps on the body is a challenge. When I did that step for this doll, I had learned that the best result is reached if you leave the back almost totally open (the bottom should be sewed for two centimeter, the rest up to the neck has to be open).


For the head you should use wool, but I  just used pillow filling. I took a stocking and filled it with a round ball of filling and created a size which I thought that would work. The next step is tying some thread to create the eye line and nose. I sewed a head shaped jersey sack and pushed the head in there. Following the Bomboletta instructions I embroidered eyes and mouth. The hair instructions from Bamboletta are also great. I used plain yarn for the hair and I tied the hair in two ponytails.


Due to the fact that wool has more body and recovery, my doll is missing a chin. But even without chin, I am still satisfied, especially because my kids love her. If I make another, and my eldest would love me to do that, I will also tie some thread at the bottom of the face to shape a chin.


An important part of playing with a doll are the clothes. A good doll has a great wardrobe. I looked through my never ending pile of  jersey scraps and at random choose a few. To make my life easier I decided to go for reversible dresses. In reversible clothes it unnecessary to separately bind the neckline, arms and bottom hem, which can be a pain for these small clothes! I made two dresses but these count as four dresses. The drew the pattern for these dresses based on the dolls body template.


Ivy and Kim you were both interested in the kam snaps, please send me an email (inspinration (at) gmail.com) and we will discuss how to make you both happy.


I love to hear what you think of my creations. Feel free to leave a comment in the language you prefer (although Google translate might have to assist me if you choose something different than English, German, Dutch or Hungarian). 

Sunday, March 22, 2015

Improvisional pleating on an assymetrical splitted dress

I am almost incapable of sewing a pattern 100% as it was intended. I am a pathological pattern flipper. Not surprisingly, I love the Flip this pattern concept of Frances Suzanne. I have followed along the previous season, but last month's Free flip was the first time I actually participated. This month we are challenged to flip the Boardwalk pattern from Peek-a-Boo patterns. With this pattern you can either sew a sweater or a dress in knit, so a versatile pattern on its own already. I flipped the pattern while keeping the elements I loved, the contrasting front button closure and a centre gathering of the front skirt.


A bit over a week ago I wrote that I love knit, and even coined the non-existing word knitification to describe me flipping a woven pattern to a knit dress. This week I went the opposite direction, I took the knit pattern and flipped it to a woven dress. I determined the right size by measuring the pattern against an already cut pattern piece of a well fitting woven dress. It turned out I needed a 2T for my three year old. Last month I saw an asymmetrical front appearing in one of my facebook groups. If I remember well, the original pattern is from a recent Knippie, but I do not know which one. I incorporated the asymmetrical concept (or at least what I remember from it) in this months pattern flip. I made a photo to show you how I drew my asymmetrical line. I first drew the complete the original bodice pattern, the horizontal line is the proposed bodice split in the boardwalk pattern. I simply pulled a diagonal line through the middle cross, this way I had the same distance  from the neckline to put the two buttons on.


To spice up my flip, and to try a new technique I used StraightGrains improvisional pleating tutorial to make a vertically pleated bodice. StraightGrain released a fourth pleating tutorial last week, putting her original pleating tutorials back on my radar. After origami pleating the fabric I actually ironed some stabilizer on the wrong side of the pleats. I feared that only stitching would not keep it in place enough, especially because the pleats are relatively long on the longest part of the bodice. The stabilizer is invisible and will keep the pleats in place for sure.


I did not wanted a gathered back piece, and to add some width I simply flared out the skirt part of the dress. I added pockets, just because I can, every dress should have pockets, new protocol.


The fabrics are both from the Shape of Spring collection of Cloud9, which I bought at modes4u.com last year. Although they are woven, the fabric has some horizontal stretch, or at least I feel it has. I hemmed the dress with a strip of the teal circle fabric. I had seen it here, and I loved the effect.


I assumed that the front buttons would create enough space to fit my daughters head, but it didn't. Therefore I added small split in the back bodice as well. I did not use the optimal technique (as usual I was too lazy to check the web how to do it exactly and simply used a technique I had seen for knit fabrics), but I am still satisfied with the result. I went for an alternative closing, by putting two flower button and a small elastic that is fixated on one side and is intended to be spread around both buttons. I have probably seen it somewhere once, but I can not remember where.


The front buttons are Kam snaps that I ordered in the US due to the birthday of a friend. I love their shape and have been searching for a project for a while on which I could put them to good use. I have not found them anywhere in the Netherlands, or Belgium, if you know an online store please tell me. If there is indeed not another store, some of you might also would like to have a few. I only ordered the flower caps, so I do not have matching sockets and studs, but I am willing to give away 100 different colored flower caps. Just mention you wanting to get them in a comment. If more than one person is interested I will come up with a way to choose a random lucky receiver. Due to the fact you can easily order them in the US (and I conveniently decide to forget the rest of the world) I only send them for free to someone located in Europe.


My middle daughter was still recovering from a cold and therefore looks a bit pale and has a bit watery eyes, but she bravely gave me some smiles.


I love to hear what you think of my creations. Feel free to leave a comment in the language you prefer (although Google translate might have to assist me if you choose something different than English, German, Dutch or Hungarian).

Saturday, March 21, 2015

Spring coat

This week Sofilantjes organized a pattern flip sew along. Melissa Malic from Rebel and Malice showed how you can flip the Irdis wrap dress to a spring coat. The sew along started on Monday and the sewing should have been done on Friday, but nice as they are (and probably anticipating that many of use can sew more in the weekend) Sofilantjes and Melissa gave people two days extra to catch up, and the winner (yes there is a price) will be announced coming Monday. For me this meant that I finished cutting yesterday (Friday evening) and sewed up the coat this morning (Saturday morning).


The Irdis dress comes both in a woven and a jersey pattern version, and the woven pattern should have been the base for a woven spring coat. Besides sizing, the difference between the jersey and the woven pattern version is that the jersey version has a three layered skirt. Both the Irdis wrap dress and the proposed spring coat have a skirt in three pieces (which you can use for some interesting color blocking). Due to my fabric choice I did not wanted to cut the skirt part in pieces. I therefore used the jersey pattern as the base of my coat. I simply used bottom skirt pieces (the largest from the three layers) only. The fact that I used the jersey pattern of course complicated the sizing. I took my daughters old coat and a pattern piece I recently used for a woven dress, and the width I needed was that of a size 158 (13 years). For the length I picked 116 (6 years). I had to be a bit creative while combining the two very different sizes but I managed.


I added the suggested collar, of which the pattern can be found in the Sofilantjes sew and show Facebook group. A coat should have pockets, so I also added those. I thought very much about adding a hood, because a good coat has a hood, but I have not come up with a good solution. I fear that due to the relatively low collar there would not be enough place to attach the hood. The hood would also obscure the back collar, which is one of the coats nice details. For now I decided to let the hood be, but this might change in the future. Maybe the other sewers will have found a solution.


The fabric I used for the outside of the coat was the oldest fabric in my closet. I actually inherited it from my grandmother who died over 10 years ago. I therefore have no idea where the fabric came from, or what the fabric is, but I assume it is wool. I now only have a small piece left that could become a hood if I find a way. When I started cutting I did not pay attention to the pattern. After cutting the main pieces I realized that with such a checkered fabric it is important that the stripes form a continues pattern. For my coat they do not line up exactly. If I would re-cut the fabric I would have cut differently anyway. I would have cut three (one back, two front) main pattern pieces, by putting the bodice and skirt parts together.


For the collar I used a thicker mixed knit fabric I bought a few months ago at Textielstad, the fabric is not available anymore. For the lining and the pockets I used a jersey which I bought on a crazy sale at Suz designer stoffen. I used the jersey for the bottom of the collar as well, two layers of the thick knit might have become too much. Now the collar sometimes shows a bit of the very colorful lining, I think it has a certain charm. I lined the sleeves with a polyester smooth lining, this trick I learned while reading about the Lars of Zonen09.


I wanted to flip the pattern flip a bit so I added an empty pipping allover the coats sides, I needed a three meter strip of jersey for that. I sewed the pipping with my serger, it went slow but it went well. To nicely finish the coat I put a decorative seam next to the pipping, this also fixated the lining and outer fabric. Decorative stitches and me are not great friends yet. That is why I rarely use them. I assume like with many sewing techniques, I need more practice and to get to know my machine better. My usual problem is bobbing thread showing, which also happened this time. This is partly caused by the fact that the bobbin and the main thread did not have the same thickness. I used embroidery thread in the needle. I did not wanted to use it in the bobbin as well because embroidery thread is a bit weaker than normal thread. In the case of this coat I do not really mind that the white from the bobbin is showing, I think it fits the design of the fabric, but I really should start studying how to get the effect done well. The picture is a bit blurry, my apologies if you get a bit nauseous looking at it.

I put one kam snap to close the coat. My daughter will have to practise a bit, but she will quickly get the hang of closing it. The coat is only almost finished, I just have to come up with a way to fixate the inner coat piece. Now it is still hanging loose (creating a bit open collar in a few of the pictures), I will probably use another kam snap to fixate the inner piece, but I wasn't sure about that this afternoon. I have learned to let things like that rest a bit, if I am not sure, to avoid regretting a quick solution. Due to the deadline of the sew along I decided tot post the coat anyway.


*** update May 24***

A week after I sewed the coat, I added a second button and indeed added a hood. My daughter loves the coat and wears it every day, preferable with hood up. The design of the coat is not distored when the hood is down. When the hood it up the front looks a bit strange, but my daughters preferences are more important than fashion.


I love to hear what you think of my creations. Feel free to leave a comment in the language you prefer (although Google translate might have to assist me if you choose something different than English, German, Dutch or Hungarian).  

Thursday, March 19, 2015

Upcycled giraffe summer dress

The people regularly reading my posts will have noticed that I am very into sew alongs. I love sew alongs because they usually challenge me to find my own style within given boundaries. Sew alongs inspire me to get out of my comfort zone. One of the Dutch Facebook groups I am a member of is organizing one with animal skin as its theme. Animal skin is not my favourite fabric, far from it even. This particular sew along is therefore totally up in my alley, how could I come up with a project that I would like and would have animal skin as a main feature?


First, I tried to get away with using the lion shirt I created by selling it as animal skin, lion skin is uni-yellow right? Although my entry was condoned, I felt I could do better, much better. So I googled animal skins and found one that I actually kind of like and could even love, giraffe skin. Coincidentally, giraffe skin is relatively easily created with some brown fabric and some bleach. I used an old water pen of my kids and filled it with bleach. Although not perfect, it did give me quite some control on the drawing process. When I started bleach coloring I didn't immediately got the right result (why would I practice right... just ignore the left upper side of the dress), but after drawing a while I was really satisfied.


The fabric I used was from a old short sleeved shirt from myself (which ironically already had two small bleach spots on it). The shirt had a ruffled front neckline and ruffled sleeve seams which I both salvaged for the final dress. I also kept the original bottom hem. This meant the dress sewed up very quickly. This is the best picture I have of the original shirt. I once plannend to make a bigger project of multiple shirts, although I did not actually start that project I was smart enough to make a before picture than.


The pattern I used is from Ottobre 3/2012, but I decided to ruffle the front of the dress instead of pleating. I cut a 62 width and a 80 length. I think she looks amazingly cute in the dress and I assume it will be worn a lot this summer.


Besides posting this animal inspired project today I also post at the Kids Clothes Week blog! Check it out here, I have written a post on how to make animal inspired clothes without featuring the actual animal or any of its parts.


I love to hear what you think of my creations. Feel free to leave a comment in the language you prefer (although Google translate might have to assist me if you choose something different than English, German, Dutch or Hungarian).  

Sunday, March 15, 2015

Cisse in knit and a reversible sweater

The boy patterns of Zonen09 are probably known by all of you. I bought the Cisse and Theo a few months ago, but until this week I hadn't sewn neither of them. This had to change, every time I see another Theo in blogland (which happens about two times per week) I plan to make it my next pattern, but somehow when I actually start my next project I realize I still have a small fear of button holes and prefer patterns of garments that I know my son will love over a Theo which I hope he will. My son never chooses a shirt from his closet, he always prefers to wear jersey shirts.


Although it is not the Theo this week I at least sewed one of my two Zonen09 patterns, the Cisse! My son loves soft trousers and a while ago I bought a few woven looking knits to avoid the sweat pants look. The fabric I used is a black jeans look from Lillestoff. For the piping details I used the yellow shirt again. All the pipings are actually empty because I removed the cord after sewing the piping. I feel the piping really adds to the illusion of a woven pair of trousers. I made the color a theme by adding yellow snaps and yellow top stitching. I cut a 92 small width wise and a 110 length wise. The length is perfect but I had to pull the waist elastic quite a lot to make it a tight fit at the waist, but this is business as usual here. 


The sweater my son is wearing is made from two jersey's I bought one and a half year ago at Joyfits.  The sweater is fully reversible and my son loved the idea of putting it on inside out after a toilet visit at school and surprising his teacher. I fear that the man will not have remembered what sweater my son was in, but I love his enthusiasm!


The pattern of the sweater is an adapted polo from Ottobre, I tried to mimic the Charlie, another pattern I love from Zonen09. I did not buy the Charlie because I felt I have that many similar pattern laying around, and I could make something myself. Well I am not satisfied, the collar does not have the right shape and size and the front pieces are not long enough. It still is a nice sweater, but now I could easily convince myself I really needed the Charlie pattern, so I bought it! I suspect I will make a true Charlie before my first Theo will be finished though.


My son as usual only wanted pictures with a plush friend, and I had to shoot quickly because he wanted to get back to his games.


I love to hear what you think of my creations. Feel free to leave a comment in the language you prefer (although Google translate might have to assist me if you choose something different than English, German, Dutch or Hungarian).