Thursday, September 24, 2015

Quick upcycling, woman's shirt to toddler dress/tunic

Sometimes you have clothes that you can not really part with. About ten years ago I bought a shirt and it still was in my closet, although I really didn't fit in it anymore. Somewhere during my pregnancies my torso seems to have grown (or could it be related to the fact that my belly got modernised and went from 2D to 3D).


Now that the weather clearly demands long sleeves and that my middle daughter's closet (fortunately) doesn't harbour many hand made long sleeved item that she still fits, I did a quick refashion. As you know, I choose to be lazy if possible, so I took my recently drawn Billie pattern and used it to draw a dress. The bottom hem and width gave me clear boundary conditions. If the garment is really a dress or rather a tunic is up for debate, but in winter, when kids are wearing leggings I think it doesn't really matter.


As I mentioned here, I am in the process of making the "perfect"pair of leggings for my middle daughter. She has a very sensitive skin and I experienced that tights make her legs very itchy. My stash contains many hidden treasures and this super soft Birch is one of them. I bought it with the intention of some baby gift sewing, but when it coincidentally ended up next to the brown dress, I saw a match made in heaven. I can not explain exactly why, but the combination makes me very happy. I presume it is because of the green/brown/yellow combo in both garments.


This pair of leggings is actually the second pair, based on the La Maison Victor child leggings (I write "based" because I changed a lot of the characteristics based on some well fitting leggings from my daughter's closet). The first version didn't make it to the blog yet, because I couldn't pair it with anything. I originally sewed this dress to accompany the first pair of legging, but that combination looked more like a match from hell. What had I been thinking? Thank god fabric stashes!


I love to hear what you think of my creations. Feel free to leave a comment in the language you prefer (although Google translate might have to assist me if you choose something different than English, German, Dutch or Hungarian). 

Sunday, September 20, 2015

Martini dress number four

After last time's dress sewing theme adventure, that fortunately ended well but on which I I feared for the dress' future, I longed for an satisfying quick sew. I took my treasured Martini pattern and sewed a fourth dress from it. Here you can find number one and two and three.


Although I used my already cut pieces (on which I did a full breast adjustment), I did change up the thing again. This time I cut the back as one piece. This was a bit of a challenge because the pattern pieces are very curvy. The end result understates why I love working with knits. Knits are forgiving (to some extend), I surely didn't succeed in puzzling all those curves together for the full hundred percent but it was good enough. I pieced the back together because this way the print is not distorted. On the front, due to my breasts the princess seams are great, but although I am curvy at the back as well, I think the added plus there is much less.


Another thing I changed is the bottom of the dress. The Martini curves inwards, but this time I drew a small flare outwards from the waist down. I drew a much lower neckline than I did last time, a few of you correctly pointed out that showing some more skin there would be better.


The fabric is from Stoffenelf and has a great drape. Stoffenelf has a quickly changing stock, and this fabric is already out of stock. Check out the current stock (many digital jersey's), you will surely find some nice alternatives. I cut this dress the night this fabric (and many more) arrived in my home. There isn't much that is more satisfying than sewing a dress that immediately fits great from fabric you just bought.


I love to hear what you think of my creations. Feel free to leave a comment in the language you prefer (although Google translate might have to assist me if you choose something different than English, German, Dutch or Hungarian).    

Tuesday, September 15, 2015

Jersey dress (Knip pattern)

I love wearing dresses, because you do not have to combine them with bottoms, they are enough on their own. Jersey dresses are the best because they will usually fit (even if you didn't sport during the summer and ate a lot of chocolate) and you do not have to iron them.


In the past, I made myself a few dresses and I love wearing all of them, but I can still use a few more. The pattern for this dress is from the most recent Knip (September 2015). I adjusted the fabric positioning because I was inspired by the Jaanu (that I still have to sew).


This was the first dress I made from the Knip and I am not that enthusiastic the sizing as I am about the Ottobre and La Maison victor. I really carefully followed the size table (so blending between sizes it is) but the whole thing was too big. I almost had to take the entire dress apart but I fixed it. For example on the back I actually removed about 5 centimeters of fabric.


The fabric is from Joyfits, a while ago she had a huge sale and I thought it was a great excuse to buy a few meters (not that I need an excuse normally, but it still made me very happy). The apple fabric is from Hilco, the fabric is sturdy with high recovery and stretch, ideal fabric for clothing. The other (upper) fabric I also bought at Joyfits, but I bought is almost two years ago. The one meter I bought from the Hilco was not enough for the entire dress, but I think this gives a nice combination.


During the fitting in which I discovered the abundance of fabric around my body, I also saw that the length wasn't that long, so I used a bias to keep all the length I had. I chose for 3/4 sleeves, like I mentioned in a previous post, I feel I can wear that length the entire year round.


I love to hear what you think of my creations. Feel free to leave a comment in the language you prefer (although Google translate might have to assist me if you choose something different than English, German, Dutch or Hungarian).    

Wednesday, September 9, 2015

DYYNI testing, the rest of the outfit and the give away winner

One and a half month ago, Pienkel released her first pattern, today she is releasing her second as part of the Aspiring Designers Challenge. I was again part of her tester team. The DYNNI is a six paneled skirt has three different official views, a one layer skirt, a two layered skirt and a two layer skirt with one rushed panel.


If you are a bit like me, you do not see three views, but you at least also see the possibility to make either a long or a short six panel skirt (depending on which layer you make, the upper layer is slightly wider than the lower layer) and you can of course create more rushed panels. I immediately thought Disney princess ball gowns. Imagine using a nice see through upper layer and rushing all six panels, your daughter will feel like a princess for sure.


The main fabric I used for the skirt is from Cloud 9 and the green is from Soft cactus. The pattern includes (optional) pockets, so if you do not have a pocket fetish like me because you haven't experienced how easy it is to add pockets to everything, this is a perfect pattern to teach you how to make them. With the code DYYNILAUNCH25 you can get a 25% discount on both her patterns in Pienkels Etsy store. In case you are wondering (like me) what the names of those patterns mean, DYYNI means "dune", Pienkel lives an an Island consisting of mostly that, so I see why she picked that name (and the rushed part might have inspired it). HIEKKA, her previous pattern's  name means "sand" (no further explanation on inspiration needed there as well).


Instead of going for multiple types of skirts, this time I sewed an entire out fit this time. Like I mentioned here, I got jealous seeing matching fall outfits. As I understand it , layering is the thing to do when the weather becomes cooler (I am a strange one myself, I just wear 3/4 sleeves whole year round and never get really cold). A few weeks ago the Jukebox hit collection was released. I love the idea of the pattern. It is one pattern set for a bolero, two shirts, two knee length dresses and a maxi dress. The manual is packed with hacking ideas and pattern mixes and the designer herself made even more hacks (on this Facebook page). I loved the idea and bought it on a 25% release sale (there is a 15% discount code on the Facebook group page). I made this reversible bolero with it. Due to the fact that I used two thick fabrics, the cute back pleat isn't really visible. I twisted a cord of a few strings of cotton to close the bolero.


The shirt my daughter is wearing is the third Billie I mentioned here. In my previous post I already mentioned a few misses I made with the pattern. Well, here is another. I was arrogant, thinking that my daughter would probably need a bit tighter shirt, her being a girl and the Billie being a boy pattern. Wrong, the pattern is unisex and like I mentioned last time, Zonen09 already has a nice tight fit. Just make the size the size table prescribes. My son and daughter have a bit more than a centimeter difference on the chest, but I assumed that she would fit in his shirt fine, so I just cut another shirt 116 (and lengthend it slightly). This shirt was actually the first one I sewed and the problem I mentioned with knits not being as stretchy as rib knit (which is prescribed in the pattern so this is all my fault) led to a very tight waist band. I omitted the wrist bands (my daughter would not have been able to put her hands through it), resulting in 3/4 sleeves. For the photo the shirt was fine, but my middle daughter will get to enjoy the shirt.


My eldest daughter was extra sad she will not wear the shirt because she actually choose and peeled the butterfly application. She did it already a few months ago, but I never came around to sewing a plain shirt. The butterfly is silver colored and it was hard to make a good picture from it because it is reflecting light.


Last but not least I happy to announce the winner of the give away, MARJOLEIN (in case more participated, this is the fabric she preferred most) has won it. Please contact me about how to get your prize.

I love to hear what you think of my creations. Feel free to leave a comment in the language you prefer (although Google translate might have to assist me if you choose something different than English, German, Dutch or Hungarian).   

Sunday, September 6, 2015

Two times Billie

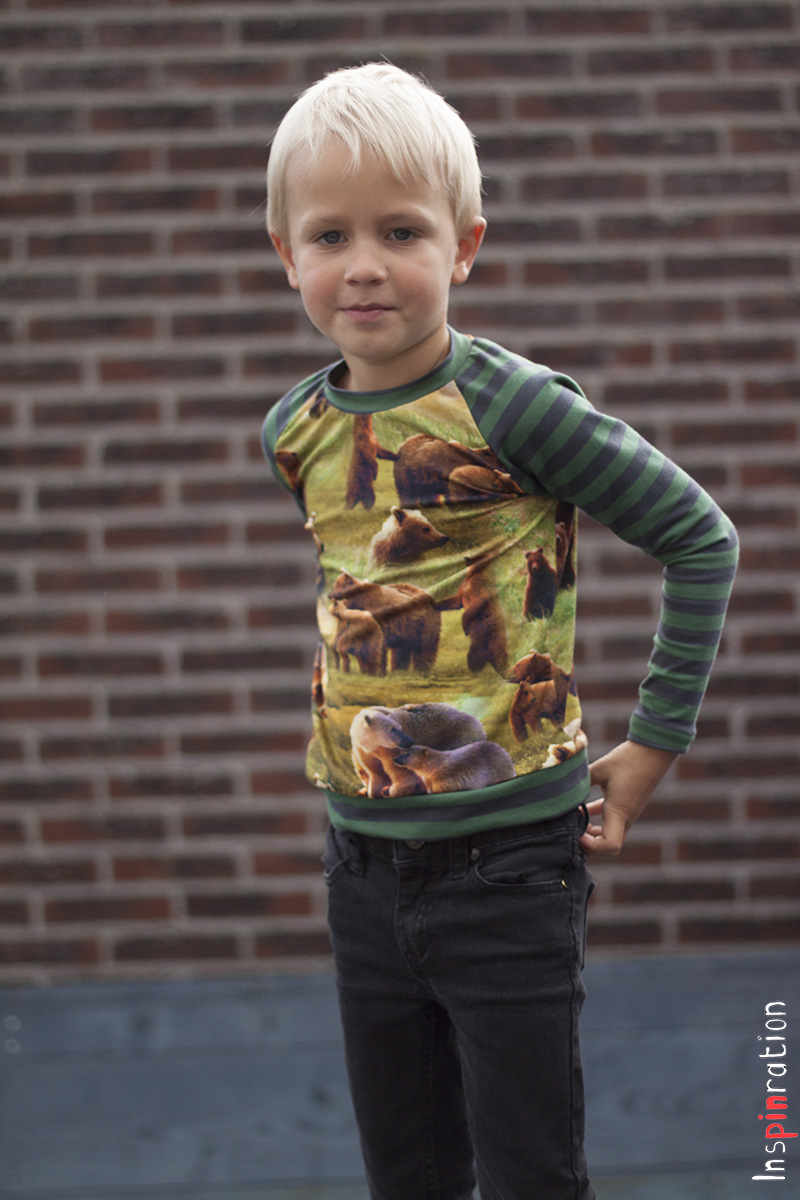
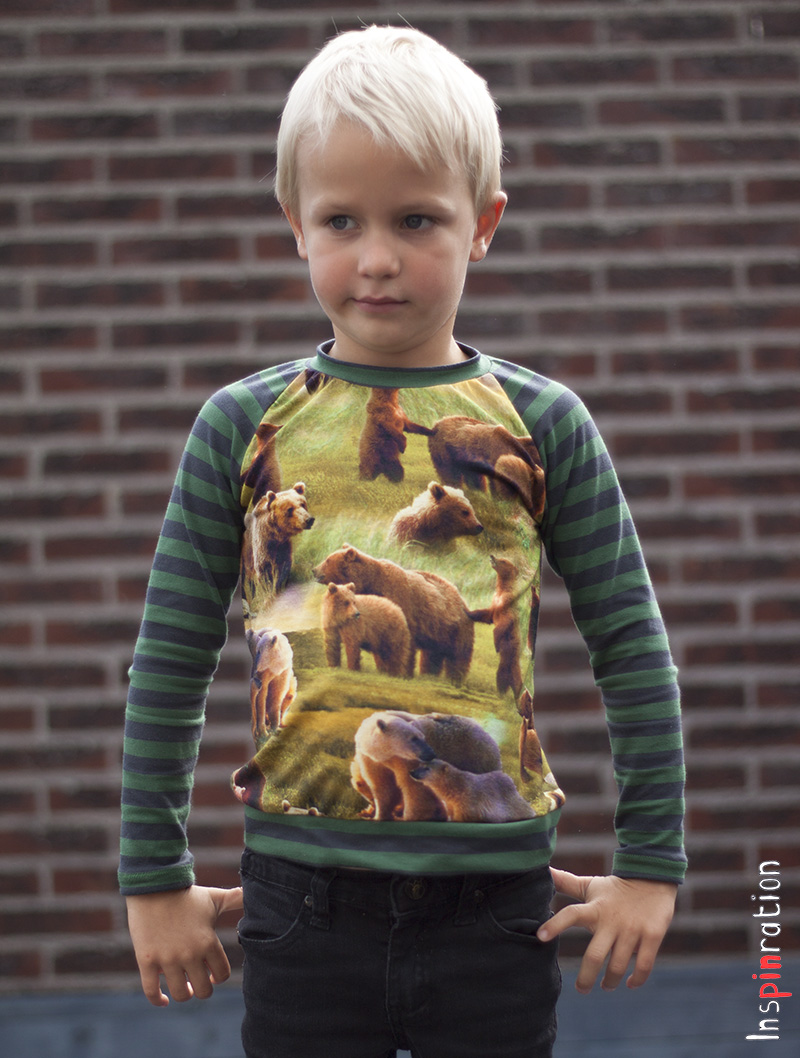
Most of you will know that Zonen09 has released two new patterns. I bought them both immediately after launch. It took me that long to buy the Charlie, now I decided not to doubt just buy them. I own many, many Ottobres (I literally only miss one) so I have tons of T-shirt patterns so why buy the Billie? Well, I was intrigued. The Theo I made simply has an amazing fit and I wanted to see if this shirt would have the perfect fit as well.


I took size 116 small (Zonen09 pattern come in two width sizes per length, taking into account that more children are skinny like mine). Although the pattern has a bunch of option, I of course also wanted something that wasn't on the menu, I wanted raglan sleeves and a V-neck. Although this is not one of the standard version, I managed to easily copy the V-neck on the raglan pattern piece.


The pattern suggests to use rib knit for the neckline, waist and neck bands. I almost never do that, I just use my nice quality jersey, but this time I shouldn't have ignored the instructions. I assumed that jersey would count as light weight rib knit and took the prescribed shorter length for neckline, waist band and wrist band. These all turned out (a bit) too short. I put an extra piece of jersey between the waist band pieces, left out the wrist pieces (more about that in a minute) but left the neckline. On the picture of the bears shirt you see that the neckline is raised a bit instead of laying nice and flat.


So about those sleeves. Another stubborn part there. The sleeves looked very, very long to me, so I thought that the too small wrist band were not necessary anyway. The elephant shirt for which I had planned wrist bands therefore just got a seam. When my son put on the shirt I saw that the sleeves are now on the short side, so the length with wrist band would have been perfect.


Although you might wonder why, I did defy the pattern on a fourth and last point, the way to sew the V-neck. The proposed method gives a nice bit round V- neckline (sounds a bit paradoxal but this really is the case). I wanted a sharp V-neck and followed the tutorial of Melly Sews on the construction method. Although my V isn't perfect, I am still satisfied. I first sewed the bit rounded version so I already stretched the bottom of the V a bit. If I wouldn't have done that, I think the V would have been perfect. I did notice that for the elephant shirt, I somehow sewed too much of the neckline on the left side. The neckband is clearly thinner there.


Both the bears and elephants fabric are from Stoffenelf. They have all sorts of relatively inexpensive digitally printed jersey. You will, probably see many more of their fabrics passing by here in the coming months because they already arein my fabric closet.


To summarize, putting a V-neck on a raglan was a good idea and using the Melly sew instructions as well. Not using rib knit and doubting sleeve length were not that successful. I think the fit of the shirt is fine, the right level of tightness, although it could have been a bit longer. My son wears his trousers very low which means that his shirts should be a bit longer to avoid a naked back while bending. I immediate cut three shirts, Wednesday you will see the third. I am very happy happy I bought the pattern having a raglan, round sleeves and envelop sleeve T-shirt pattern all on one (glued) pattern is simply perfect. I will have to sew many if those the coming months.


My blog anniversary give away consisting of fabric and patterns is still open for a few days, check it out here if you didn't already participated.

 I love to hear what you think of my creations. Feel free to leave a comment in the language you prefer (although Google translate might have to assist me if you choose something different than English, German, Dutch or Hungarian).

Tuesday, September 1, 2015

Buearam princess dress and blog anniversary give away

Today, one year ago, I posted this post. That post was the official start of my serious blogging. In August last year, I created my first posts on sewing (all back dated to when the clothes had been finished). Since that September first last year, I have blogged frequently, mainly about my sewing projects, and I have loved doing it. This blog is a documentation of my projects, it is like a sewing diary. I use it as a learning tool, during the year I have learned many sewing skills and photographic skills, this blog helps me take on those new challenges. The blog is full of pictures of my kids so it also doubles as a digital photo album.


A one year anniversary asks for a (small party). I am a bit of a minimalist when it comes to parties, but a dress and gifts are the minimum. Lets start with the dress. My daughter has been wearing her Bueram dresses often, very often. When I sewed them, I immediately had four other ones in mind, but (sewing) life got in the way. When my daughter recently requested a dress with floor length, I knew that was the perfect opportunity to sew at least one of the four I planned. A true party dress.


I used the fabric that I also used here, so now there isn't enough for a June for me, but do not feel sorry for me, there is plenty of choice in my fabric stash. The fabric is light blue and it is princess length, so my little one has named it her Elsa dress.


My daughter loves the dress. Based on that Lollipop you might think I had to bribe her for a shoot, but no. Almost the opposite. She had been dying to wear the dress for days, but it was raining all the time when we were home. Without pictures, clothes are not to be worn (perfect policy seeing that she managed to drool over this dress in the 5 minute shoot we had) so she was happy when we ran outside between two showers (see how wet the table is).


Like I said in the introduction of this post, I have learned a lot of new sewing skills. The first Bueram was the first shirred back I sewed. Later, I tested another dress which involved shirring (Dear Prudence) and learned a cool trick on how to make the perfect top row. The secret is an extra piece of elastic that you put in the top row. I did it on this dress and the tops is now simply perfect. I did manage to butcher the bottom shirring rows, my elastic wasn't long enough, and my lines were not straight. I think having a similar extra elastic at the bottom would have created the best look, but that is for next time.


Due to the fact that she will play in the dress, I decided to let it not really lay on the floor. This way, she will not trip and hopefully the bottom hem will not get damaged. She will grow so I made a wide hem to be able to lengthen the dress (and a damaged hem you can not lengthen nicely). The hem is visible because I did it with my machine, I really should have hand sewed it.


Now, over to the other half of the party, the gifts. I wanted a gift that would be clearly connected to my blog. A gift that the readers of my blog would probably like. I thought about what I like to win and my answer was: fabric and patterns.

You all know about my love for jersey. Jersey was the fabric that made me addicted to sewing. I had sewed a few cotton dresses but when I discovered Lillestoff jersey, I became hooked  to sewing. I was over the moon when I came across Joyfits, both transport and meter prizes are better for me than ordering at Lillestoff directly (what I did at first). She doesn't just stock Lillestoff, she has all kind of fun high quality jerseys and most of my jersey stash comes from Joyfits. So, I asked Joyfits if she was willing to sponsor a meter of organic fabric, because the one thing better than jersey is organic jersey.

Looking at my own behavior,  I feel that winning a piece of fabric is somehow more appealing than winning shop budget, strange but still that is how I work. If I see that I can win a meter of fabric I am more intrigued than if I can win the value in euros. So, together with Marloes  (owner of Joyfits) we picked  a great uni-sex fabric. Look at these super cute lions! I am allowed to give a whole meter of this one for free (it is 160 cm wide so you can make a lot of it). I wanted to have an unisex gift because I sew for my son and daughters and assume my readers will like both as well. Besides getting the one meter, she will even send it to you for free (and she will send internationally). It could be that you are actually not like me (how boring would the world be if we were all the same) so, If you do prefer shopping budget or if you would have chosen another fabric, we still want to make you happy. If you win, you are actually allowed to pick your own favorite.


So, how I can I top a meter of organic fabric? What about a meter of organic fabric plus patterns. As with the fabric, I wanted uni patterns and patterns that could be sewn with jersey. Looking at my sewing, it was a logical choice to ask Anne from Sofilantjes if she would be willing to sponsor my give away. Also Anne reacted positively and I am allowed to give away the Omni Tempore and the Domi, her two uni-sex pattern. If you saw my previous post you might want to change your choice to the Otium, to create your own Boy Otium, I suppose she would be up for that.


During the year, I entered some competitions and one of my winning was a set of two flocks and wall sticker from Violette design. This is a great gift, but I can cut my own because I bought a Cameo this year.  I therefore asked Violette design if I would be allowed to transfer the gift to my readers and I was. So the third part of the give away is winning two big flocks for T-shirts (16 cm high) a wall sticker of your choice.

When I did an earlier give away someone told me that she would prefer to win a finished garment, she was physically incapable of sewing.  I promised her that I would sew a dress for her if she would win. I feel that I should also contribute something to the gifts, so if you (for whatever reason) prefer that I sew a garment from the fabric that you won, I will do it. I think it is a very nice package of gifts, I hope you will want to win it.

If you want to enter the give away just use the rafflecopter, another first for me! You do not have to be an official follower of my blog to win the prize (but it would be a great gift to be if you would become a Bloglovin follower), but if you do not react to my winner announcement in the future (I will at least announce twice) than I will draw a new winner. Thank you for reading along this past year, I hope you will stick around.

a Rafflecopter giveaway I love to hear what you think of my creations. Feel free to leave a comment in the language you prefer (although Google translate might have to assist me if you choose something different than English, German, Dutch or Hungarian).