Friday, November 13, 2015

Slouchy sweater pattern release

Today Emily from Nap Time Creations is releasing the Slouchy Sweatshirt pattern for woman. The pattern is a nice basic pattern with two sleeve lengths (Yeah for 3/4 sleeves). It is a very quick sew because it uses a flat sleeve head, like I sewed here as well. Cutting the fabric will take more time than sewing it (on your serger).


It is great for layering, such that the underneath blouse is visible at the bottom, but it can also be worn as a single item (which I prefer myself). You could easily lengthen the sweater a bit if that is more your style. The big advantage of basic pattern is that you can easily adjust them to your own tastes.


I used only one meter of main fabric for this sweater. I mostly have 1 meter coupons of jersey and due to the 3/4 sleeves I could easily cut all pieces from my flower fabric. I bought it last year at a web shop that closed in the meantime. I didn't have myself in mind when I ordered it but I fell in love with this shade of blue. The black uni colored black fabric is from Joyfits.


The whole sweater can be sewn on your serger, no regular sewing machine needed for hemming. I adore those types of projects. I have a good sewing machine, but I somehow have a better relationship with my serger.


The fit was immediately perfect, I love my new shirt, it combines great with blue jeans. The shirt comes in the sizes XS to XXL. Check out Emily's release post for more information about the pattern! The pattern will be discounted for the first two weeks, so until Black Friday, the pattern is on sale for just 4 dollars.


I love to hear what you think of my creations. Feel free to leave a comment in the language you prefer (although Google translate might have to assist me if you choose something different than English, German, Dutch or Hungarian).

Sunday, November 8, 2015

Star Anise Dress release from Gracious Threads

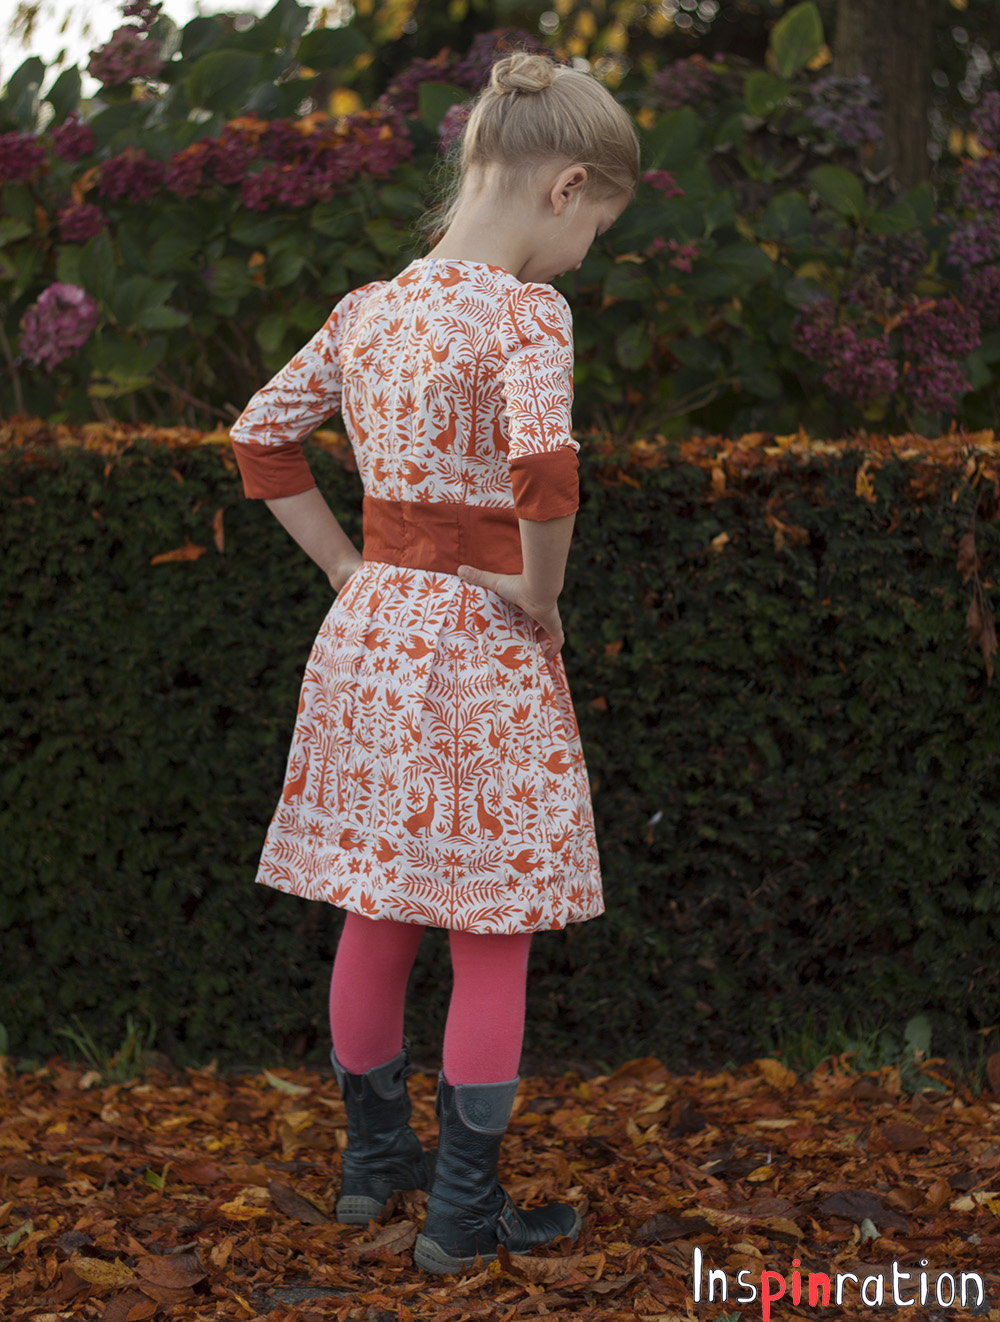
Last Friday Gracious Threads released a new dress pattern, the Star Anise and I was allowed to test it. This pattern for woven fabrics gives a look that I normally do not sew, I couldn't explain what was different until Jess wrote it herself, this is a sophisticated dress. My almost eight year old indeed looks much more grown up in this dress than in the twirly dresses I usually sew her. I feared for a moment my client wouldn't want a not so twirly dress, but she likes it a lot and so do I, so prepare for a picture overload!


My girl is a skinny one, so I had to combine a size 5 chest with a size 8 length. Somewhere something went wrong and my seams do not match. I rechecked the pattern and that wasn't the problem, the pattern is perfect! It is not a huge problem to me, the main fabric is that crowded that the lines are not very visible. Check out the official release post of this dress to see how beautifully the seams are supposed to line up.


The dress is designed with mid length puffy sleeves that end just above the elbow. Jess showed me a dress she sewed with slightly longer sleeves and I asked permission to sew the same length. With winter around the corner I think 3/4 sleeves are a bit more suitable (seeing as my girl doesn't really has layering stuff). The funny thing is that the sleeves and waistband now line up almost perfectly with these 3/4 sleeves, almost like I intended it like that, but do not be fooled, it is totally coincidental. The pockets are my own addition.


I bought the fabric at fabric.com almost a year ago. It is called Moda Folklore Otomi Cloud-Pumpkin. It was on clearance sale then and now seems to be sold out everywhere. I took great care to put the main graphic on the front of the bodice. I tried to have a perfect back as well, but somehow screwed up the cutting part. I think it still looks nice though. I could have put the top left side of the zipper such that the print would have been perfect, but I feared the bodice would become too small then.


The contrasting rust fabric is from Soft Cactus. Most of the testers choose a contrasting waistband, but this dress is also very pretty in one uni color, the seams are true eye catchers then. Although it might be an official "special occasion" dress, it works great for school dresses or any other day dresses as well, so hop over to Gracious Threads and checkout the pattern!


 I love to hear what you think of my creations. Feel free to leave a comment in the language you prefer (although Google translate might have to assist me if you choose something different than English, German, Dutch or Hungarian).

Friday, November 6, 2015

ADTV T-shirt pattern release

I sew all kind of projects rangling from simple ones to very challenging ones, but the simple, quick projects that can be worn a lot are probably my favorites. Nothing as satisfying as being able to cut, glue the  pattern, cut and sew the project all in one evening. Or sewing up multiple in an evening if you had already done the glueing and cutting of the pattern. T-shirt patterns are ideal for that. Today Sofilantjes  is releasing a versatile T-shirt pattern, the ADTV pattern. You can use it to make quick staple goods, or more sophisticated looking (but still quickly sewn) versions.


The pattern has two official looks, one with a V neck and one with buttons. I have been wanting to sew a perfect V for a while and was happy I could test this pattern. This time I behaved like a good student, not skipping any step (even adding another basting stitch) and I am very satisfied with the result. Especially Anne's advise to first baste the neck, check and seam rip, was very valuable! We all want to sew it right the first time, but taking out a basting stitch is so much easier than taking out a stretch stitch!


I went wild with my fabrics, my husband actually laughed out loud when she saw the mushroom version. He asked me where the hell did I find that fabric (stoffenelf). I totally understand his reaction, One and a half year ago my reaction would have been the same, now I love it! Fabrics are changing due to changing fashion and it really took me a while to get used to the photo print versions. But over time, seeing them in other projects really turned me around. This artichoke dress is still the most memorable dress in this category.


I first wanted to combine the mushroom fabric with red white polka dots (a left over from this project), but I feared that the result would  be too girly.  Therefore I went for a blue polka dot. Both kids like the mushroom shirt the best. I have a good amount left so I think that I willl combine it with the red and white polka dot for a next project. The fairytail fabric is from Lillestoff.


Both shirts are the same size, my son's size. The other testers were showing off sibling pictures so I decided to put the second shirt on my slightly bigger elder kid (this way I also avoided having to redress and reshoot my son). The prints are unisex  anyway. She doesn't have much growth room, but it is perfect for now. She is eying the mushroom shirt as well, so it will not get much closet time for sure.


Although the buttons are functional, my kids can put the shirt on or off without using the buttons. In the smaller sizes the buttons will be very usefull though! When you are an efficient sewist like me, you can just cut the version of the buttons and fold it in half for the V-neck. No worries if you do not get it, when you buy the pattern you will understand.


The pattern is on sale during the weekend so hop over to Sofilantjes now! You could also pick up the Domi pattern to sew up the crazy quick pair of trousers my son is wearing.


 I love to hear what you think of my creations. Feel free to leave a comment in the language you prefer (although Google translate might have to assist me if you choose something different than English, German, Dutch or Hungarian).   

Saturday, October 31, 2015

Blind zipper Otium with tumb holes

This shirt had to happen after I sewed my son this zipper Otium (pattern from Sofilantjes). My eldest immediately ordered one. My eldest two kids are almost the same size, only one centimeter difference around the chest and a few centimeter in length. I therefore planned to use the same pattern pieces as for my son, and just draw a small seam allowance (in Sofilantjes' patterns seam allowance is included, so normally you do not have to draw anything extra) . This short cut actually resulted in a much longer process than if I would have just started from sratch. A bit longer shirt also required a bit different diagonal line etc. I would like to say that I learned my lesson, but I fear I will try the same trick next time.


I had planned to sew this shirt last week, during Kids Clothes Week and due to the theme I planned a blind zipper (disguised pocket) instead of a visible one (and because I am incapable of just doing the same thing again).


Although I still buy fabric, I really try to use the older ones as well. I bought the green main fabric almost two years ago at Joyfits. Although it is a lovely quality, the fabric never got turned into a garment. I pulled it from the pile a few weeks ago and cut a pair of leggings from it. I had half a meter of fabric and for long I didn't wanted to cut half projects from such a length, because what would I do with the other half. This resulted in many fabrics just staying on the shelf, so I changed strategy (I just use what I need for a project and worry about the "scraps" later). After cutting the leggings the fabric stayed on top of the pile and like with this fabric I quickly saw a possibility to use the rest of it.


Combining the green main fabric with something was the biggest challenge, it is an interesting, retro type of green which doesn't match with many of the bright colors I have in my stash. The brown /broken white stripes matched perfectly though. Of course my daughter also requested thumb holes after this shirt.


My eldest is over the moon with the hidden zipper. She loves to show off her new clothes and I am sure that almost nobody will spot the zipper. To make it even less obvious I put the zipper pull at the bottom side this time. The zipper pull is brown and matches the brown stripes and birds nicely.


The last one is a bit blurry, but you will get the point, the book is in there. I love to hear what you think of my creations. Feel free to leave a comment in the language you prefer (although Google translate might have to assist me if you choose something different than English, German, Dutch or Hungarian).  


Saturday, October 24, 2015

KCW Lili fall dress

After pulling the leaves fabric, that I used for this project, from the bottom of a pile, I really felt the urge to sew up something else with it. Two weeks ago I received a Lili pattern on paper as a reward for testing it, so I decided to make another Lili, one with long sleeves this time. The sleeves make the dress a true allrounder.


I decided to omit the official collar, but to add an interesting twist, I added a smaller collar. The collar is self drawn. I didn't put any stabilizer in the collar and this way the collar fits over her head without a zipper or button closure. It would have looked nicer if I would have ironed the collar, but it is Kids Clothes Week so I was in a hurry to take pictures.


Like with the second Lili dress, I made box pleats instead of folding the pleats to one side. The sleeves fit perfectly. What I find intriguing about this pattern, the front isn't a copy of the back (with a different neckline). The shoulders and armholes really have a different shape, which is not usual for knit patterns. This already shows in the sleeve pattern, the sleeve head is far from symmetrical.


This is my last KCW week entry for this season. I have some tests on my table, so although they are kid's stuff, I can not show them yet.


*** added bonus, this is a perfect garment for the "Climate Change" prompt on Top Stitchers***


I love to hear what you think of my creations. Feel free to leave a comment in the language you prefer (although Google translate might have to assist me if you choose something different than English, German, Dutch or Hungarian).  

Thursday, October 22, 2015

KCW: Domi pants

She made trousers with a sweatpants pattern while upcycling a normal pair of trousers. I thought that was a great idea, I have some trousers on my upcycle pile and I own some nice trouser patterns, but somehow I do feel motivated to sew regular trousers (they somehow feel like a lot of work). Making one with a sweatpants pattern did sound very appealing.


I took my favorite sweatpants pattern, the Domi (from Sofilantjes), which I sewed several times already. I used last time's version, the one where I lowered the rise 5 centimeter (my son wears his trousers on his hips). Now I cut the main pieces from a non-stretching pair of pants. My son's body type is very straight so I knew he wouldn't need the main fabric to stretch to get the pant on.


The pockets, waistband and cuffs were cut from stretch fabric. The grey fabric is even official ribbing fabric with a lot of stretch. This pair of pants is a true winner. Due to the main fabric the trousers really look like regular trousers, but because of the waistband and the fit they are very comfy. The leg cuffs are great because the trousers would be a bit long, this way he will be able to grow and the trousers will keep a perfect length. It will take  while before his ankles will be visible.


I will do this trick again for sure, disguising a pair of sweats as regular trousers (it was sewn up so quickly!) but next time I will use a less contrasting knit for the cuffs and waist. My son was not in the mood to take off his coat, with him I have to pick my battles, so I decided his coat was fine for these picks. Did you notice that the entire outfit is home made?  You can find the coat here and the sweater here.


 I love to hear what you think of my creations. Feel free to leave a comment in the language you prefer (although Google translate might have to assist me if you choose something different than English, German, Dutch or Hungarian).