


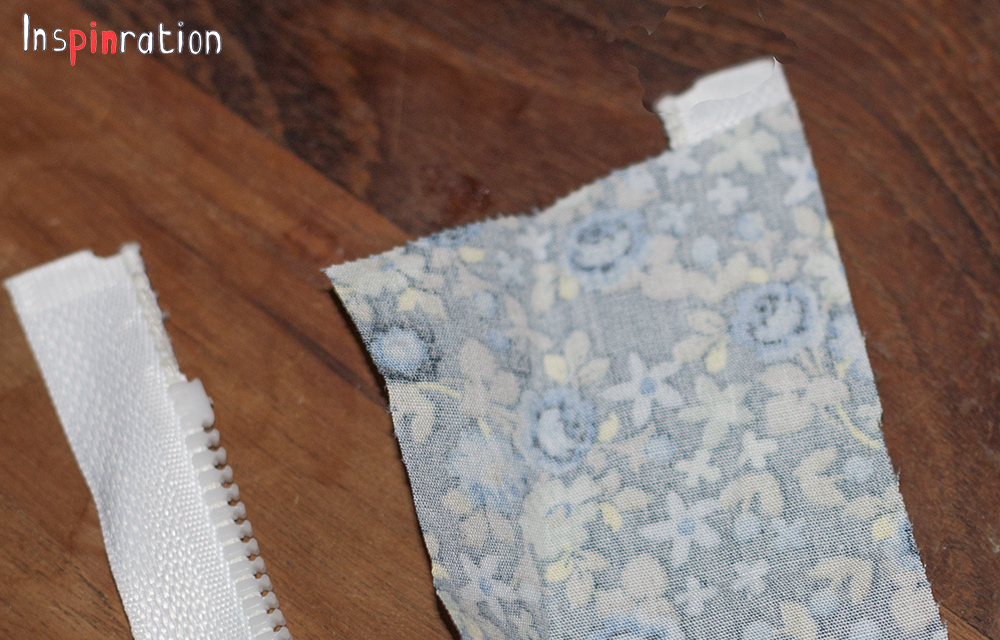
You might have seen these decorative zippers. They are beautiful, but a bit expensive as well. To mimic the effect you can bind an inexpensive zipper's sides and just sew the whole thing on the garment, like you would do with the official decorative zipper. I am sure someone else had the same idea already, but I have not seen it yet, so I thought you might like a tutorial on it.


The Zoo Collection pattern has two cutting lines. One cutting line for using the placket and one for the Turtle option (full front - when you cut the pattern piece on the fold). For this tutorial you need the fold cutting line. Cut one half front on the fold cutting line (do not actually fold the fabric) and cut the other (mirror image) with 1.5 cm extra width (just place it 1.5 cm from the side of your fabric). This extra piece will become your zipper guard. Mark the middle line on the wider front with an aqua trick marker (or other washable marker). Use your serger or sewing machine to finish the inner sides.

Cut two strips of 2.5 cm wide times the length of the garment plus 2 cm (these will be the pieces that will be on the side of your zipper and you will have to fold it over the top of the zipper). These strips will not have to stretch so you do not have to cut on the bias. Sew the shoulders such that both fronts are connected to the back. Note that this will be an unlined garment. So you also have to cut a piece of bias to bind the neckline. Also cut two strips of bias to bind the armholes (these pieces will bind a curve so they have to be cut on the bias). For how to finish neckline and armholes use the pattern's explanation on how to finish the legs. Just measure the length of the neckline after finishing the shoulders to determine the necessary length of the bias, do the same for the armholes. Finish the neckline and armholes.

Take the zipper, turn one of the strips bad side up and align the right side of the fabric with the right side of the right zipper half. Use your zipper foot to sew as close to the teeth as possible. Now fold the fabric back, over the side of the zipper and you will see the side of the zipper is covered.

Fold over the top of the fabric such that the top of the zipper is also nicely wrapped. Place the zipper on the piece that was cut to the fold cutting line, such that the teeth are lined up with the side of the fabric. The teeth should hang slightly over the fabric's edge (about one millimeter). The zipper halves will become one. The exact middle of the zipper, while closed, should align with the front line. For this step it is important that the the strip on the zipper does not obscure your view of the front line. If the piece is a bit too wide, just cut is back slightly. Now sew close to the right side of the edge of your bounded zipper (but still on it). Now finish the zipper strip with a narrow zigzag (you could do this beforehand, but because everybody will use slightly different zipper width, in this order you will not have to cut off the finished side if the strip turns out too wide). Fold both the main fabric and the zipper strip back towards the outer side. Stitch both the folded side of the main fabric and the zipper strip to the main fabric, just off the zipper edge.

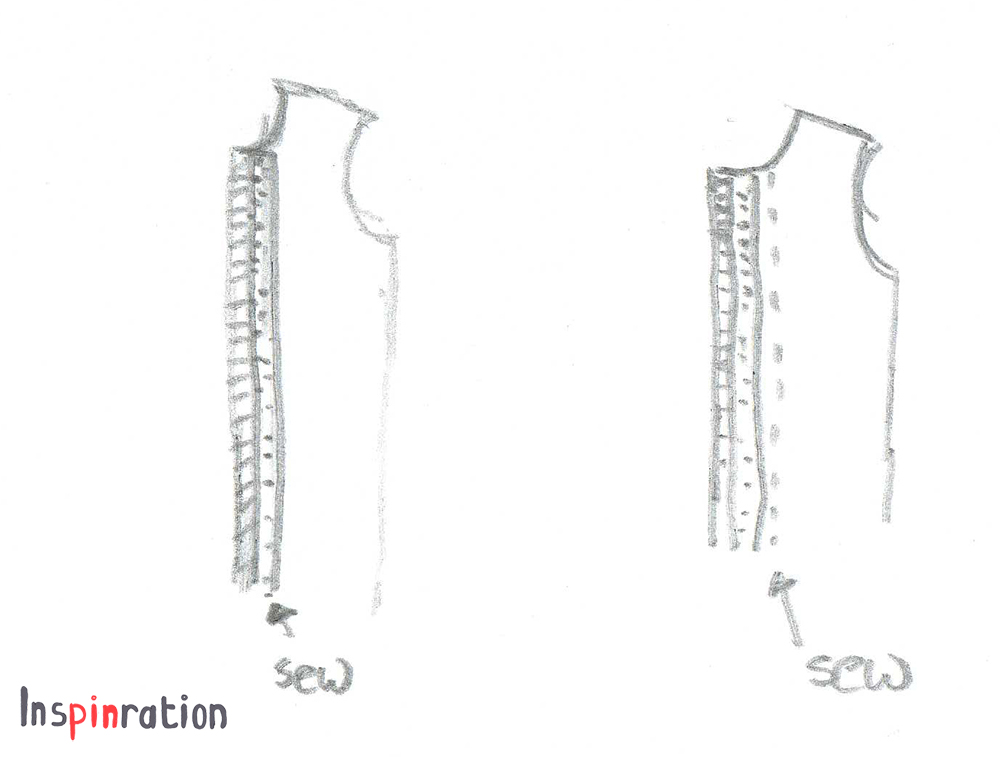
Now sew the other fabric strip on the other zipper side, in mirror image of what you just did. So, align the left side of the fabric with the left side of the zipper. Fold under the strip, both under the side and under the top. Now place the zipper teeth on the line you made with the aqua trick marker (or any other washable marker). Stitch again close to the edge of the zipper, but still on the zipper. Now, cut back the zipper strip seam allowance to 3 millimeter. The next stitch line is close to the zipper teeth (for the other side you sewed on the main fabric to fixate). The stitching of the two sides is not symmetrical, but if you use matching thread it does not show.


Now just finish the garment as usual.

For this tutorial I made an unlined garment, you can of course also make a zipper front with a lined garment. In that case you sandwich the zipper between main and lining (like you usually do with the placket option). You will have to subtract half the width of the zipper from the fabric pieces in that case.


If you want the zipper guard to be a double layer, you could make the left front 3.5 cm wider instead of 1.5 cm wider. Then, fold it backwards just before the last stitch line, this will secure it under the zipper. If you do not need a zipper guard, you could cut two pieces the width of the fold line. In that case finish the left side of the garment the same as right (so finish the rest piece of your binding, to avoid fraying).


The fabrics are both from Eline Pellinkhof. I used some home made bias I had laying around from earlier projects and as you can see, I just did not have enough for both legs, this is not visible usually though.


I love to hear what you think of my creations. Feel free to leave a comment in the language you prefer (although Google translate might have to assist me if you choose something different than English, German, Dutch or Hungarian).
Oe wat leuk staat dat! Dank je voor de tutorial, ga ik zeker eens gebruiken! Had een jumpsuit met rist voor de zoon in gedachten.
ReplyDeleteOh ik ben benieuwd, ik had er nog niet aan gedacht dat dit ook wel eens heel zou kunnen werken voor jongens, misschien voor een Theo...
DeleteLeuk! Moest wel even drie keer lezen ;)
DeleteAls je nou een sier stiksel make op de rechter helft, vlak bij de tandjes. En je flapt de rits onderslag deels terug en stikt die vast vlak naast de sierstrip, is het weer symmetrisch... toch?
Je bedoelt een derde stiksel rij aan beide kanten erbij om het symmetrisch te maken? Ja dat kan natuurlijk. Tja ik heb echt het idee dat ik nog veel moeten leren qua tutorials, want het lijkt eerder moeilijker dan makkelijker vind ik...
DeleteMooi en leuke stofjes heb je gebruikt!
ReplyDeleteIk kocht ooit een paar meter van deze serie, met plannen voor mezelf.. Dat is er nooit van gekomen :)
Delete