In my first Kids Clothes Week I turned two pillow cases into clothes,
one became a dress, the other a sweater. I still had some pillow cases
left from last year and it was high time to turn another one into
something wearable. A pillow case disguised as clothing fits the theme, right? My son, who missed out on the action last year
(because the sweater actually stayed in his sisters closet) got first
pick. He choose a jaguar who seems to be hiding, ready to pounce. The
animal is probably disguised in a bush or shadow.
I again
used the Billie pattern, I will probably try the other Billie versions
as well, soon, or maybe later, but for now I am just very content with
this easy recipe. The raglan shape frames the animal's head nicely. On
the original picture the jaguar has ears. Those ears were just cut of by
the bodice shape, and I decided to use them in the sweater. The left
ear's picture is slightly different than the shape I cut the ear in, but
I think it still looks great. I fixated the (lined) ears my hand with a
small stitch on the sleeve.
The fall fabric and the brown
circles are both from Joyfits, I bought them probably two years ago, so
they are out of stock. The leaves of the fall fabric disguise small animals. I used the fall fabric here already and I have
some other plans with it for this week. It is the ultimate fall fabric
and I feel I have to use it in the right season. I lined the pillow case
front with an upcycled shirt.
The shirt was a quick and
easy sew, so I wanted to add an extra detail and I went for thumb holes.
I have been planning to sew them for months but always forget my plans
when I am cutting. My son loves them. I used this tutorial to make them.
He is very happy with his new sweater so he didn't mind the shoot (because he is allowed to wear the clothes after). He even was in for showing his "angry jaguar" face.
I love to hear what you think of my creations. Feel free
to leave a comment in the language you prefer (although Google
translate might have to assist me if you choose something different than
English, German, Dutch or Hungarian).
Tuesday, October 20, 2015
Monday, October 19, 2015
KCW: Toddler playdress disguised as Dolce and Gabbana
Kid's Clothes Week is upon us again, this will be my fifth time
participating. I tried different strategies over the past seasons and
experienced that tackling a few relatively easy projects works best for
me. I will not be making seven projects, like when I was an official
contributor, but I do expect more than my regular two per week.
This season's theme is "disguise", as always you do not have to sew something related to the theme, but I think it is a nice challenge to stretch the theme in such a way that it fits. Today's outfit is a perfect example. I sewed my smallest one a knock off designer dress. It is a simple jersey playdress disguised as a designer piece.
I often fall in love with new fabric (the love for my husband is a very steady one). Especially when I meet a fabric in an online store, I often immediately want to make a commitment and just take it home. The problem is that my fabric closet is not as big as my heart and my closet is full.Therefore, now a days I am really testing out relationship first. Fill my digital cart and click away, fill my digital cart and click away, this pattern repeats itself over the course of a few weeks. If I then finally really can't stand it anymore, I buy the fabric.
The problem with this strategy is other fabric lovers, so sometimes it happens that my treasured one isn't there when I am ready to take the plunge. The fabric I used for this dress is an example of one that (almost) got away. I had planned to use this fabric for a dress for myself. I love red in general and the graphics on this one are amazing. I had been digitally caressing it for weeks but when I finally placed my order (one in which I bought this fabric as well, and that one is in stock again now), it was gone. I asked if some new was coming in, but no, they only had 40 cm left.
A small piece is better than no piece, so I asked if I could buy the small piece (it wasn't online) and I was told that I could get it as a gift with the rest of my order, thanks again for that Stoffenelf! Although making something for myself with 40 cm was too far fetched, I was sure that I could at least make something for my smallest girl with it.
Around the same time as the fabric arrived, I came across this picture. It is a piece from the Dolce and Gabbana collection from last year, and I loved it. Like I said, I am a sucker for red and that type of graphics. I know that the original dress wasn't jersey, but I thought that the fabric is pretty darn similar and decided to make my first knock off designer piece.
Like I said, I only had 40 cm and had to think very hard about how to cut my fabric. I wanted a relatively nice placement on the bodice and skirt and because of that, I didn't manage to create a pleat in the front. I simply didn't have enough fabric. I also went for long sleeves, instead of 3/4 ones. I love them for myself, but for my kids I prefer regular long ones.
I used my trusted onesie pattern from Ottobe 1/2012 for the top of the bodice and sleeves. I didn't manage to cut the sleeves at one piece, so I made extra long sleeve cuffs. The skirt length is based on this project (my youngest loves them). I prefer her dress to be below the knee, or else she grows out it extremely quickly, this one has already become too short for example.
My little one loves photo shoots. She literately doesn't want them to end, she actually screamed when I took her off the table. She is the opposite of him, who immediately states he only wants one picture. I think she is crazy adorable, which could be due to the hair (I know many kids her age have much more, but our others didn't have that much hair). Even when she picks her nose I think she looks darn cute, but that is of course because she is mine.
I love to hear what you think of my creations. Feel free to leave a comment in the language you prefer (although Google translate might have to assist me if you choose something different than English, German, Dutch or Hungarian).
This season's theme is "disguise", as always you do not have to sew something related to the theme, but I think it is a nice challenge to stretch the theme in such a way that it fits. Today's outfit is a perfect example. I sewed my smallest one a knock off designer dress. It is a simple jersey playdress disguised as a designer piece.
I often fall in love with new fabric (the love for my husband is a very steady one). Especially when I meet a fabric in an online store, I often immediately want to make a commitment and just take it home. The problem is that my fabric closet is not as big as my heart and my closet is full.Therefore, now a days I am really testing out relationship first. Fill my digital cart and click away, fill my digital cart and click away, this pattern repeats itself over the course of a few weeks. If I then finally really can't stand it anymore, I buy the fabric.
The problem with this strategy is other fabric lovers, so sometimes it happens that my treasured one isn't there when I am ready to take the plunge. The fabric I used for this dress is an example of one that (almost) got away. I had planned to use this fabric for a dress for myself. I love red in general and the graphics on this one are amazing. I had been digitally caressing it for weeks but when I finally placed my order (one in which I bought this fabric as well, and that one is in stock again now), it was gone. I asked if some new was coming in, but no, they only had 40 cm left.
A small piece is better than no piece, so I asked if I could buy the small piece (it wasn't online) and I was told that I could get it as a gift with the rest of my order, thanks again for that Stoffenelf! Although making something for myself with 40 cm was too far fetched, I was sure that I could at least make something for my smallest girl with it.
Around the same time as the fabric arrived, I came across this picture. It is a piece from the Dolce and Gabbana collection from last year, and I loved it. Like I said, I am a sucker for red and that type of graphics. I know that the original dress wasn't jersey, but I thought that the fabric is pretty darn similar and decided to make my first knock off designer piece.
Like I said, I only had 40 cm and had to think very hard about how to cut my fabric. I wanted a relatively nice placement on the bodice and skirt and because of that, I didn't manage to create a pleat in the front. I simply didn't have enough fabric. I also went for long sleeves, instead of 3/4 ones. I love them for myself, but for my kids I prefer regular long ones.
I used my trusted onesie pattern from Ottobe 1/2012 for the top of the bodice and sleeves. I didn't manage to cut the sleeves at one piece, so I made extra long sleeve cuffs. The skirt length is based on this project (my youngest loves them). I prefer her dress to be below the knee, or else she grows out it extremely quickly, this one has already become too short for example.
My little one loves photo shoots. She literately doesn't want them to end, she actually screamed when I took her off the table. She is the opposite of him, who immediately states he only wants one picture. I think she is crazy adorable, which could be due to the hair (I know many kids her age have much more, but our others didn't have that much hair). Even when she picks her nose I think she looks darn cute, but that is of course because she is mine.
I love to hear what you think of my creations. Feel free to leave a comment in the language you prefer (although Google translate might have to assist me if you choose something different than English, German, Dutch or Hungarian).
Saturday, October 17, 2015
Challenge completed, Gwen shirt
If this would have been a face to face conversation the answer would have been simple, just do like her, I love the combination of raglan uni colored sleeves with a printed main part. But this wasn't a spoken conversation, so my answer had to be presented differently. I logically decided to sew my own version.
I didn't want to fully copy the previously mentioned example, so I used a different kind of pattern. I used the recently released Gwen pattern (from SeeKateSew). I bought it in the bundle, but it is now also available as a separate pattern. The fun part about this pattern is that it uses faux raglan sleeves. The sleeves have the regular round head, but due to an extra piece on the shoulder, the illusion of a raglan is created.
You all know about my inability to follow a pattern, so I made an adjustment to the back. There was another sewist that had an intriguing sweater recently. I liked the lines on the back, so I drew the shoulder pieces on the back slightly lower which created an arch.
To make the print challenge a true challenge I choose a very colorful print from my collection ("Fly me to paradise" from Hilco Hamburger's Liebe) that I hadn't planned for myself (usually things are the other way around). I combined it with my favorite color, mustard yellow (bought at Joyfits) and I feel it is now a lovely combination for a grown up. Ann, what do you think, would this work for you?
Although there were no rules in this game to start with, I will shake it up again. I am also asking for help, but slightly differently. Due to my pregnancies (and lack of sporting) I have a belly. The pictures of this sweater clearly show were my trousers end and my belly begins. Even if I pull it in, it just isn't flat as it used to be. Now I am asking your help. Please link up any project you have sewn that disguises a belly (dress patterns will get an extra bonus points). If you haven't sewn it, but you know about a good pattern, feel free to mention it in the comments! Thanks in advance.
I love to hear what you think of my creations. Feel free to leave a comment in the language you prefer (although Google translate might have to assist me if you choose something different than English, German, Dutch or Hungarian).
Tuesday, October 13, 2015
Compagnie M hack
I do not need an excuse to perform a sewing hack, still the competition of Compagnie M got my creative juices flowing (even quicker). You will
surely have heard about the big competition in which sewists can compete
in three different leagues. I was planning a Mix and Match entry (not
changing any pattern piece, just a different combination), but in the
end my project did became a hack.
The base of the dress is the Ileana, I had a well fitting pattern due to the pattern test. Both the bodice and skirt did not get any alterations. Most of you will immediately recognise the Lotta flaps on this garment. I love those flaps (I used them here) I used both the neck and the pocket flaps for the current dress. For the pockets I had to perform a small pattern hack. The circle skirt called for different shaped base pocket, I did keep the outside look of the Lotta pocket, only the "inside" was changed.
I love front closures (keeping in mind gym classes etc). After already hacking the button placket during testing, I went for a front visible zipper this time. I was inspired by the zipper Nina that I sewed (and wrote a tutorial for). I was planning to let the zipper end mid skirt, but when I realised the zipper was long enough to run over the entire dress, I changed my mind.
The second part of the hack are the sleeves. I started with the length of the Mara combined with the shape of the Louisa (so that wasn't a hack yet right, just mixing), but when I put the sleeves on my daughter's arm the sleeves were too wide of my liking. I made the sleeves narrower towards the wrist.
Both fabrics are from Soft Cactus and the flowers have a nice retro Compagnie M feel. The flower buttons are again the flower snaps, I still love them a lot.The zipper is a separating zipper that I bought in a multi colored set through Ali-express once. I finished the hem with some home made bias tape, just as Marte advises.
The circle skirt twirls perfectly, if you want a happy daughter, just make her a dress with a circle skirt.
This last picture is too white, there was too much sun because she ran from the shade. I had forgotten to turn my camera to Raw, so I couldn't make the picture better than this, I still love it though. She was running and twirling so happy, I had to share. For my daughter, and therefore for me this dress is already a winner.
I love to hear what you think of my creations. Feel free to leave a comment in the language you prefer (although Google translate might have to assist me if you choose something different than English, German, Dutch or Hungarian).
The base of the dress is the Ileana, I had a well fitting pattern due to the pattern test. Both the bodice and skirt did not get any alterations. Most of you will immediately recognise the Lotta flaps on this garment. I love those flaps (I used them here) I used both the neck and the pocket flaps for the current dress. For the pockets I had to perform a small pattern hack. The circle skirt called for different shaped base pocket, I did keep the outside look of the Lotta pocket, only the "inside" was changed.
I love front closures (keeping in mind gym classes etc). After already hacking the button placket during testing, I went for a front visible zipper this time. I was inspired by the zipper Nina that I sewed (and wrote a tutorial for). I was planning to let the zipper end mid skirt, but when I realised the zipper was long enough to run over the entire dress, I changed my mind.
The second part of the hack are the sleeves. I started with the length of the Mara combined with the shape of the Louisa (so that wasn't a hack yet right, just mixing), but when I put the sleeves on my daughter's arm the sleeves were too wide of my liking. I made the sleeves narrower towards the wrist.
Both fabrics are from Soft Cactus and the flowers have a nice retro Compagnie M feel. The flower buttons are again the flower snaps, I still love them a lot.The zipper is a separating zipper that I bought in a multi colored set through Ali-express once. I finished the hem with some home made bias tape, just as Marte advises.
The circle skirt twirls perfectly, if you want a happy daughter, just make her a dress with a circle skirt.
This last picture is too white, there was too much sun because she ran from the shade. I had forgotten to turn my camera to Raw, so I couldn't make the picture better than this, I still love it though. She was running and twirling so happy, I had to share. For my daughter, and therefore for me this dress is already a winner.
I love to hear what you think of my creations. Feel free to leave a comment in the language you prefer (although Google translate might have to assist me if you choose something different than English, German, Dutch or Hungarian).
Saturday, October 10, 2015
Itch to stitch Birthday Tour
Parties are fun, especially digitally ones where I do not have to
arrange a babysitter for my kids. Today, I am part of Itch to Stitch's
party, she celebrates her one year anniversary. Like for a non-digital
party, I dressed up. To avoid showing up in exactly the same pattern as
somebody else, I did put my own spin on the pattern.
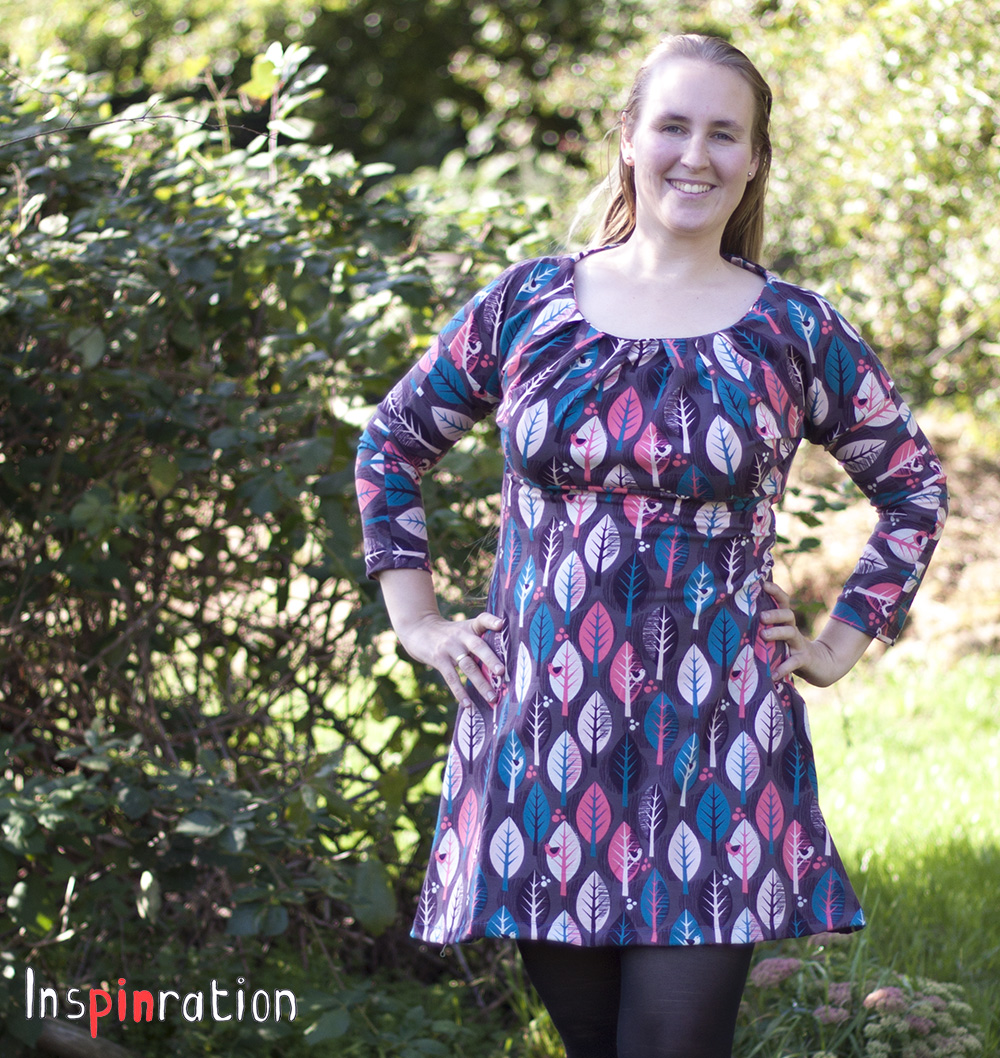
The pattern I used is the Kathryn shirt/dress. I bought this pattern a few months ago when it released and the anniversary tour was the perfect occasion to sew it up. I bought the pattern because of the folding detail on the chest. I suspected that this would be a perfect pattern for my shape and I was right. Although the pattern doesn't explicitly support different cup sizes like many of Itch to stitch's pattern do (those come in 5 different cup sizes, it is very easy to make the shirt fit your front perfectly. For the fulled part of the shirt I choose the size that corresponds with my chest size and I graded down to the size that corresponds with my waist size. I assume that this pattern is flattering on any breast type. For the fuller breasted the pattern is perfect to create enough space, for the smaller breasted I assume it creates more volume.
Due to the fall weather conditions, I added sleeves to the pattern. I used a retail bought sweater as example. The Kathryn pattern has short (Dollman) sleeves, and I simply added (3/4) sleeves with a flat head. Due to the flat head, construction was super simple, no cruve sewing. This constitutes to a very easy sew, which would be perfect for beginners. I drew the sleeves based on that retail sweater's. The sleeves of the original sweater are relatively tight and I kept them that way, I really like the result. What about a sleeve extension Kennis Wong?
The fabric is called "Leaves" and is from Lillestoff, it is an oldy and probably not available anymore. I bought it last years and I still love the colors. I had one and a half meter of fabric and that should have enough for this dress, but I managed to cut the front bodice upside down. Due to the pleats, the bodice piece looks a bit weird and because I sewed this on a sewing date, I wasn't paying enough attention and the leaves ended up upside down. I considered claiming creative freedom for a moment and just using it, but decided against it. I managed to use that wrongly cut piece again, by cutting a sleeve from it, but this mistake made it impossible to cut a new front bodice plus the skirt pieces etc. It almost fitted, almost.. I solved this issue by just sewing a small extra piece to the bodice, did you spot the extra seam?
I flared out the skirt part of the dress, the little girl inside of me demanded a bigger skirt. The fit was immediately perfect. I finished the hem with my "signature style" double colored twin needle seam. It had been a while since I last used a twin needle. Now a days I usually use a zigzag to finish my seams, but the colors of this fabrics just begged for double colored seams.
Of course I am not the only guest to this party, make sure you mingle and check out the creations of the other bloggers through out the coming days. Like all good parties there is also a goodiebag with sale codes (20off, 30off and 40off) you will get 20% off one pattern, 30% off two patterns, or 40% off three or more patterns. Participate in the rafflecopter to see if your goodiebag has the golden ticket.
Be sure to scroll to the bottom for your chance to win great prizes by these sponsors:
The pattern I used is the Kathryn shirt/dress. I bought this pattern a few months ago when it released and the anniversary tour was the perfect occasion to sew it up. I bought the pattern because of the folding detail on the chest. I suspected that this would be a perfect pattern for my shape and I was right. Although the pattern doesn't explicitly support different cup sizes like many of Itch to stitch's pattern do (those come in 5 different cup sizes, it is very easy to make the shirt fit your front perfectly. For the fulled part of the shirt I choose the size that corresponds with my chest size and I graded down to the size that corresponds with my waist size. I assume that this pattern is flattering on any breast type. For the fuller breasted the pattern is perfect to create enough space, for the smaller breasted I assume it creates more volume.
Due to the fall weather conditions, I added sleeves to the pattern. I used a retail bought sweater as example. The Kathryn pattern has short (Dollman) sleeves, and I simply added (3/4) sleeves with a flat head. Due to the flat head, construction was super simple, no cruve sewing. This constitutes to a very easy sew, which would be perfect for beginners. I drew the sleeves based on that retail sweater's. The sleeves of the original sweater are relatively tight and I kept them that way, I really like the result. What about a sleeve extension Kennis Wong?
The fabric is called "Leaves" and is from Lillestoff, it is an oldy and probably not available anymore. I bought it last years and I still love the colors. I had one and a half meter of fabric and that should have enough for this dress, but I managed to cut the front bodice upside down. Due to the pleats, the bodice piece looks a bit weird and because I sewed this on a sewing date, I wasn't paying enough attention and the leaves ended up upside down. I considered claiming creative freedom for a moment and just using it, but decided against it. I managed to use that wrongly cut piece again, by cutting a sleeve from it, but this mistake made it impossible to cut a new front bodice plus the skirt pieces etc. It almost fitted, almost.. I solved this issue by just sewing a small extra piece to the bodice, did you spot the extra seam?
I flared out the skirt part of the dress, the little girl inside of me demanded a bigger skirt. The fit was immediately perfect. I finished the hem with my "signature style" double colored twin needle seam. It had been a while since I last used a twin needle. Now a days I usually use a zigzag to finish my seams, but the colors of this fabrics just begged for double colored seams.
Of course I am not the only guest to this party, make sure you mingle and check out the creations of the other bloggers through out the coming days. Like all good parties there is also a goodiebag with sale codes (20off, 30off and 40off) you will get 20% off one pattern, 30% off two patterns, or 40% off three or more patterns. Participate in the rafflecopter to see if your goodiebag has the golden ticket.
Scruffy Badger Time | Call Ajaire | Wally and Grace | Sew Wrong | Bella Sunshine Designs
Seaside Notions | Made by Jaime | Sweet Little Chickadee | Inspinration | Friends Stitched Together
Stoney Sews | Just Keep Sewing | My Little Sewing Dreams | Allie J. | Creative Counselor
Love, Lucie | Girls in the Garden | FABulous Home Sewn | Goddess of Sewing | Rebel & Malice
The Telltale Tasha | House of Estrela | Made by Sara | Sew Shelly Sew | Red Knits
Be sure to scroll to the bottom for your chance to win great prizes by these sponsors:
The Fabric Store - $100 Gift certificate
Elliott Berman Textiles - Fabric bundle from France & Italy
Craftsy - three online classes of your choice
Girl Charlee Fabrics - $25 Gift certificate
Indie Sew - $25 Gift certificate
UpCraft Club - $25 Gift certificate
Quarto Publishing Group USA - the SHIRTMAKING WORKBOOK by David Page Coffin
The featured designer of the day will give away 2 patterns to a lucky winner:
Follow Itch to Stitch's blog closely to win these patterns!
a Rafflecopter giveaway
Wednesday, October 7, 2015
Minimi Project, Dungarees skirt pattern test
I love buying fabric, sometimes I think I sew to be able to buy new
fabric. When I see fabric I see possibilities, endless possibilities and
need those possibilities in my stash. Due to that desire I have an
extensive stash, but besides my big new fabric stash I also have a big
pile of clothes to be upcycled. I regularly upcycle clothes, like here, here and here. Upcycling fabric gives an extra type of satisfaction,
if you haven't done it yet, try it!
When you are upcycling clothes you often have to be extra creative (yeah!) in how to cut your pattern pieces from the existing garment. I feel that the most satisfying upcyled project not just uses the fabric from the original garment, but some elements of the garment are still recognisable in the new one. This dungarees skirt is a perfect example of that.
A few weeks ago, one of the designers behind the Minimi project placed a testers call on Facebook. The Minimi project already realised a book, and now they are also going into pdf patterns. I did my usual digital wave dance and got the opportunity to test. The pattern is designers for upcylcing a man's shirt into a dungarees dress, but the instructions can also be used to make the dungarees from scratch.
The idea of these dungarees is that you mis-button the shirt and than cut the pattern pieces, this way you create a front pleat. I really love the idea, it is so cleaver! I first planned to use a shirt with stripes, but due to the fact that you cut the pattern vertically I opted for a uni colored version.
When we had to pick a size, there was no size table available and I picked a 86 for my two and a half year old. She usually needs a smaller chest size, but because I couldn't check it, I wanted to be sure that she would fit it for a while. The dungarees are indeed a bit big, I kept the length a bit long as well, this way she can grow in it. Although the chest area is a bit wide, I think it is fine for these dungarees, this way she can really wear a sweater under them in the winter. When the weather will become nicer in spring, she will be able to wear it with a thing shirt under it.
The original shirt had been in a bag for a while and although I ironed the hell out if it, I didn't manage to make it wrinkle free (I know I should have washed it before cutting etc, but I do not have that type of patience). A bit wrinkled is how it will look on her anyway, because she will be allowed to play in it. A wash will do wonders for the wrinkles, but I usually do not dare to wash before I make pictures, Murphy's law and all. Surely there will a new colored garment in that wash, messing up everything, that really almost never happens, but when I am planning to make blog photos, I just do not dare to take the risk.
My sewing machine has all kinds of fun stitches that I never use. I thought this plain fabric would be ideal to decorate with one of those. So besides some brown top stitching, I also stitched little flowers on the the bottom hem.
The pattern is not available yet, but you can put yourself on the list to get informed when they will be. If you can not wait, you could always buy the book to get yourself some upcyling action.
I love to hear what you think of my creations. Feel free to leave a comment in the language you prefer (although Google translate might have to assist me if you choose something different than English, German, Dutch or Hungarian).
When you are upcycling clothes you often have to be extra creative (yeah!) in how to cut your pattern pieces from the existing garment. I feel that the most satisfying upcyled project not just uses the fabric from the original garment, but some elements of the garment are still recognisable in the new one. This dungarees skirt is a perfect example of that.
A few weeks ago, one of the designers behind the Minimi project placed a testers call on Facebook. The Minimi project already realised a book, and now they are also going into pdf patterns. I did my usual digital wave dance and got the opportunity to test. The pattern is designers for upcylcing a man's shirt into a dungarees dress, but the instructions can also be used to make the dungarees from scratch.
The idea of these dungarees is that you mis-button the shirt and than cut the pattern pieces, this way you create a front pleat. I really love the idea, it is so cleaver! I first planned to use a shirt with stripes, but due to the fact that you cut the pattern vertically I opted for a uni colored version.
When we had to pick a size, there was no size table available and I picked a 86 for my two and a half year old. She usually needs a smaller chest size, but because I couldn't check it, I wanted to be sure that she would fit it for a while. The dungarees are indeed a bit big, I kept the length a bit long as well, this way she can grow in it. Although the chest area is a bit wide, I think it is fine for these dungarees, this way she can really wear a sweater under them in the winter. When the weather will become nicer in spring, she will be able to wear it with a thing shirt under it.
The original shirt had been in a bag for a while and although I ironed the hell out if it, I didn't manage to make it wrinkle free (I know I should have washed it before cutting etc, but I do not have that type of patience). A bit wrinkled is how it will look on her anyway, because she will be allowed to play in it. A wash will do wonders for the wrinkles, but I usually do not dare to wash before I make pictures, Murphy's law and all. Surely there will a new colored garment in that wash, messing up everything, that really almost never happens, but when I am planning to make blog photos, I just do not dare to take the risk.
My sewing machine has all kinds of fun stitches that I never use. I thought this plain fabric would be ideal to decorate with one of those. So besides some brown top stitching, I also stitched little flowers on the the bottom hem.
The pattern is not available yet, but you can put yourself on the list to get informed when they will be. If you can not wait, you could always buy the book to get yourself some upcyling action.
I love to hear what you think of my creations. Feel free to leave a comment in the language you prefer (although Google translate might have to assist me if you choose something different than English, German, Dutch or Hungarian).
Subscribe to:
Posts (Atom)