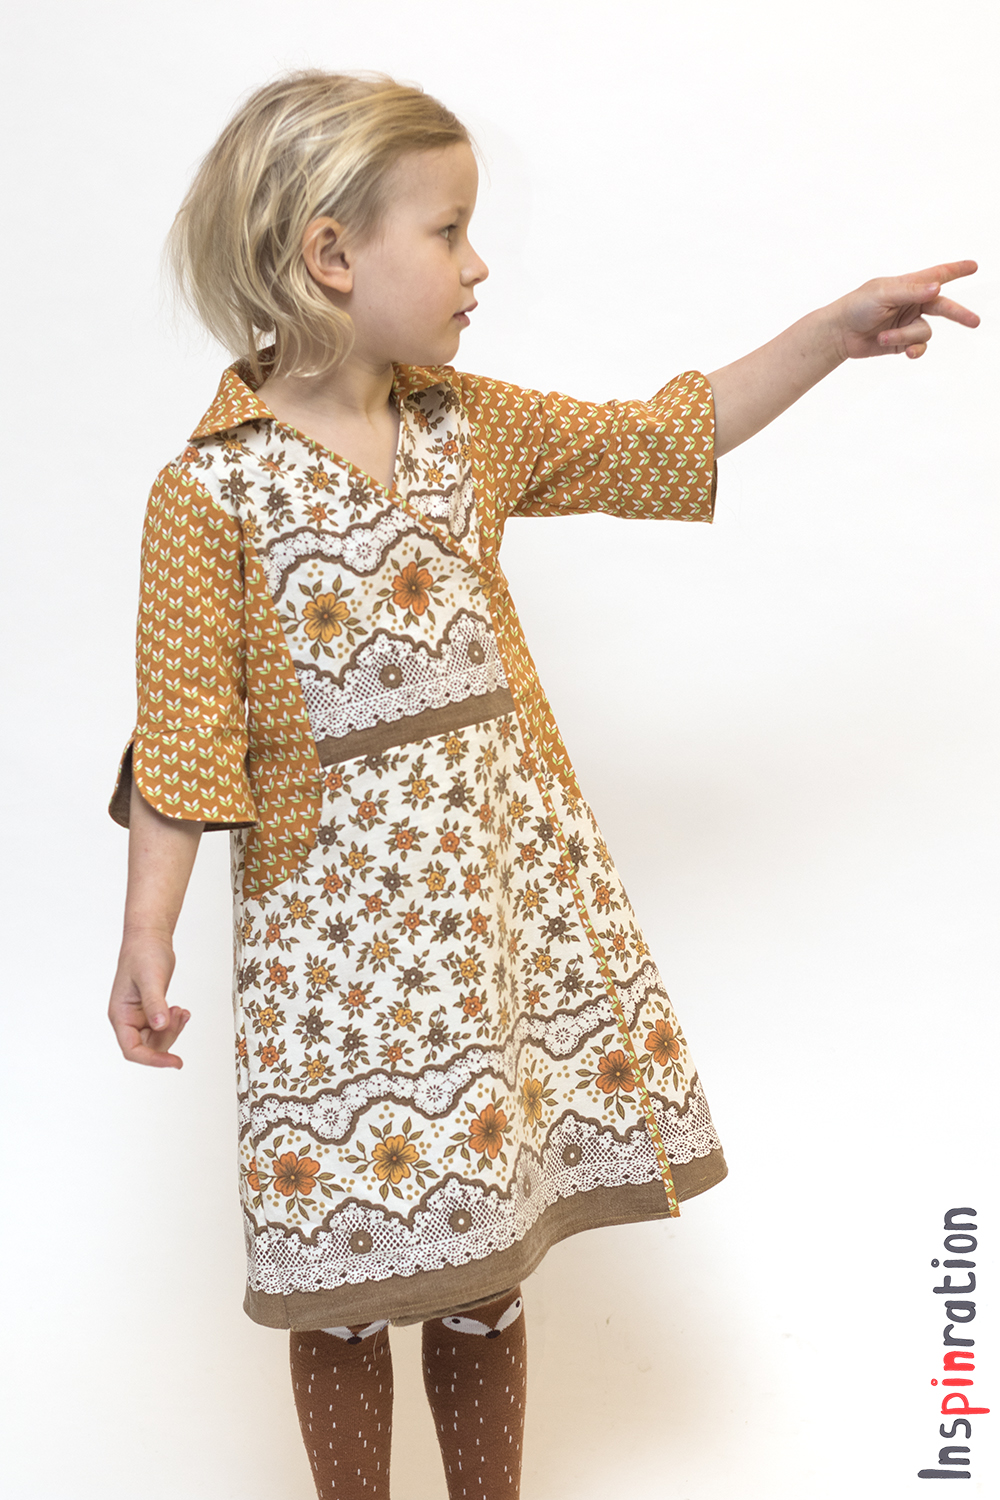
Yesterday, we had a lovely spring like day. It made me long for
better weather even more. I always seem to forget how
great it is to be able to go outside without coat, leave the garden door
open and have fresh air around the house. Today's dresses are made with
the newest release by Compagnie M*, the Frederique dress*, and fit
perfectly with hopeful
thoughts of spring!
Gisteren was het hier echt heerlijk
lente-achtig weer. Dan verlang ik echt nog meer naar de warmte van de
zon. Ik vergeet elke jaar in de winter weer hoe heerlijk het is om
zonder jas naar buiten te gaan, om de tuindeuren open te kunnen hebben
en het hele huis naar "buiten" te laten ruiken. De jurken die ik vandaag
presenteer, die ik maakte met het nieuwste patroon van Compagnie M*, de
Frederique*, passen perfect bij zulke zomerse gedachten.
I
have a love for waist ties and apparently my girls do to.They have
skinny waists and usually like very fitting clothes, so waist ties are
perfect in that case. My middle one asked me to
make her a waist tie dress, after her bigger sister got this one. As
usual, she had to wait a few months, I still have to make her those lady
bug slippers that I promised her almost a year ago. When Marte
from Compagnie M showed her newest design, I immediately saw a chance to
at least take the waist tie demand of my to-do list.
Ik ben
helemaal weg van jurken met touwtjes in de taille en mijn dochters
blijkbaar ook. Ik denk dat het komt doordat ze zo smal zijn en van
aansluitende kleding houden. Mijn middelste vroeg om een jurk met "van
die touwtjes" nadat ik haar grotere zus op deze trakteerde. Zoals
gebruikelijk moest ze er wel even op wachten (die lievenheersbeest
pantoffels die ik bijna een jaar geleden beloofde zijn er ook nog niet).
Toen Marte haar Frederique showde zag ik meteen een kans om in ieder
geval een ding van mijn to-do lijstje af te strepen.
The
pattern is, as we are used to by Compagnie M, very versatile. Of course
there are pocket options, multiple collars, multiple sleeve options and
multiple closure methods. You know I love color block options, so those
princess seams make my heart sing. You can dress your daughter in this
dress whole year round due to the long and short sleeve option. After
making amazingly beautiful "plain" Frederique dresses, several testers
started to hack, so I think there will be many tutorials
available to give this dress even more spins. A reversible option is
already included in the pattern itself!
De Frederique is,
zoals we van Comagnie M gewend zijn, weer heerlijk veelzijdig.
Natuurlijk zijn er zakopties, meerde kragen, meerder mouwen en meerde
sluitmethodes. Als echte colorblock liefhebber was ik natuurlijk ook
meteen weg van die prinsessennaden. Met deze jurk kleed kan je je
dochter het hele jaar van jurken voorzien aangezien er dus twee lengtes
mouwen bijzitten en de optionele manchetten geven nog extra speel
mogelijkheden. Verscheidene testers "showde al wat eigen variaties, dus
ik verwacht dat er ook heel wat tutorials gaan komen om het patroon van
nog meer variatie mogelijkheden te voorzien. Een omkeerbare versie zit
trouwens zelfs al beschreven in het basispatroon.
I
am very much trying to decrease my stash (did you check the right side
of my blog recently). I did buy three fabrics this
week though, but in my defense, I got a fabric voucher for my birthday.
My jersey stash is still huge, but my
woven pile is not shameful at all anymore. I even doubted for a second
if I would have any nice fabric to sew up a Frederique, but of course I
still managed to create a few
possible combinations.
I eventually went for an upcycle. I used a 20 year (plus) old pillow
case as my main fabric and some Soft Cactus for contrast. I had to cut
very efficient, so there is a seam on the
inner skirt part and I did not have enough to add seam allowance to
dress (which I solved by adding a bias to the neckline).
Ik
doe dus echt een serieuze poging om mijn stoffenvoorraad terug te
dringen. Keek je al eens aan mijn rechterzijde op de blog? Deze week
kocht ik echt toch drie stoffen (in verdediging van mezelf) ik had een
cadeaubon gekregen voor mijn verjaardag. Mijn tricot voorraad is nog
steeds enorm, maar mijn katoentjes moet ik ondertussen echt zoeken. Even
vreesde ik zelfs niet genoeg mooie stof te hebben voor een Frederique,
maar natuurlijk was mijn vrees ongegrond. Na wat graven had ik meerdere
leuke opties. Uiteindelijk ging ik voor een recykleer projectje. Ik had
een kussensloop van minimaal 20 jaar oud en een stukje contrasterende
Soft Cactus. Het was wel een uitdaging om het jurkje te knippen uit dat
kussensloop, maar met een bias op de hals (ik had niet genoeg stof voor
een naadwaarde) en een extra zoom in de binnenste rok lukte het.
Like
I mentioned before, the testers
immediately fell in love with the pattern and made more than they were
asked. A few testers made jersey ones and my love for jersey of course
made me want to make one as well. Sizing down is the recepe for nice
knitification, so I simply used the same pattern pieces for my eldest as
the ones that I used for my middle one (I did lengthen ofcourse). I am
still very
much into brownish fall colors, but added a bit of spring blue. I got
this lovely deer fabric from Joyfits last year. I
think it will look lovely on a bit more colored skin in the summer.
Zoals
ik eerder vermelde waren de testers super enthousiast over het patroon
en maakte zij meer dan van hen verwacht werd. Enkele testers ging ook
met tricot aan de slag en ik kon natuurlijk niet achterblijven. Bij een
tricot versie is het aan te raden de jurk wat kleiner te knippen en ik
gebruikte gewoon dezelfde patroondelen voor mijn oudste als waar ik de
katoenen versie voor mijn middelste van knipte (ik verlengde wel
natuurlijk). Ik ben nog steeds helemaal into de herfstkleuren, maar ik
gebruikte een fris blauwe kleur voor wat lente contrast. De stof kreeg
ik vorig jaar van Joyfits. Ik denk dat de jurk er super mooi uit ziet in
de zomer tegen een wat gekleurder velletje.
The
lovely weather yesterday also made me do a photography shoot outside. In
my favorite shooting spot from last year, I mostly found grey and
brown, so the dress is not really coming alive as I hoped. My daughter
loved being there with me, so I would say the shoot was success anyway.
Het
mooie weer deed me ook naar buiten trekken voor nog een fotoshoot. Op
de plek waar ik vorig jaar mooie foto's trok was nu alles echter bruin
en grijs, hierdoor valt de jurk een beetje weg tegen de achtergrond.
Mijn dochter vond het heerlijk om met mij buiten te zijn, dus het was
toch nog een succesvolle shoot dus.
The Frederique* is now
available on the Compagnie M web shop* for 7 euro for the digital pattern, there is also a paper pattern option (if you buy two, they will be send for free to Belgium, the Netherlands, France, Germany and the UK).
Will you go for a long or short sleeves version? My sewing is all spring
and summer already.
Frederique* is nu beschikbaar op de site van
Compagnie M* voor 7 euro voor de digitale versie en natuurlijk is er ook een papieren versie. Als je nu twee papieren patronen besteld worden ze gratis bezorgd in Nederland en België. Welke versie ga jij maken, ga je al voor
zomer of toch nog maar 1 met lange mouwen? Ik ben al helemaal om naar de
zomer garderobe in ieder geval.
Feel free to leave a comment in the language you prefer (although Google
translate might have to assist me if you choose something different
than English, German, Dutch or Hungarian). If you buy anything through
my affiliate links (*), I get a small commission (the price stays the
same for you), I am very grateful for everything that feeds my fabric
addiction.
Ik vind het altijd super leuk om reacties te lezen om mijn creaties. In
deze post zitten enkele affiliate linken, aangeven met een *. Mocht je
het patroon aankopen doordat je in de shop kwam via een link van mij,
dan krijg ik een kleine commissie. Het patroon wordt niet duurder voor
jou, maar mijn stoffenkast is er wel heel blij mee
Last week, I mentioned One Thimble issue 14* already. This weekend, it
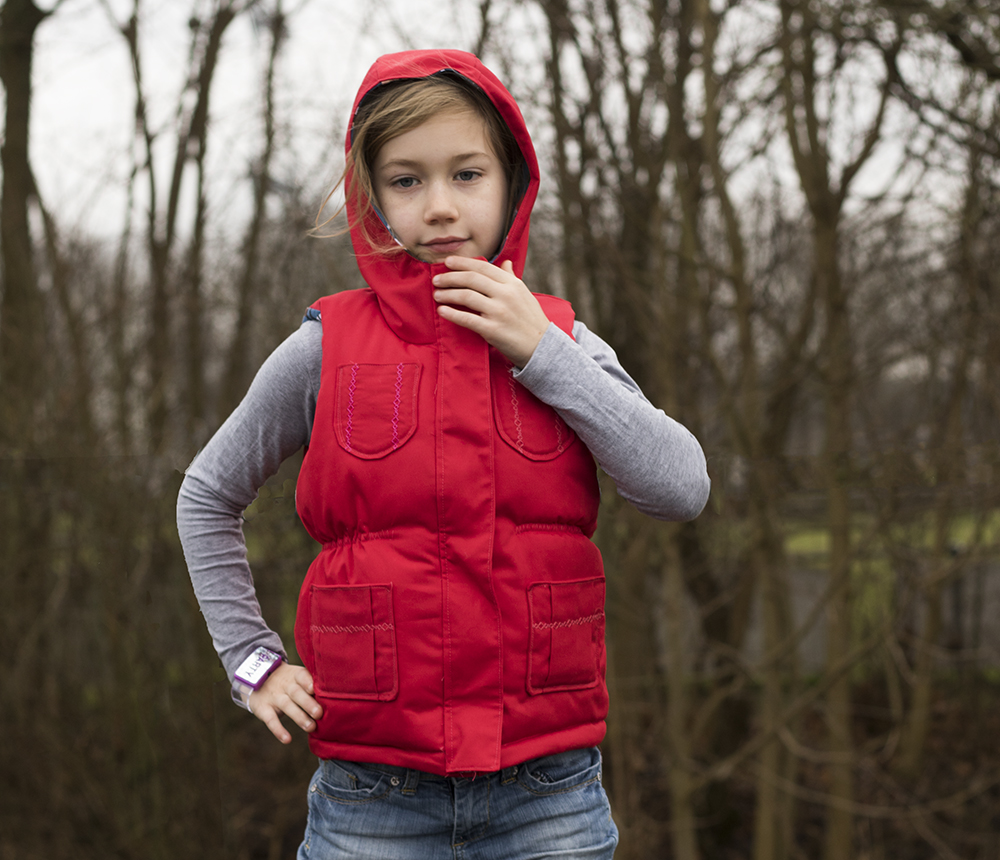
got released and I tested one of the patterns, the Thyme vest* my Paisley Roots. This is supposed to be a layering, an in between seasons garment.
My kids love to have freedom of arm movement, so I thought it would be
ideal with some batting as a truely in-between coat, I might have overdone it a bit though.
Vorige
week sprak ik al over One Thimble issue 14*. Afgelopen weekend kwam het
digitale magazine weer uit en ik mocht een van de patronen, het Thyme vest* van Paisley Roots testen. Het hoort een tussenlaag kledingstuk te
zijn, maar aangezien mijn kids van bodywarmers houden, deed ik er een
laag wattering tussen. Ik overdreef echter lichtelijk...
This
vest has all the features to make it your kids favorite, a hood, lots
of pockets and elastic in the waist to avoid that wind blowing up inside
it. The vest is fully lined, so there is a very pretty finish
(there even is a facing for the bottom of the vest, to avoid a slipping
lining) and you can use some of your bigger scraps of a treasured fabric
to make a
nice pop. I used some Snow white jersey from Lillestoff (bought years
ago at Joyfits) that matched
perfectly with the red outer fabric (that I bought at Textielstad as a
coupon).
Het vest heeft alle eigenschappen die mijn kids fijn
vinden, een kap, veel zakken en elastiek in de taille zodat de wind er
niet onderdoor blaast. Het vest is volledig gevoerd en heeft daardoor
een hele mooie afwerking. Er is zelfs zo'n extra stukje aan de onderkant
van van de binnenkant zodat je voering echt niet zichtbaar is. Voor de
voering kan je mooi een leuk stofje gebruiken, altijd een leuke
verrassing als de jas open gaat. Deze Sneeuwwitje Lillestoff tricot met
rode details paste er perfect bij vond ik (kocht ik jaren geleden bij
Joyfits). De buitenkant van het vest kocht ik bij Textielstad as een
coupon.
The pattern instructs to sew some decorative
lines on the pockets. I used the pockets to practice one of the fancy
stitches on my sewing machine. I personally love the fact that the
pattern has snaps and a zipper. In my version there are no buttons
though, somehow my girl voted against them. The vest stays closed
without them as well, but they do provide some extra wind protection.
The front flap can not blow open if it is closed with the snaps. If I
would have to guess, I think my girl voted against the buttons because
she just wanted to wear the vest immediately.
Het patroon
schrijft voor om enkele rechte lijnen te stikken op de zakken. Ik ging
echter voor een van de siersteken op mijn naaimachine, ik gebruik die
eigenlijk nooit, dus leek me een ideaal moment. Ik persoonlijk vind het
super fijn dat het patroon met rits en drukknopen komt. Mijn dochter was
echter tegen de drukknopen (ik denk omdat ze hem gewoon meteen aan
wilde). De jas blijft prima dicht zonder de knopen, maar ze geven wel
wat meer windbescherming. Met drukknopen kan de flap namelijk niet
openwaaien.
Okay,
about that batting. I upcycled an old pen play blanket, and like I
already mentioned, it might have been (insert a very sarcastic face
here) a bit too thick. I had a horrible
time sewing in the elastic (think similar situation of having 10 meter
of tule under your machine). In the end I just went for a zigzag, and
not
the pretty stitch lines the pattern prescribes. Yes, you are right, I
was not being the perfect tester this time. Karly did say, she now could
write an advice against using too much batting in the instructions and
if
you use batting, to quilt it to the lining pieces (I quilted it to the
main,
which also created some trouble). I do promise to be a better tester
next time Karly ;).
Okay, over die wattering dan. Ik gebruikte een
oud boxkleed, lekker warm leek mij. Maar zoals ik al zei, overdreef ik
natuurlijk. Het naaien van het elastiek in de taille was een DRAMA
(vergelijkbaar met het rimpelen van 10 meter tule). Uiteindelijk ging ik
dus maar voor een gewoon zizagstiksel en niet het mooie rechthoekige
stiksel uit het patroon. Ik was dus verre van de perfecte tester deze
keer. Karly (de designer) zei wel dat ze nu in ieder geval ook schrijven
dat je geen wattering gebruikt of anders in ieder geval dunne en dat je
die aan je voering vastmaakt (ik naaide hem aan de buitenkant vast en
dat gaf ook allerlei problemen). Ik beloofde Karly volgende keer braver
te zijn.
Feel free to leave a comment in the language you prefer (although Google
translate might have to assist me if you choose something different
than English, German, Dutch or Hungarian). If you buy anything through
my affiliate links (*), I get a small commission (the price stays the
same for you), I am very grateful for everything that feeds my fabric
addiction.
Ik vind het altijd super leuk om reacties te lezen om mijn creaties. In
deze post zitten enkele affiliate linken, aangeven met een *. Mocht je
het patroon aankopen doordat je in de shop kwam via een link van mij,
dan krijg ik een kleine commissie. Het patroon wordt niet duurder voor
jou, maar mijn stoffenkast is er wel heel blij mee
Today, we are celebrating the Cicero* launch! During the previous two Sofilantjes* releases, my daughters stole the show. I sewed the Folis trifecta for my eldest and middle daughter and those girls also got all the Orbis trousers. I do have a son though, one that loves my sews. So, he needed some sewing love. When Anne showed me her new unisex jacket design, I knew who would be the first receiver. Besides rudely asking to be allowed to pre-test, I even asked Anne to add an extra element to the design. I suggested a high collar on the awesome jacket she designed. I was allowed to sew a prototype with the suggested collar, and guess what, it became a part of the final pattern. I am super proud!
Vandaag heten we de Cicero* van Sofilantjes* welkom. Bij de laatste twee lanceringen gingen mijn twee oudste dochters met de buit aan de haal. Alle drie de Folisjes en de Orbis broeken gingen naar die dames. Mijn zoon was dus duidelijk een keer aan de beurt. Toen Anne in december een prototype van de Cicero liet zien was ik meteen enthousiast voor mijn zoon. Ik vroeg daarom of ik geen prototype mocht naaien en of dat niet brutaal genoeg was, vroeg ik ook nog of ze niet een hoge kraag wilde toevoegen. De prototype mocht ik naaien en ik mocht ook een prototype maken van de kraag. Mijn zoon en Anne (en ik) waren fan en de kraag werd een deel van het officiële patroon!
The eye catcher of the Cicero are of course those asymmetrical front pockets (yes, that are pockets!). I really love the combination of color block and functional pocket. Also the back has a possible color block option, which would make this jacket perfect for using scraps. Next weekend, our sew weekend will happen again, and I am planning all kinds of scrap projects. A Cicero with short sleeves from scraps is on the planning. Although I sewed only long sleeved versions, the pattern comes in a short sleeves version as well. If you sew one in jersey fabrics, this would be a cool shirt for spring as well.
Het bijzonderste aan het patroon zijn natuurlijk die schuine zakken op de voorkant. Ik ben helemaal fan van deze functionele zak oplossing in een color block. Ook de achterkant heeft een color block mogelijkheid, door al die losse stukken is dit patroon dus ook uitermate geschikt voor kleine restjes. Volgend weekend is het weer naaiweekend, ik heb allerlei rest projectjes op de planning staan. Een Cicero met korte mouwen met veel verschillende stoffen staat ook op de planning. Een tricot versie met korte mouwen lijkt me namelijk een fijn zomer shirt.
The blue greyish version was my first jacket and I made it from two larger scrap pieces (for next weekend I plan a version with all kind of different scraps, not just two). The stars fabric I used for this hat and the blue sweat from Cas and Nina was already used in this sweater. The brown version was sewn with some leftover summer sweat from Joyfits (first made its appearance in the Folis post) and awesome animal sweat that I bought at the Stoffenmadam.
De blauw grijze versie was de eerste versie die ik naaide. Ik gebruikte daar twee grote resten voor, de sterren werden hier al gebruikt en de blauwe stof (oorspronkelijk van Cas en Nina) kwam hier al in beeld. Voor de bruine gebruikte ik een restjes summer sweat van Joyfits, dat ik over had na het maken van deze Folis en een geheel nieuw stuk bruine dieren sweat dat ik kocht bij de Stoffenmadam.
After making two Cicero jackets for my son, I sewed one for my eldest daughter. The Cicero has side seams that are curved towards the front a bit, making them ideal for side seam pockets. Anne was not sure if she wanted to include side seam pockets, it had been her original idea, but she was on the fence a bit. Fortunately, her testers convinced her that you would love included side seam pockets. The color block that I did on my daughter's jacket (with hood) is not in the pattern. I decided to only use the upper color blocked piece, and use one big piece for the bottom part. It is very easy to make this color block yourself though. Take two lower pieces and overlap them two centimeters (yes really, two, just do it), and you are done.
Na twee Cicero's voor zoonlief was toch weer een dochter aan de beurt. De Cicero heeft zijnaden die net wat naar voren liggen. Hierdoor zijn ze ideaal voor zakken in die zijnaden. Anne was oorspronkelijk van plan zijzakken toe te voegen, maar had zich toch bedacht. Gelukkig lukte het ons testers haar ervan te overtuigen dat ze er toch echt in hoorden. De color block die ik op dit vest met kap deed, is geen officiële optie. Ik knipte het voorpand dus in twee delen in plaats van drie. Deze optie is echter heel makkelijk te maken. Pak je onderste twee patroondelen en laat ze precies 2 centimeter overlappen (echt waar 2 centimeter overlap, dat is alles wat je moet doen).
The zippers that I used for my vests are long plastic ones (80cm originally). I like this kind of zipper because they are super easy to shorten to the right size. Just cut the zipper (with scissors) to 2 cm longer than the required length, remove the extra teeth (the ones on that extra 2 cm) from the top with pliers. Than, at the top of one of the sides, place one of those removed teeth between the two upper teeth. Take soldering iron (or something else that can become hot) and melt the three teeth to one new stop. It does not have to be a work of art, but just make sure it does not become too wide. Here you can see a closeup from my first try. Do the same thing on the other side of the zipper.
De ritsen die ik voor deze vesten gebruikte waren van origine lange (80cm) risten. Deze plastic ritsen zijn echter super makkelijk op maat te maken. Je knipt de rits af met een schaar op de gewenste lengte plus 2 centimeter. Vervolgens verwijder je de extra tandjes van die laatste extra 2 centimeter. Een van die verwijderde tandjes plaats je dan tussen de bovenste twee tanden van een van de kanten van de rits. Pak een soldeerbout (of iets anders wat goed heet wordt waar je een beetje mee kan vormen) en smelt de drie tanden tot een nieuwe ritsstop. Het hoeft geen kunstwerk te zijn, maar zorg dat het geheel niet te breed wordt. Hier zie je een close-up van mijn eerste versie.
My daughter's version was sewed with a scrap left after sewing this dress and a other beautiful Lillestoff sweat that I bought as a small coupon from Cas and Nina. I actually already sewed a fourth version, and it should not surprise you that it is a hack. I was not a hundred percent satisfied yet, so I will sew another before I show you want I did (with a tutorial of course).
Mijn dochters versie naaide ik met een restje van toen ik deze jurk naaide en een mooie andere Lillestoff sweat die ik ook als coupon kocht bij Cas en Nina. Ik naaide overigens ook al een vierde versie. Het zal jullie vast niet verbazen dat ik zeg dat het een hackje is. Ik ben nog niet 100% tevreden, dus ik naai nog een nieuwe, voordat die met tutorial op de blog komt.
As usual with a Sofilantjes release the pattern is on an awesome sale for just 48 hours. So get your Cicero* for 5 euro (excluding VAT) in the Sofilantjes web shop*.
Zoals altijd is er weer een leuke lanceringskorting. De Cicero* is de komende 48 uur (tot de nacht van zondag op maandag) te koop voor 6 euro inclusief btw in de Sofilantjes webshop*.
Feel free to leave a comment in the language you prefer (although Google translate might have to assist me if you choose something different than English, German, Dutch or Hungarian). If you buy anything through my affiliate links (*), I get a small commission (the price stays the same for you), I am very grateful for everything that feeds my fabric addiction.
Ik vind het altijd super leuk om reacties te lezen om mijn creaties. In deze post zitten enkele affiliate linken, aangeven met een *. Mocht je het patroon aankopen doordat je in de shop kwam via een link van mij, dan krijg ik een kleine commissie. Het patroon wordt niet duurder voor jou, maar mijn stoffenkast is er wel heel blij mee
Three months ago, Sofilantjes'*Orbis* pants were part of One Thimble issue 13*. Tomorrow, One Thimble 14* will be released, which means that the Orbis was allowed to come home. Therefore, Orbis is now available through the Sofilantjes' website. To celebrate this homecoming, a blog tour is being organized. Today, I have the honor of showing you my three new versions. It is already day four of the blog tour, so this means you have a nice big load of inspiration to sift through, if you missed the tour until now.
Drie maanden geleden verscheen de Orbis*, het nieuwste broek patroon van Sofilantjes* in One Thimble 13* (een digitaal naaimagazine). Morgen komt One Thimble 14* uit want inhoud dat de Orbis weer naar huis mocht en daardoor is het patroon nu beschikbaar op de Sofilantjes site. Natuurlijk verscheen er nu dus dan ook een Nederlandse versie van het patroon. Om deze heugelijke gelegenheid te vieren, organiseert Sofilantjes een blog tour. Ik mocht weer fijn meedoen en laat jullie vandaag mijn drie meest recente versies zien.
Last year I made my first Orbis for my middle daughter. This time, my eldest was on the receiving side of my sewing. Normally she wear dresses, twirly dresses. On her break dance classes she does need trousers though. So I sewed this funky purple one. The fit is perfect, the pocket is big, the asymmetrical zipper is super cool and she will be able to wear it for a while. No changes needed you might say. But my hacker brain always wants to play, and Anne allowed it.
In het najaar naaide ik reeds een eerste versie van de Orbis voor mijn middelste dochter. Deze keer was echter mijn oudste aan de beurt om een broek van mij te ontvangen. Ze draagt eigenlijk alleen maar jurken, liefst rond-draai-jurken, maar voor haar break dance lessen heeft ze toch echt een broek nodig. Ik ging daarom voor een lekkere heftige funky paarse versie. Hij paste direct perfect, heeft een grote zak(ken), een coole asymmetrische rits en ze gaat hem een goede tijd passen. Wat wil je nog meer zou je denken, nou mijn brein heeft altijd nog meer noten op haar zang.
I was wondering how the trousers would look without the fake fly. I like the asymmetrical look, but I wanted to experiment a bit more. For my next version, I therefore omitted the fly and I wrote a tutorial on how I did it. I already had so many pictures in the this post, that I decided to make the tutorial a separate entry, and you can find it here. If you checked my first Orbis, the fabric from this third Orbis should be very familiar. I even used the same contrasting ribbing.
Ik wilde namelijk wel eens weten hoe die broek eruit zou zien zonder gulp. De asymmetrische look is erg leuk, maar die drang naar afwisseling he... Dus knipte en plakte ik een beetje en fabriceerde een orbis zonder gulp en ik schreef een tutorial hoe jij dat ook kan doen. In deze post zaten al zoveel foto's dat ik besloot om de tutorial op een aparte pagina te plaatsen, hier kan je hem vinden. Als je trouwens mijn eerste Orbis bekeken hebt, dan komt de stof van deze versie je vast erg bekend voor.
Due to my diversity addiction, I was not done with experimenting. So, besides having an asymmetrical fly and no fly, I also wanted to make a straight fly (which I also added to the tutorial). This last Orbis was sewn with a piece of leftover fabric from a sweater that I sewed in January, but still am not allowed to show you. The fabric is the silver version of the pink fabric that I used for this dress. The fabric has a bit lower amount of stretch than regular jersey, so I sized up a tiny tiny bit. The silver fabric is special and sparkly, but I felt it needed some extra spice. I therefore used my daughter's favorite color, blue, as a contrast for the snaps, the waistband and the top stitching thread.
Maar ik was nog niet tevreden. Ik had een versie met asymmetrische gulp, zonder gulp en nu wilde ik natuurlijk een rechtte gulp. Ook dat nam ik op in de tutorial. Deze laatste Orbis maakte ik van zilveren French Terry (net als alle andere stoffen uit deze post kocht ik die ooit bij Joyfits. Fun fact het waren drie verschillende bestellingen). Ik knipte de broek uit een restje van de stof, het oorspronkelijke project was een trui voor mezelf die volgende week eindelijk op de blog mag komen. Hoewel de stof zelf al glittert wilde ik toch nog iets extra's. Ik koos er daarom voor om mijn dochters lievelingskleur (licht blauw) als contrasterende kleur te gebruiken bij de snap, de tailleband en het topstiksel.
One straight Orbis and two adjusted. That is what I promised Anne and Melissa. After making pictures of the purple one, I realized I had not fulfilled my promise! I actually folded the fake fly incorrectly to the outside. That is what you get when you get arrogant and think you do not need the instructions. It was not super strange, that is why I had not noticed (did you spot in in the second picture?), but it was not a straight Orbis. So, I took off the snaps, seam ripped a small piece and adjusted the fly. Than, I even top stitched the zipper (which I had omitted in the first run), so that I could actually present you a straight Orbis as well. I think my son will be the next receiver of a set an Orbis set.
Een standaard Orbis en twee aangepaste, dat was wat ik Anne en Melissa beloofde. Nadat ik foto's maakte van mijn paarse broek, realiseerde ik me echter dat ik me niet aan mijn belofte had gehouden! Ik had de gulp naar buiten gevouwen in plaats van naar binnen. Dat krijg je als je arrogant denkt de instructies niet te hoeven checken. Het zag er niet echt vreemd uit (vandaar dat het me niet opgevallen was, zag jij het in de tweede foto?), maar het was niet de beloofde versie. Gelukkig was het snel aan te passen. Snaps eraf, beetje los tornen en weer vastzetten. Deze keer deed ik zelfs het voogeschreven topstiksel. De volgende set Orbis broeken zal waarschijnlijk voor de zoon zijn.
I already mentioned that I am part of a blog tour at the start of my post. here you can find all the other participants, and do not forget to check tomorrow's participants as well.Also do not forget to visit the Sofilantjes'webshop to check out Orbis pattern*.
Ik schreef dus al dat ik deel ben van een blog tour. Hier zie je een overzicht van de andere deelnemers, vergeet ook zeker niet om morgen nog even terug te komen en de laatste te checken.Vergeet ook niet het Orbis patroon* te checken in de webshop.
Feel free to leave a comment in the language you prefer (although Google translate might have to assist me if you choose something different than English, German, Dutch or Hungarian). If you buy anything through my affiliate links (*), I get a small commission (the price stays the same for you), I am very grateful for everything that feeds my fabric addiction.
Ik vind het altijd super leuk om reacties te lezen om mijn creaties. In deze post zitten enkele affiliate linken, aangeven met een *. Mocht je het patroon aankopen doordat je in de shop kwam via een link van mij, dan krijg ik een kleine commissie. Het patroon wordt niet duurder voor jou, maar mijn stoffenkast is er wel heel blij mee
I know, I know, it is still winter in the Netherlands, but I am
dreaming of better weather. Two weeks ago, I already showed you this
summer dress, today I am showing three more summer items. Yesterday,
the Arctic Racer was released by Harristar designs, and today I am
showing you the three versions I sewed up during testing.
Ik weet
het, het is koud, erg koud, maar toch droom ik al van de zon. twee weken
geleden showde ik al een zomer jurk, vandaag heb ik drie zomerse
naaisels in de aanbieding. Gisteren kwam namelijk het nieuwe patroon van
Harristar Designs uit, de Arctic Racer Tank. Vandaag laat ik die drie
versies zien die ik naaide tijdens het testen.
I
recently came across Harristar designs when I was searching for extra
inspiration for clothes made out of jersey scraps. I have a lot of
those, and although I have some awesome patterns for scraps (like this one), I can
always use some more. I therefore bought the Dimo pack from Harristar,
joined their Facebook group and saw the tester call they posted a few
hours earlier. If you are considering buying one of Harristars patterns
(and you should), I advice you to first join the Facebook group
though, the Harristar Gazer pattern is free for member of that group!
Begin
dit jaar kwam ik de patronen van Harristar tegen toen ik aan het zoeken
was naar meer inspiratie voor kledingstukken uit tricot resten. Ik heb
een heel setje van zulke patronen (zoals deze), maar er is altijd ruimte voor meer
inspiratie. Ik kocht daarom het Dimo pack en meldde me aan bij de
Facebook groep. Daar viel ik met mijn neus in de boter, er was net een
tester call geplaatst. Mocht je interesse hebben in een van de Harristar
patronen, meld je dan eerst aan voor de groep, dan kan je namelijk het
Gazer patroon, gratis krijgen.
Harristar designs are packed with
options and the new Arctic Racer totally fits the bunch. With the
pattern you can make a tank (two types of bottom hems), a tunic, a normal dress (flared or more A line), a
rushed dress and a maternity dress. The dress even comes with
pockets, those were added later in game, after I sewed all my three
versions, on my next one I will use them for sure. Amber, the designer
was cool with us testers hacking a bit, so my first dress, was a one
sided rushed version. I wrote a tutorial for you, if you would be
interested in making something similar.
De patronen van Harristar
zitten lekker vol opties, daar houd ik van. Ook met de nieuwe Arctic
racer kan je meerdere kanten op. Er is een top met twee verschillende
onderkanten (recht of gebogen), een tuniek lengte en een jurk lengte. De
jurken opties zijn er met een uitlopende rok, meer A lijn versie en met
een gerimpelde versie. Tot slot is er ook nog een zwangerschapsversie
opgenomen. Het patroon heeft zakken, maar die werden pas toegevoegd
nadat ik alle drie mijn versies naaide (anders hadden ze er zeker
ingezetten bij mij). Amber, de designer liet haar testers meteen spelen,
en ik naaide tijdens het testen dus al een kleine hack (alleen aan de
voorkant gerimpelde jurk). I schreef er een simpele tutorial voor, mocht
je interesse hebben in iets vergelijkbaars.
All options are
sewn up very fast. All hems are just folded over and sewn down. I still
do not own a coverstitch, but it worked fine with my general sewing
machine as well. I actually hemmed with the inside of the garment on
top, this way I always caught the fabric perfectly, and my bobbin stitch
looks decent enough on the outside of fabric. I do advice to use a good
quality knit for these projects. Making such an easy hem is perfect for
good recovery knits, but flimsy ones easily overstretch. A flimsy
fabric might also create some trouble if you make the dress. The weight
of the dress might pull you shoulder straps down.
Alle versies
zitten super snel in elkaar. Alle zomen zijn naar binnen gevouwen en
vastgenaaid. Ik heb nog steeds geen coverlock, maar het ging ook prima
met mijn naaimachine. Ik naaide echter wel op de binnenkant van de stof,
zo kon ik netjes dicht bij het einde van de stof naaien. Mijn
spoeldraad kant is dus zichtbaar aan de buitenkant (maar ik koos
natuurlijk voor goed matchend garen). Deze snelle zoomversie werkt
uitstekend op stevigere tricot's. Ik raad het echter niet aan op een
dunne versie, dan rekt het vrij snel uit en gaat het lubberen. Een te
dunne tricot zou ook moeite kunnen hebben met het gewicht van de jurk.
De bandjes worden dan te ver naar beneden getrokken.
I
made the top from the same fabric that I used for these trousers. The
one sided rushed version's fabric is from Joyfits. The flower fabric has
been in my stash for over two years. I bought it when a web shop went
out of business and I could not bring myself to cut it. It is so
beautiful, that it surely was going to me something for me. After making
the rushed version and seeing other tester pictures, I knew this
pattern would be a match made in heaven, and I was right.
Ik
maakte mijn top uit dezelfde stof als deze broek. De aan één kant
gerimpelde jurk naaide ik uit een stofje van Joyfits. De zwarte bloemen
stof lag al een paar jaar heel geduldig te wachten op het ideale
project. Ik kocht het bij een webshop die ermee ophield en ik vond hem
zo mooi, dat hij hoe dan ook voor mij ging worden. Na het maken van de
gerimpelde versie en het zien van de andere test versies, durfde ik het
aan en ik ben er helemaal gelukkig mee.
Due to the release there
is a 35% discount on your entire purchase for today with
the code ArcticRacer35 (usable once per email address). You can find the
Harristar web shop here.
Door de lancering van
het nieuwe patroon is er nu een 35% winkelbrede korting in de Harristar
webshop. De code ArcticRacer35 is eenmalig te gebruiken per email adres
en geeft vandaag korting op je gehele winkelwagentje (2
februari) in de webshop.