The goal of the KCW is (as far as I know) to realize how much you can
sew in one hour a day. Well today I managed to fully fulfill that goal. I
still do not have a clear view of what I want to sew this week (I know I am late with that) and
decided for a quick project for this evening. My middle daughter is in
need of dresses (with long sleeves).
To follow the theme of the week I
chose a fairytale fabric showing scenes from the fairy tail Rapunzel. I
managed to cut the pattern and fabric in one hour (which do not really
count because they do not involve the sewing machine) and I managed to
sew up the entire dress in another hour! I had already made the dress
(Ottobre 3/2012) in a different size for my eldest so I knew what I was
doing but I was still delighted that I could make this in just one hour
(of sewing).
I read somewhere a few weeks ago that if you ask kids to do different moods (sad, scared, sleepy) than their "happy" will come out automatically. I tried this a few shoots ago and since then my middle daughter and son always want to do all the moods. The not-happy once usually do not make the cut, but this time I left in my middle daughters' "sad" face, I thought it was very adorable.
This last picture shows why I love Lillestoff. Lillestoff has a great recovery which is very important, because this is a natural pose for my kids.
Tuesday, October 21, 2014
Monday, October 20, 2014
KCW day1: Dragon small Fry
After I made my first real trousers I was determined to make more. I
wanted to make a more traditional looking trousers and started cutting
the parts from one of my husbands old striped jeans. My son watched me
cutting and disaproved, he did not want boring trousers (I told you he
loved the others right). So while continuing cutting I thought about how
to make the trousers meet both our demands.
The day before I cut the parts I had gone through my stash of scraps and came across a very small piece of Dragons and Knights from Lillestoff. From that fabric I had made him a hoodie sweater which he LOVES. He uses it as a coat and if it would be up to him he would use it way into winter. The scrap piece I had left was really small but big enough to brighten up these "boring" trousers. This time I made pockets inside the trousers instead of on them and chose to put some fabric behind the pockets. Again, I covered the back pockets with jersey and I made two applications from the only two remaining (almost) whole dragons left on my scrap.
For the pictures the trousers HAD to be paired with his hoodie. I made the hoodie (Ottobre 4/2012) last year and did not blog about it yet. It was my first jersey project involving a zipper and while sewing the zipper I realized why I should have used stabilizer. The line in the middle does not line up. I also butchered the zippers. I had cut out the zipper piece before sewing instead of first sewing and than slashing but somehow managed to make the whole thing stay in place anyway by using an buttonhole stitching all around the zipper. But like I said my sons loves the thing and I learned a lot, so I consider it a very successful project.
After I made the pictures, and the model was already asleep, I realized that the trousers were still covered in loose threads. Is it just me, or are your projects also covered in these horrible little monsters. I think hanging threads are THE thing how people can most easily spot which of our cloths are hand made. Even if I am sure that I cut and brushed everything of they still seem to grow on my garments. After I took the picture with my son it them I restored the buttonhole, it had been stretched out, making the final fit better than the one in the picture.
So I had started these trousers yesterday and had hoped to finish them yesterday as well but I missed an hour. This is why my first KCW day was spend on finishing this pair of trousers. Although I was not planning these to be part of my weeks sewing I think Dragons fit the storybook theme fine.
Follow my blog with Bloglovin
Thursday, October 16, 2014
Janneke dress
Two weeks ago I won a piece of great fabric in a wonder full give away.
The give away was connected to the one year anniversary of Mieke's blog
and for this joyous occasion she also created a free baby girl dress
pattern! The fabric came of the webshop LieselLove.
For next project I really have to measure twice and cut once. Although my cutting did not result in the same massacre as last week I did manage to wrongfully cut the back piece of the dress by cutting it on the fold. This resulted in no sewing allowance for the zipper. By making the back pleats slightly smaller and using an extreme small sewing allowance for the zipper I managed to work around it. The back piece is therefore still one piece below the zipper.
The one piece back of course created some troubles with the construction of the dress because now turning through the shoulder was not possible anymore. I tried two different ways of turning whilst having sewn shoulder, armholes and neck but I did not manage to find the solution (Although I feel there is one and probably will realize it after reading my Fawn Lilly instruction again). The end of the evening was nearing and I decided to just open up a shoulder and turn there. Afterwards I sewed up the shoulder by hand using invisible stitches. It worked out fine.
I love how the dress turned out. Thank you again Mieke! Based on the measurement table I chose the second size and lengthened it and the fit is perfect. On other blogs I usually love picture overloads, I hope you do too.
In case you are wondering what that box with number in her hand is... We store left over Lego pieces from Creator sets (never mind if you do not know this Lego line) together in a box with the number of the set on it. My little model was not really in the mood for smiling (or not crying for that matter) and I had to distract her. Not many things work better in at such a moment than things that make a lot of noise when shaken.
Monday, October 13, 2014
Edward's menagerie and an early snowman
I created this blog over two years ago but I have not been very actively
posting much. Among the most early posts, the ones that are floating on
the internet for more than two years, the cactus crochet tutorial has
been clearly the most popular. This post pulls in a steady 20+ views per
week (which is huge for me because most of my posts have not been
viewed for more than 10 times in total).
Since I made my resolution to post more (first of September this year) I have only been posting sewing projects. Although I sew a lot I also still crochet, but I have not posted about it. I hereby show you all my crochet accomplishments of the last one and a half month together.
In August I bought the book Edward's menagerie and I have been crocheting from it ever since. I love the book so much! I now have created six animals from it (the average amount of projects I make from a book is below one) and I will make more for sure. I did not post about them because my animals are not new, or different compared to the ones from the book. Sewing posts are different that way because you usually, at least, have some new type of fabric compared to all the other ones floating around on the web. Your sewing project is original if you consider the whole package even if you followed the pattern to the letter. Keeping that in mind I feel that I can post my six animals together, as a unique inspirational package (and one of them is actually different from the book).
The middle animal that has a head resembling a squirrel is actually a beaver. The favorite plush animal of my middle daughter is a beaver and she really wanted a crocheted version. I had to come up with a tail (which is the thing that sets a beaver aside from a squirrel), which would would have been relatively straight forward if the tail did not had to have different color on each side. When I started the beaver I tried to get away with a brown belly, but after six rows of brown belly my three year old pointed out to me that the white belly was missing. Her beaver has one, and she doesn't care that the ones in the wild do not. I therefor did not dare to make a one colored tail. In the spirit of the pattern I tried to make a continuous tail (not making two separate and sewing them together). This resulted in some color leaking on the sides. By adding an extra row of singles I could hide them quite well. If you are trying a beaver I do recommend to either choose one color or have two halves. Either way my daughter loves her extra friend.
The other part of this post is a recycling project. I cut up one of my husbands old white shirts and turned it into t-shirt yard and crocheted a potholder. I had seen these great coaster, but neither me nor most of my friends use coasters. But the idea does work great for a potholder I think. The snowman melting down due to the heat of the pot id much more logical right than being squashed by a soda, am I right?
Thursday, October 9, 2014
Finally trousers: Small Fry 2T
I mentioned it last month already, my son needs trousers, very slim
trousers. Although he is five, he has the waist of a 2 year old. He has
the length of a(n almost ) five year old which creates major fitting
issues with store bought trousers. To make the issue even worse, he also
has a very sensitive skin and prefers "soft trousers". I made him a few
trousers from jersey in the past. He loved them, but they always looked
liked pyjama pants no matter how many pockets I sewed on them.
I was kind a dreading the whole trouser issue they seemed like a lot of more work than a dress and much less fun. I love the way my daughters dance in their dresses, their happy faces while spinning, but trousers... are kind a boring. So I thought.
I came across the Skinny Fry trousers last week. The trousers are a fun pattern by themselves, but the fact that the 2T is free makes them even better. I drew my pattern pieces longer to fit my son longer length but kept all the other sizes as the original. I made the trousers from one of my own old trousers, which were made of stretchy cord fabric apparently was sleeping while cutting because I was making mistake on mistake. By mistake I three times cut the right front pocket! I realized after cutting the second that I made a mistake and luckily found another spot to cut the left pocket from, but somehow again cut a right one! Than of course I ran out of good spot to cut fabric from en decided to add a jersey fabric printed right pocket (with a stretchy cord facing). I really overestimated the amount of good fabric I had and also had to cut the back pocket from the jersey (I had a bad spot on my trousers that I could use for facing but not as a main fabric part). To make it a theme I added some extra jersey on the front of the pants behind the other pocket as well. My son is a lefty and I therefore put the back pocket on his left cheek.
While sewing I was amazed how much I liked constructing the jeans. I liked it some much that when I realized I had also cut two left back legs (insert scream) I did not throw the whole away. I just went back to my jersey fabric and cut an entire left leg (and used the wrong left leg as a facing.
Like I said earlier I did not make real trousers before and therefore did not realize the difference in waist band construction between girl and boy trousers. I naively thought that I could just use that part of my waistband which had the button on it and shorten the other side. This of course did not workout because boy pants cross over the waistband exactly the other way around. If I would have realized this earlier I would have just made girl fly instead of a boy fly (really we are relatively gender neutral around here and a "bad" direction fly easily fits with my sons love for pink, flowers or happy prints).
I added some adjustable elastic in the back to be sure the trousers would stay on his tiny waist (unbelievable but I really needed it turned out when he put them on). After cutting the button of the waistband I decided to use snaps matching the color of the jersey print. I finished the side of the waist band the lazy way, adding some more matching color.
When my son saw the trousers he immediately loved them. He was a bit bummed out when he saw the jersey leg at the back... he would have preferred it on the front. As you can see the trousers are great for playing, jumping and goofing around. I loved sewing them and more will follow. I immediately bought a Cisse pattern now it is still on promotion sale today!
Sunday, October 5, 2014
Project Run and Play: Signature style
I made it! I sewed along for Project run and play all four weeks! It was very fun to do and I recommend everybody (who is not doing it yet) to do it next time. Looking at what others came up with is even more fun if you have tried yourself as well.
Well week four, signature style. I do not feel I have a sewing style, I also do not have a clothing style in general. I therefore decided on sewing my son a coat. That way all my kids would have received an outfit over the course of these four weeks. The coat would have come from Ottobre (which is my go to sewing magazine) and the coat would have been lined jersey (my go to fabric).
But then I saw this pin. I saw that it was a sleeve (of course) but I immediately thought neckline. I am a huge fan of children cloths that my kids can put on and close themselves. Besides saving time in the morning before school my kids prefer to be able to put on their cloths alone after gym as well. This is also why I loved the front of the dress from Big dill that inspired last weeks dress. I bought (and sewed) the Lilly Fawn dress because I was intrigued by the promise (and delivery) of a zipper/button free woven dress. Back to the pin of a sleeve that screamed neckline to me. I realized that a reversed tulip sleeve kind of neckline on a woven fabric dress should make it possible (for my eldest who has a totally square torso) to put on the dress without extra opening.
I started to draw something myself but quickly returned to my computer to restart pattern search. I searched on shawl collar and enter the Bimaa sweater. Many versions had passed me by and I already gotten the impression that this pattern should be something special but until that moment I hadn't seen it. For those few people that like me until a week ago have not given the Bimaa a close look, the Bimaa is a jersey pattern supporting three different collars. One of those collars is a shawl collar that perfectly fitted my plan.
I used the six year old collar version and made it slightly higher (a fix part of "my style" would have to be adjusting the pattern at least 
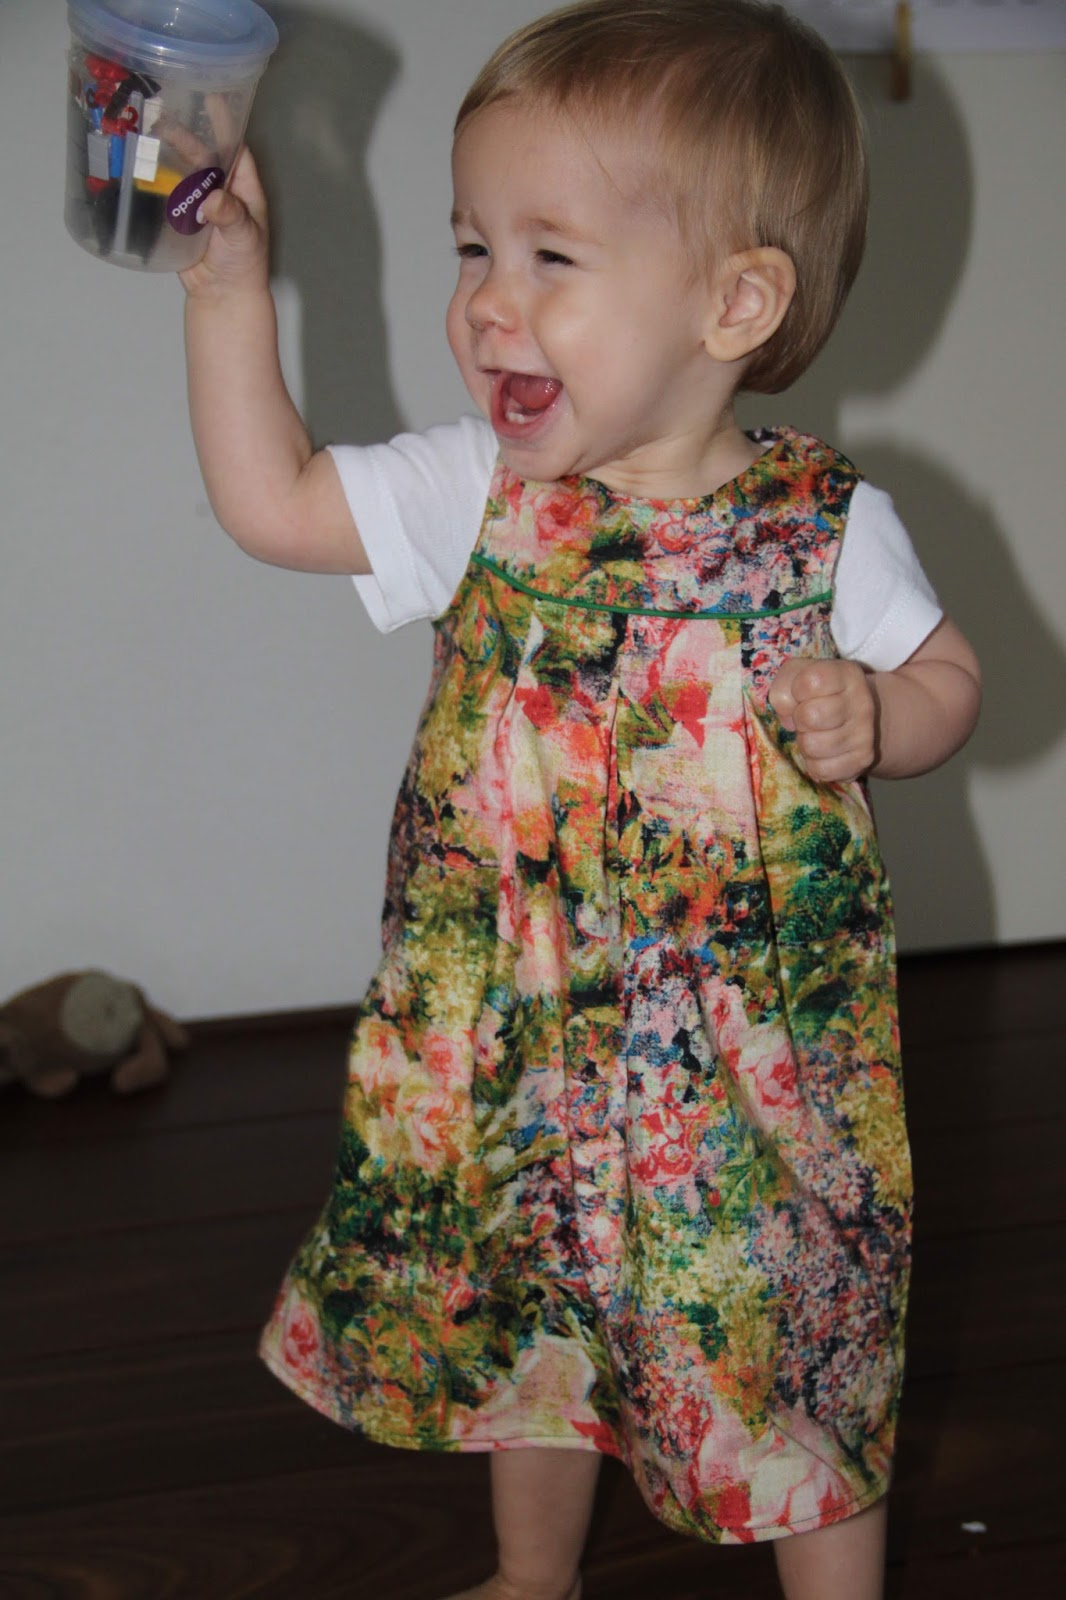
slightly). I took a general bodice I had lying around and paired it with a Lotta skirt. The Lotta pattern had been on my do to pile too long already, I love the pockets! I opted for a sleeveless version to make the likelihood higher that my daughter can put in on herself (in the past I had learned that small zipper and sleeveless dress pair well, small zipper and sleeves do not). Trying something new is something I love (can that me part of a style as well?) and I decided to go for pipping.
After last weeks success with making my own bias I assumed that making own pipping would be just as easy. Unfortunately, I had not realized that the seams in home made pipping (which did not bother me with bias sewing) complicate the sewing process of pipping significantly. I used my blind zipper feet which went okay in general (I made my own pipping thread by turning some thin yarn into a heavier thread, and I should have put more effort to make it a clear edged thread) but the blind zipper feet lost its way a bit when he met some seams. I probably should have also read up more on pipping before I started sewing this week (and not just relying on my memory of what I had read in the past). Long story short, the pipping is not as it should be, but lets label it "my style", I am not great in the small details.
The brown fabric is from Birch and both the facing and the fabric I used for the pipping are from Robert Kaufman. I bought a fat quarter pack a while ago and had not used it yet. The fat quarter contains all kind of gold fabrics that my daughter loves.
This long story has a happy ending, the dress fitted fine and (although she might have to practise a bit) it is possible to put the whole thing on by an almost 7 year old alone. To sum up my style: last minute change of plans, pattern mash up, not perfect finished, to me a new technique, un-ironed, zipper/buttonless, twirling dress with pockets.
Friday, October 3, 2014
Marcel Marlier sew along
I confess, I have no memories of children books from Marcel Marlier.
Although I am from the Netherlands (next to Belgium) I do not have fond
memories from my childhood, but I have nice memories from last week,
that also counts right? Last week I came across the "I [heart] Marcel Marlier Sew Along" from
Sewpony and StraightGrain. The theme of the sew along are the drawings
from Marcel Marlier, and what a great theme it is! It is amazing that he
drew so many detailed girl dresses. I have spend over an hour roaming
the web for pictures.
My middle daughter is in need of some new dresses so yesterday I picked my favorite picture (which may or may not be inspired by the fact that I had matching fabrics). I used a combination of knit and woven cotton. I love knits, they are so easy to wear, but the dresses that make me drool are usually from woven cotton. Pleating for example looks much better with woven fabrics than with knits. The "original" front of the dress has diagonal pleated stripes which I mimicked with knit by creating diagonal seams. I first made the seams and than cut the front bodice. I misjudged the amount three times, if you are doing something similar be on the safe side and use a big piece to start from.
Because "winter is coming", I decided to go for longer sleeves.
I have some patterns for woven collars, but all of them had an opening on the front. I therefore drew something by hand. The result is far from perfect but it works. I only added the collar on the front to avoid the need to add a zipper or buttons on the back. The neckline can still stretch from the back, which enables pulling over the head.
Subscribe to:
Posts (Atom)